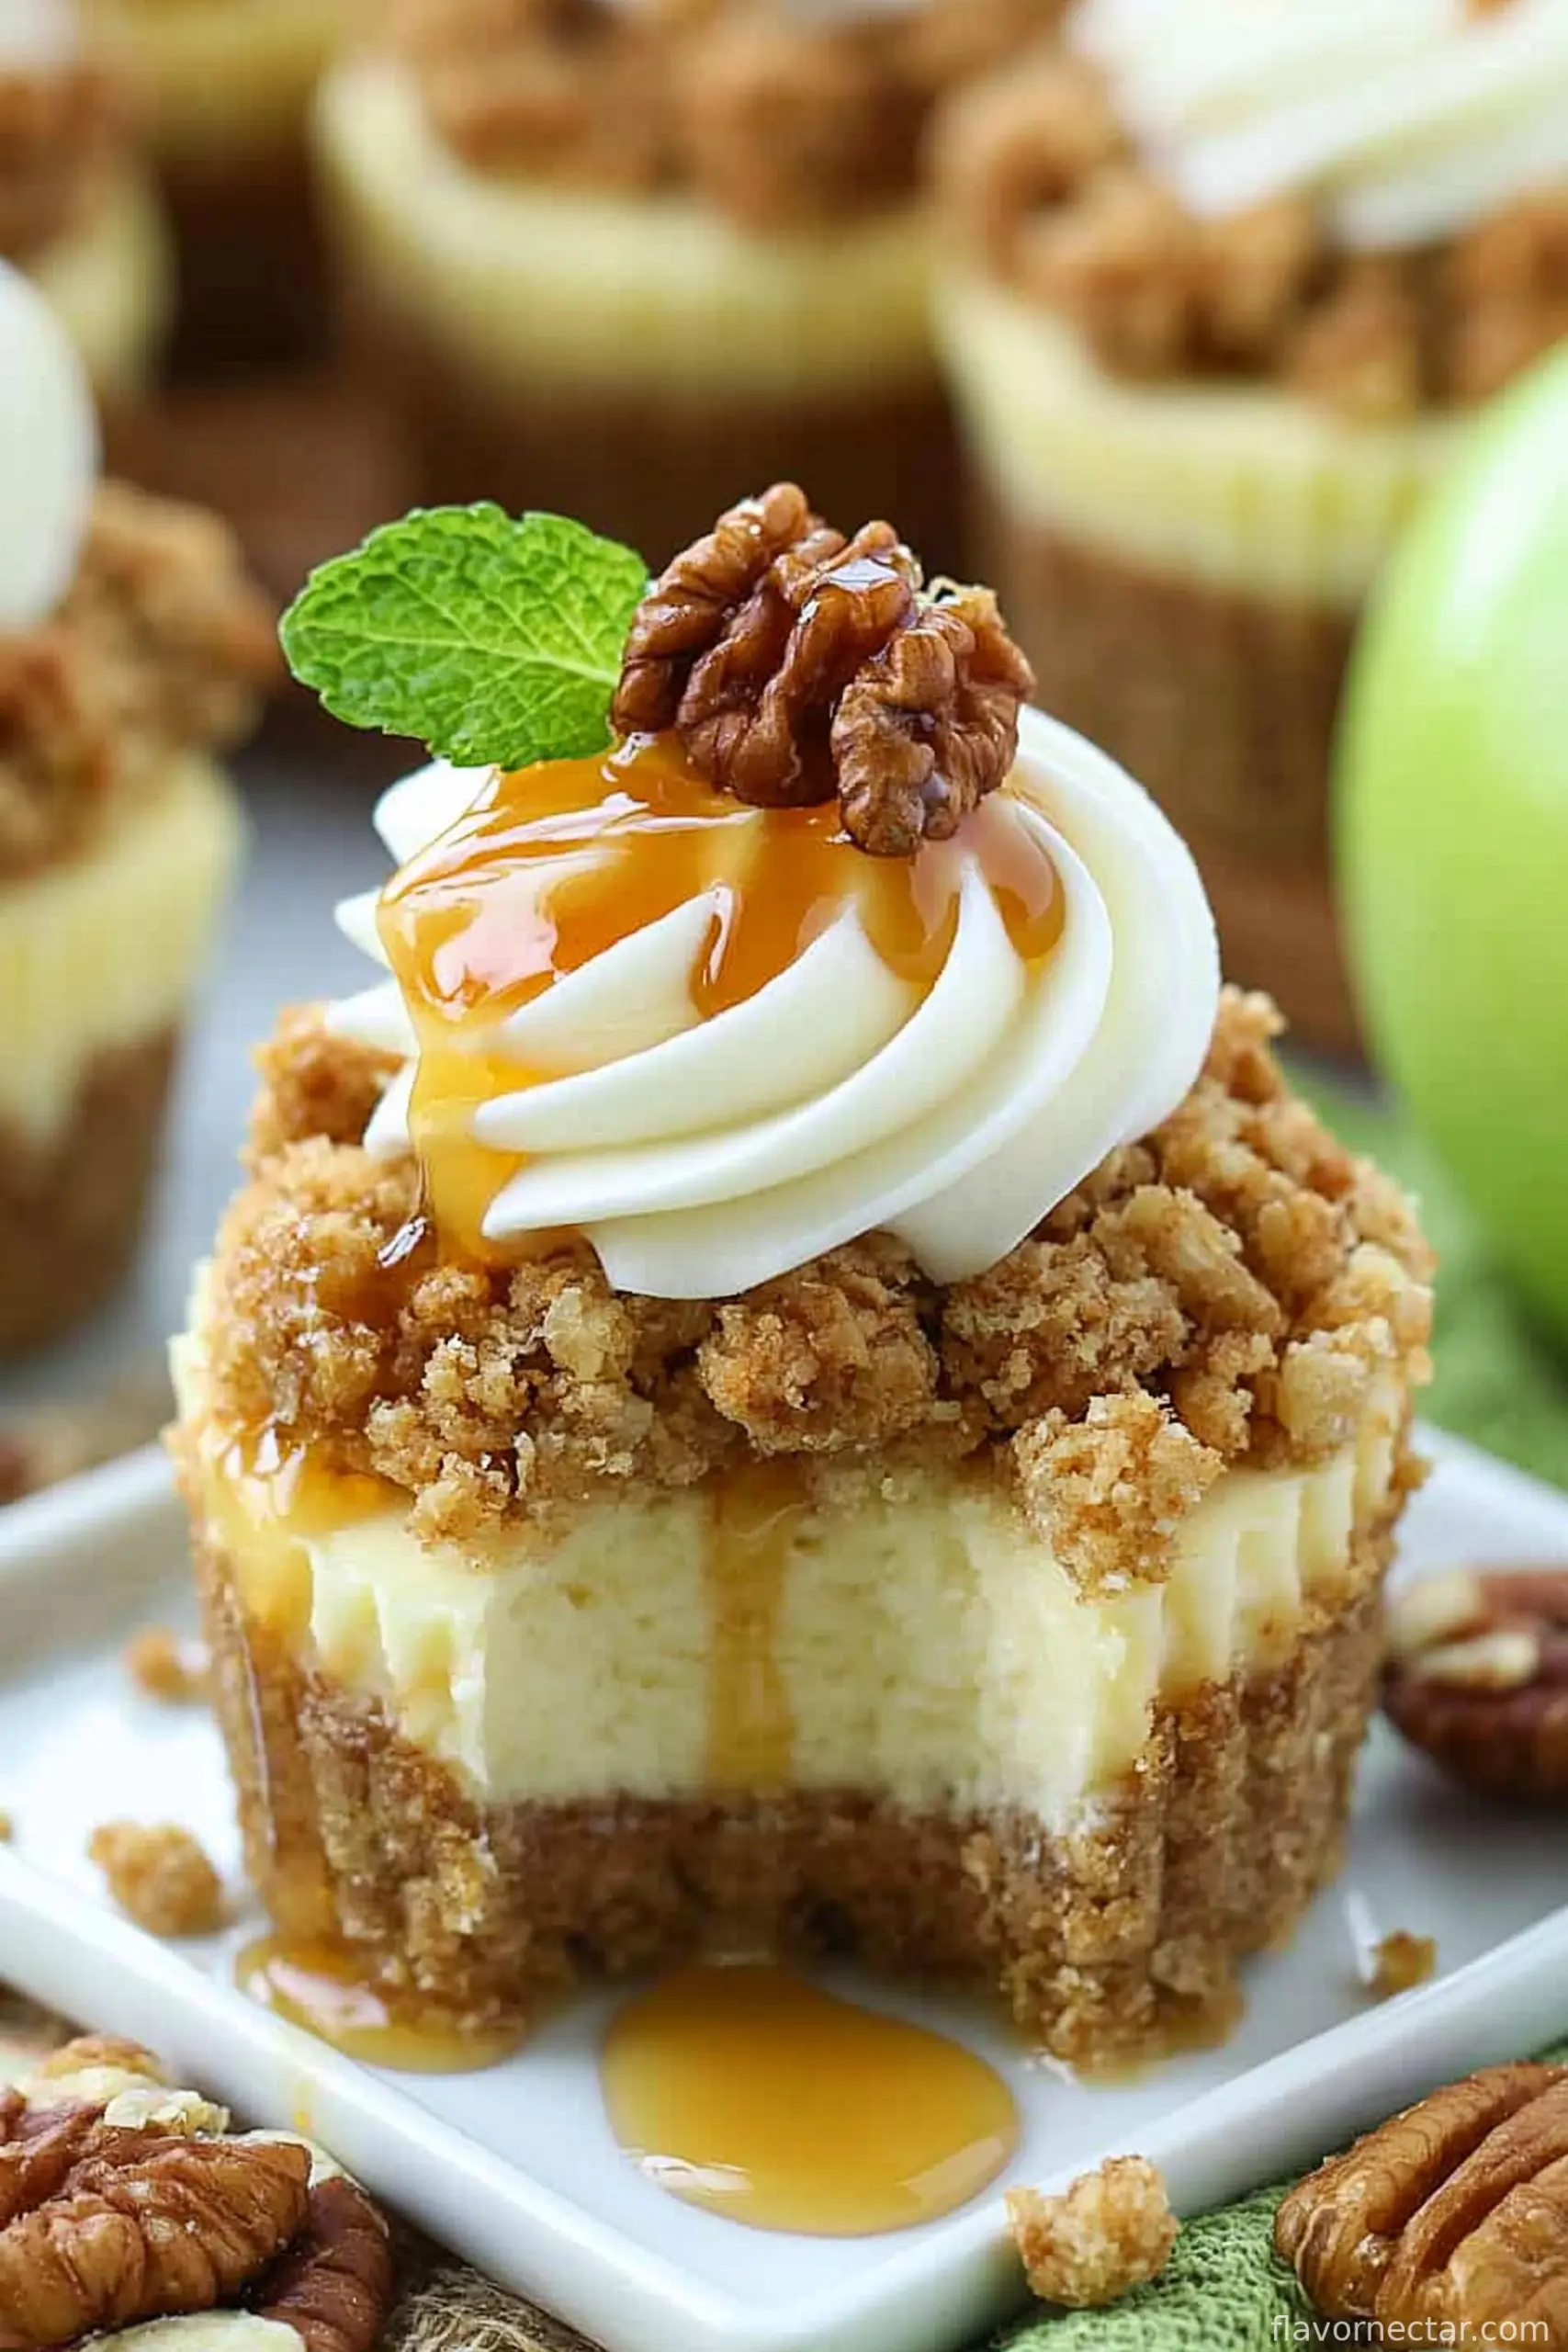
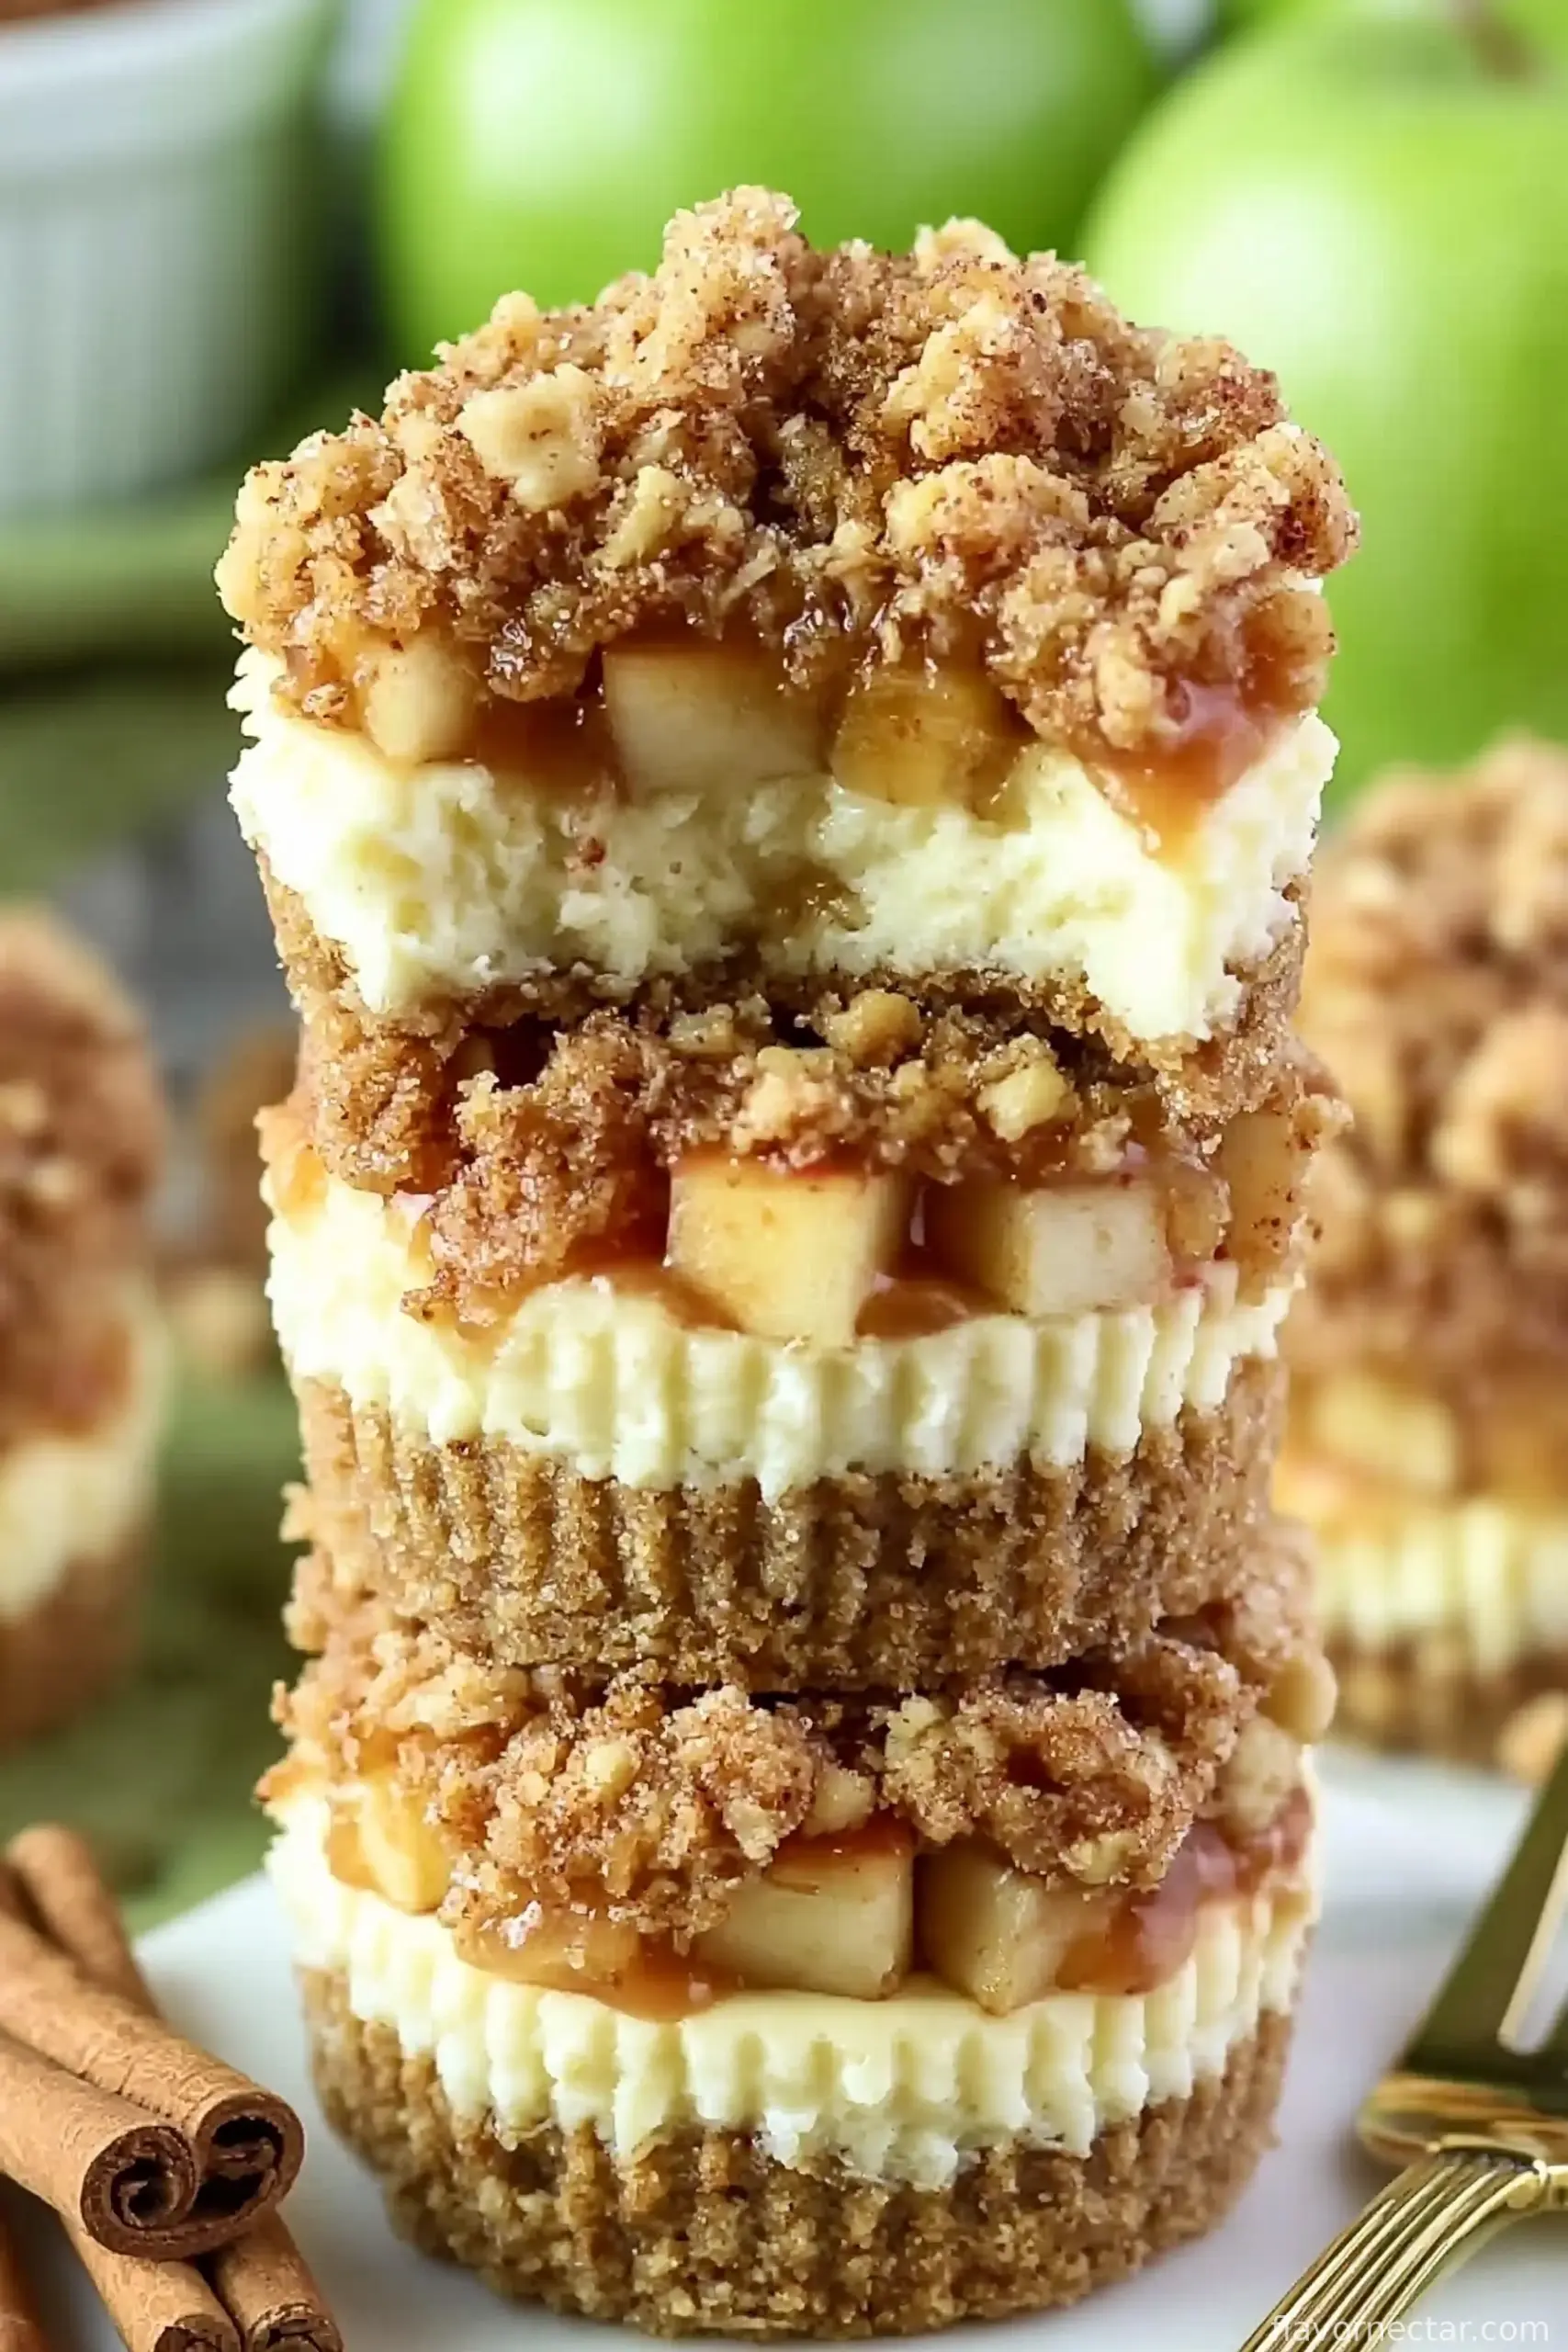
Apple Crisp Mini Cheesecakes: A Cozy Kitchen Favorite
I have this memory from a couple autumns ago: my neighbor Sarah bouncing over with a basket (wicker, actually—she’s old school) of what looked like pudding cups. Nope. It was little cheesecakes topped with warm, cinnamon apples and that crumbly, magic stuff from apple crisp. I thought, “Why have I never smushed these two desserts together before?”
Since then, these Apple Crisp Mini Cheesecakes have become kind of a regular thing at my place—especially once the weather starts pretending it’s chilly, which, where I live, is more of a hopeful suggestion than an actual season. Anyway, if you need an excuse to buy another bag of apples, this is it!
Why You’ll Love Making These
I make these when I want the whole vibe of an apple pie but, honestly, don’t feel like rolling out dough or constructing a full-on cheesecake. My family goes bonkers for them because they get their own little dessert (no arguing over who got more crust). Plus, you can do most of it in advance.
Bonus: You don’t have to juggle a big water bath or anything that makes your oven look like a science experiment. There was one time I tried to shortcut the caramel drizzle by using store-bought ice cream topping… just, don’t do it. Homemade or nothing, trust me! Actually, on second thought, it’s your kitchen, so you do you.
Ingredients You’ll Need (and some personal swaps!)
- 1 cup graham cracker crumbs (sometimes I use digestive biscuits if I’m out—works fine)
- 3 tablespoons melted butter
- 2 tablespoons brown sugar (light or dark is all the same to me, but my gran swore by dark brown)
- 8 ounces cream cheese, softened (full-fat for me, but have used Neufchâtel in a pinch)
- 1/3 cup granulated sugar
- 1 large egg
- 1/2 teaspoon vanilla extract
- 1 medium apple, peeled and finely diced (Granny Smith is my fave but whatever apple looks lonely in your fruit bowl is fair game)
- 1 tablespoon sugar (for the apples—can skip if they’re super sweet)
- 1/2 teaspoon cinnamon, plus a bit extra for sprinkling
- 1/4 cup old-fashioned oats (you can get away with quick oats, but it’s not quite the same texture)
- 2 tablespoons flour (all-purpose, but almond flour worked surprisingly well once when I ran out)
- 2 tablespoons butter, cold and cubed
- 2 tablespoons brown sugar (for the crisp topping)
- Pinch of salt
How to Throw These Together (My Way!)
- Heat your oven to 325°F (160°C). Line a muffin tin with 8 paper liners—parchment ones don’t stick as much, but I usually just grab whatever’s in the drawer.
- Mix the graham crumbs, melted butter, and 2 Tbsp brown sugar together in a bowl. Press a heaping tablespoon of the crumb mix into the bottom of each liner. I use my (clean) thumb, but a shot glass does the trick too.
- In a medium bowl, beat the cream cheese and granulated sugar together until it’s almost fluffy—don’t worry about lumps, they’re like the freckles of the cheesecake world. Beat in the egg and vanilla till smooth.
- Spoon the cheesecake batter over the crusts, about 2 heaping tablespoons per cup. Don’t stress if it doesn’t look even.
- In a skillet, toss the diced apple with 1 Tbsp sugar and 1/2 tsp cinnamon. Cook over medium heat for 3-4 minutes, just till they soften a bit (this is where I sneak a taste and sometimes—oops—eat a bit too much, so I’ll dice an extra apple in case).
- Spoon the apple mix over each mini cheesecake—try not to steal all the apples for yourself (guilty!).
- For the crisp: mix oats, flour, 2 Tbsp brown sugar, salt, and remaining cinnamon in a little bowl. Rub in the cold butter with your fingers until it’s pea-sized and crumbly (messy is good here, and don’t sweat if it clumps funny).
- Sprinkle the crisp generously over the apples. Pat it down just a little if it looks like it’ll topple off.
- Bake 20-24 minutes until set around the edges and the crisp is golden. They’ll puff up and then settle down as they cool—don’t panic if they deflate a bit. Cool completely, then refrigerate for at least 2 hours (overnight’s even better, though I rarely make it that long without sneaking one).
- (Optional) Drizzle with caramel sauce before serving if you’re feeling extra, but it’s not strictly necessary. Or do a blob of whipped cream if you want to show off.
Real-Life Notes from My Kitchen
- One time I used apple pie filling in a rush; way too sweet. Homemade apples keep it bright and not so syrupy.
- Actually, they taste a bit better the next day—the flavors just kind of settle in together.
- Lined tins with regular cupcake papers work fine, but sometimes the crust sticks. Parchment liners = less angry muttering later.
Some Wild Variations I’ve Tried
- Pear instead of apple? Shockingly delicious, but definitely different (like, more “fall brunch” than classic dessert vibe).
- Swapped the graham crumbs for gingersnap cookies once. Strong move for ginger fans. The time I tried chocolate wafers? Well, probably not my brightest idea—kinda weird with apples.
- I thought about tossing nuts on top for crunch but my youngest acted personally offended, so I skip them now.
A Quick Word on Equipment (and dodging disaster)
Look, a handheld mixer makes things easier, but I’ve totally gone off-script and done the cream cheese part by hand. It’s a work-out, but you get there eventually. No muffin tin? Try ramekins or even oven-safe teacups (just let them cool longer). Shot glasses for pressing crusts—old family hack.
Keeping ‘Em Fresh (If They Last That Long)
Store these in the fridge, covered, for up to 4 days—though honestly, in my house it never lasts more than a day! They don’t freeze all that well (the apples go a bit weird), but you could try if desperate.
Serving Them Up, Home-Style
My crew loves these with actual scoops of vanilla ice cream on the side; Mum always insisted whipped cream and a pinch of extra cinnamon. Sometimes I sneak one for breakfast. Sorry… not sorry.
Lessons Learned (AKA: My Pro Tips)
- Letting them chill makes all the difference—the first time I was impatient, the cheesecake was gooey and kinda droopy. Not a pretty sight.
- Don’t overpack the crisp; too much and it sinks right into the cheesecake. Moderation (for once) is your friend.
- Give the apples a minute to cool before piling them on or the cheesecake mix will melt and, well, you’ll see.
Burning Questions I’ve Actually Gotten
- Can I do these gluten-free?
- Yep! Just use GF oats and swap in almond or GF flour for the crisp and crust. Tastes just as snackable.
- What if I don’t have cream cheese?
- Honestly, I tried with ricotta once—funny texture, but it works in a pinch. Or Neufchâtel. Or… run to your neighbor’s and borrow cream cheese, like I do.
- Can I double the recipe?
- Just did this for a party. Worked great; only thing is, add an extra few minutes to baking time if you crowd the oven.
- Help, my crust stuck to the liner!
- Yeah, me too. If you can, let them chill fully first and peel gently. Or use parchment parchment parchment.
- Is it still good without crisp topping?
- Tried this once when I was feeling lazy. Still yummy, but not quite the same level of “ooh, fancy” when serving. I’d say go for the full works.
Ingredients
- 1 cup graham cracker crumbs (sometimes I use digestive biscuits if I’m out—works fine)
- 3 tablespoons melted butter
- 2 tablespoons brown sugar (light or dark is all the same to me, but my gran swore by dark brown)
- 8 ounces cream cheese, softened (full-fat for me, but have used Neufchâtel in a pinch)
- 1/3 cup granulated sugar
- 1 large egg
- 1/2 teaspoon vanilla extract
- 1 medium apple, peeled and finely diced (Granny Smith is my fave but whatever apple looks lonely in your fruit bowl is fair game)
- 1 tablespoon sugar (for the apples—can skip if they’re super sweet)
- 1/2 teaspoon cinnamon, plus a bit extra for sprinkling
- 1/4 cup old-fashioned oats (you can get away with quick oats, but it’s not quite the same texture)
- 2 tablespoons flour (all-purpose, but almond flour worked surprisingly well once when I ran out)
- 2 tablespoons butter, cold and cubed
- 2 tablespoons brown sugar (for the crisp topping)
- Pinch of salt
Instructions
-
1Heat your oven to 325°F (160°C). Line a muffin tin with 8 paper liners—parchment ones don’t stick as much, but I usually just grab whatever’s in the drawer.
-
2Mix the graham crumbs, melted butter, and 2 Tbsp brown sugar together in a bowl. Press a heaping tablespoon of the crumb mix into the bottom of each liner. I use my (clean) thumb, but a shot glass does the trick too.
-
3In a medium bowl, beat the cream cheese and granulated sugar together until it’s almost fluffy—don’t worry about lumps, they’re like the freckles of the cheesecake world. Beat in the egg and vanilla till smooth.
-
4Spoon the cheesecake batter over the crusts, about 2 heaping tablespoons per cup. Don’t stress if it doesn’t look even.
-
5In a skillet, toss the diced apple with 1 Tbsp sugar and 1/2 tsp cinnamon. Cook over medium heat for 3-4 minutes, just till they soften a bit (this is where I sneak a taste and sometimes—oops—eat a bit too much, so I’ll dice an extra apple in case).
-
6Spoon the apple mix over each mini cheesecake—try not to steal all the apples for yourself (guilty!).
-
7For the crisp: mix oats, flour, 2 Tbsp brown sugar, salt, and remaining cinnamon in a little bowl. Rub in the cold butter with your fingers until it’s pea-sized and crumbly (messy is good here, and don’t sweat if it clumps funny).
-
8Sprinkle the crisp generously over the apples. Pat it down just a little if it looks like it’ll topple off.
-
9Bake 20-24 minutes until set around the edges and the crisp is golden. They’ll puff up and then settle down as they cool—don’t panic if they deflate a bit. Cool completely, then refrigerate for at least 2 hours (overnight’s even better, though I rarely make it that long without sneaking one).
-
10(Optional) Drizzle with caramel sauce before serving if you’re feeling extra, but it’s not strictly necessary. Or do a blob of whipped cream if you want to show off.
CLICK FOR NUTRITION INFO
↑
Approximate Information for One Serving
Serving Size:
1 serving
Calories:
232 caloriescal
Protein:
4 gg
Fat:
13 gg
Saturated Fat:
0g
Trans Fat:
0g
Cholesterol:
0mg
Sodium:
0mg
Potassium:
0mg
Total Carbs:
25 gg
Fiber:
0g
Sugar:
0g
Net Carbs:
0g
Vitamin A:
0
Vitamin C:
0mg
Calcium:
0mg
Iron:
0mg
Nutrition Disclaimers
Number of total servings shown is approximate. Actual number of servings will depend on your preferred portion sizes.
Nutritional values shown are general guidelines and reflect information for 1 serving using the ingredients listed, not including any optional ingredients. Actual macros may vary slightly depending on specific brands and types of ingredients used.
To determine the weight of one serving, prepare the recipe as instructed. Weigh the finished recipe, then divide the weight of the finished recipe (not including the weight of the container the food is in) by the desired number of servings. Result will be the weight of one serving.
Did you make this recipe?
Please consider Pinning it!