If You Love Warm Bread, You’re in the Right Place
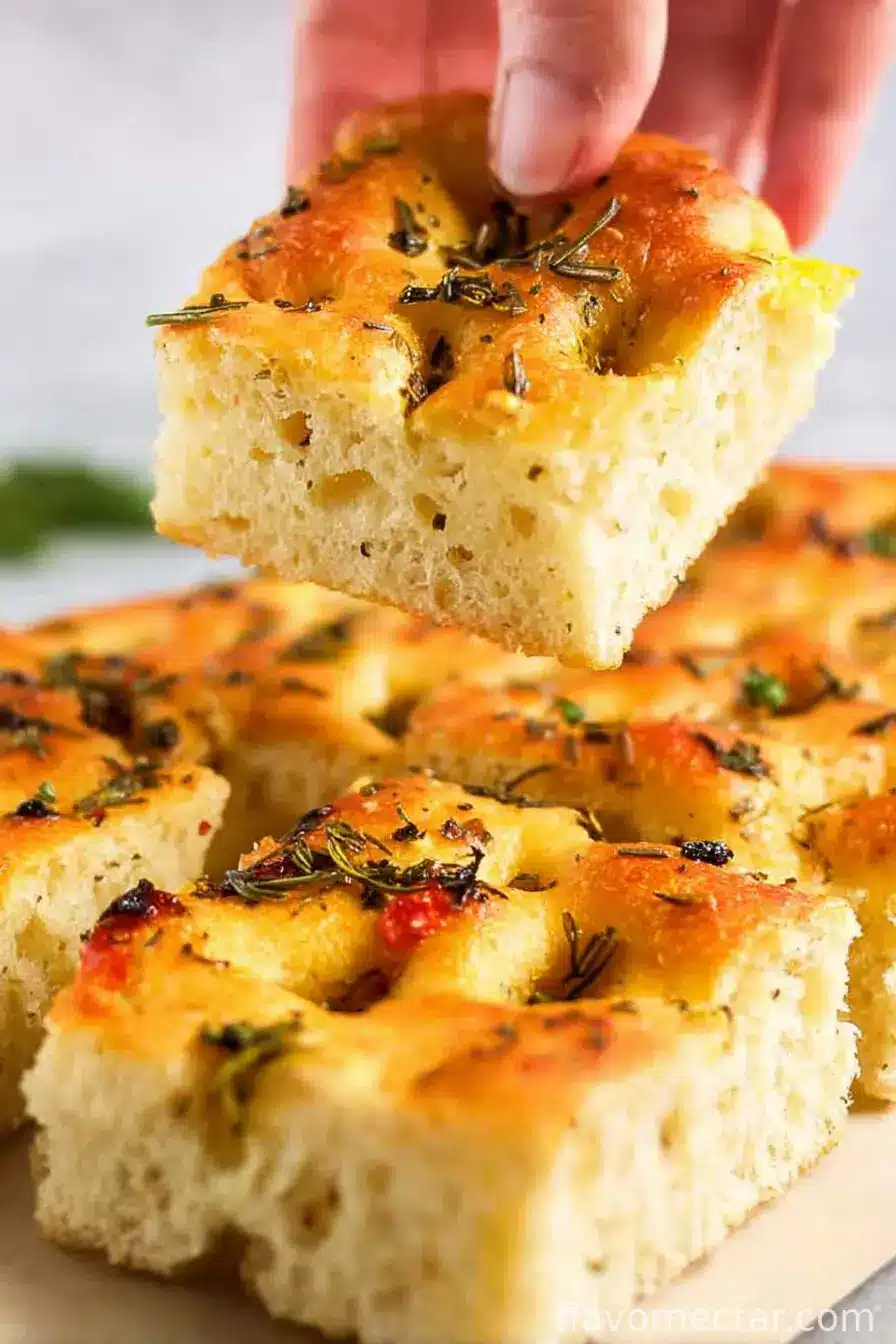
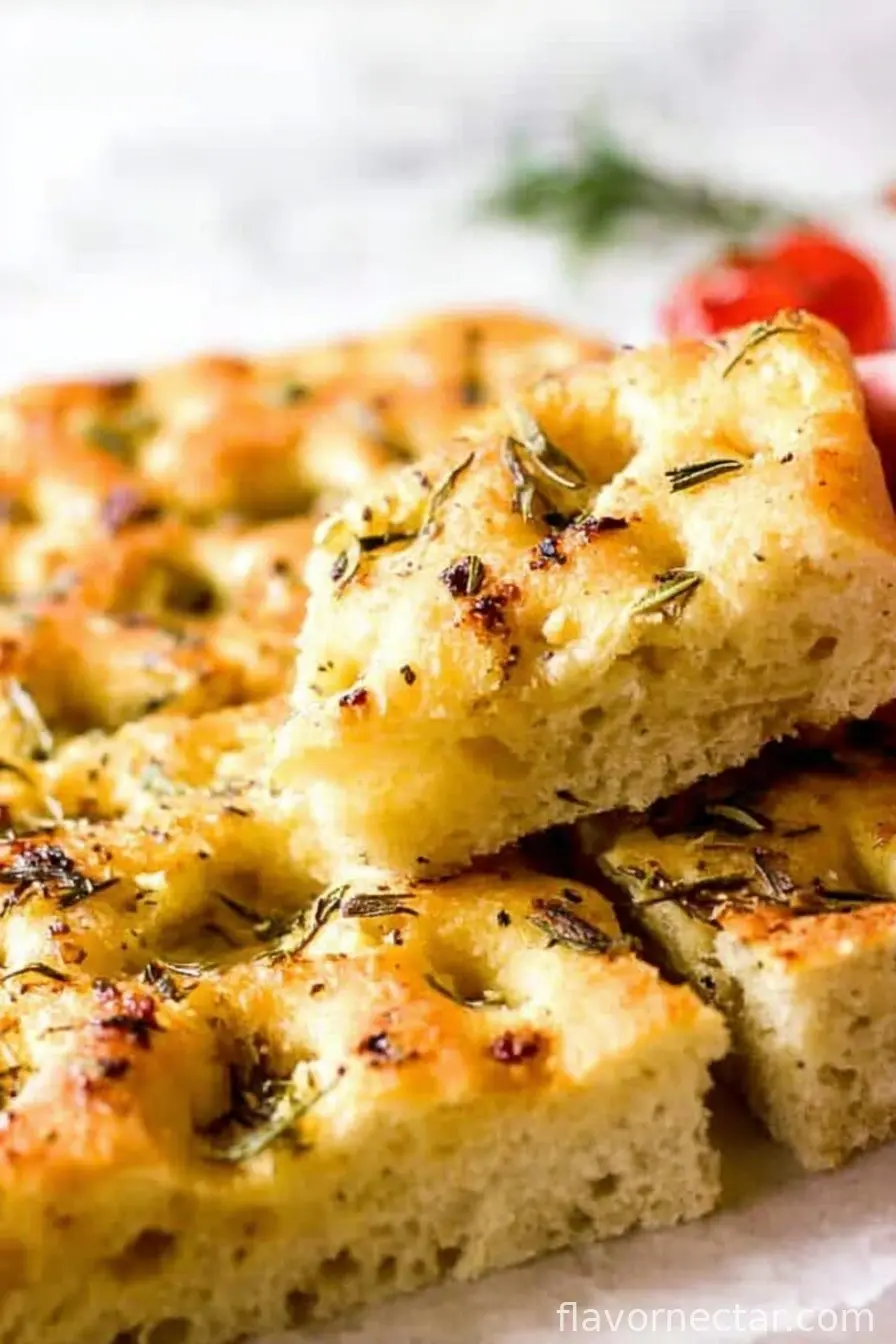
Alright, let me spill: I’ve always had a soft spot (pun intended) for homemade bread, and this easy focaccia bread is the one I keep coming back to. You know those recipes you make, and halfway through the house just fills up with that yeasty, golden goodness smell? This is that. I can still remember the first time I tried making focaccia years ago—let’s just say it didn’t look like the pictures and I may or may not have used the wrong pan (rookie move). But the taste? Instantly hooked. And honestly, now I make this for every get-together, or just when I want to feel fancy for no good reason. Plus, it’s honestly a bit fun to poke all those dimples in the dough. Who knew baking could be a stress reliever?
Why You’ll Love This Focaccia (or at Least, Why I Do)
I make this when I want something to impress people without actually working that hard. My family goes wild for it—especially my youngest, who likes to “help” knead and always manages to eat more flour than seems humanly possible. Actually, I’ve noticed this bread disappears faster than cookies. Plus, it’s forgiving. I forget to set timers, sometimes get distracted (once chasing the cat off the counter), and it always still turns out edible… most of the time. Even that time I used an ancient packet of yeast. (Don’t be like me—fresh yeast is friendlier.)
Here’s What You’ll Need (Swaps Welcome!)
- 2 cups (250g) all-purpose flour (sometimes I mix in whole wheat flour if I feel health-conscious… which is rare, let’s be real)
- 1 teaspoon instant yeast (any dry yeast works; my gran always swore by whatever was on sale)
- 3/4 cup (180ml) warm water (if you stick your finger in and it feels like a nice bath, you’re golden)
- 1/2 teaspoon sugar (sometimes I just grab a pinch from the sugar jar with my fingers)
- 1 teaspoon sea salt, plus extra for sprinkling (table salt works in a pinch—ha!)
- 1/4 cup (60ml) good olive oil, divided (I use whatever the supermarket has if I’m not feeling fancy)
- Optional: A few sprigs of fresh rosemary (or just a shake of dried basil—oregano in a pinch)
- Optional: 1/4 cup pitted olives, sliced (sometimes I just toss on cherry tomatoes if that’s what I’ve got)
How to Make Focaccia, Distracted or Not
- Mix It Up: In a big-ish bowl, combine flour, yeast, sugar, and salt. Pour in the warm water and 2 tablespoons of the olive oil. Stir with a wooden spoon until it’s all shaggy and weird-looking—it always looks a bit odd here. If it feels dry, splash in another spoonful of water.
- Knead Time: Dump the dough onto a floured counter. Knead for about 5–8 minutes until it’s kind of smooth, but don’t stress if it’s still a tad sticky. Actually, if you’re feeling lazy, I’ve sometimes just kneaded it in the bowl and it turned out fine.
- The Rise & Shine: Plop the dough back in the bowl, slather the top with a tiny bit of olive oil, and cover it with a tea towel. Let it rise somewhere warm for 1 to 1.5 hours, or until doubled. I usually forget about it for closer to two hours and it’s never an issue.
- Shape & Rest: Drizzle some oil into a baking pan (8×8 inch square or a round cake tin both work—I’ve even used a rimmed baking sheet in a pinch). Stretch and squish the dough gently into the pan. If it springs back, cover it for 10 min and try again—don’t fight it. Let it rest for another 20 minutes.
- Dimple Time: Here’s the fun part. Poke your fingers into the dough and make those iconic focaccia dimples (therapeutic, truly). Drizzle the rest of the olive oil all over—it’ll look like too much but trust me, it soaks in. Scatter over rosemary, olives, or whatever extras you like, plus a sprinkle of sea salt.
- Bake: Into a hot oven it goes—425°F (220°C) for 20–25 minutes, till the top’s golden-bronze and the kitchen smells like heaven. (This is where I check “just in case” at 18 minutes, but it always needs the full time, honestly.)
- Cool & Enjoy: Let it cool for at least 10 minutes if you can stand to wait. Then cut, tear, or just attack it straight from the pan. Nobody’s judging.
Notes from a Non-Perfectionist
- If you accidentally let it rise too long, don’t panic—it’s still going to be delicious. Maybe just a little extra “airy”.
- Once I forgot the salt—blandest bread ever. (So, don’t skip!)
- This dough freezes okay pre-bake, but honestly—I just make a fresh batch each time.
Variations I’ve Actually Tried
- Sometimes I go heavy on garlic, throwing in roasted cloves—outstanding!
- Once, I mixed in sundried tomatoes. Tasted great, but turned a bit mushy next day.
- I tried with cheddar once instead of olive oil on top—let’s just say, it wasn’t my best move.
Equipment (But Don’t Let that Stop You)
- Bowl for mixing (big salad bowl works in a pinch—I’ve used a soup pot one time, no one knew)
- Baking pan (square, round, baking tray—honestly, it’s pretty forgiving)
- Measuring cups/spoons (but I confess, I eyeball the oil some days)
- Tea towel or cling wrap to cover dough (an old T-shirt will do if nothing else is clean—no shame)
How to Store (If You Somehow Have Leftovers)
Wrap extra focaccia in foil or stash it in a zip-top bag on the counter. It’ll keep for a solid day, maybe two, but I find it softens up quickest in plastic (texture gets a bit odd). You can also freeze it, but seriously, it never survives the afternoon here—it’s like magic how fast it vanishes.
How I Like to Serve It
I love it hot, dunked straight in olive oil and balsamic. My sister likes it with soup (she says it officially counts as a meal then). For parties, I slice it thick, wedge it with cheese—people forget about the main course every time. Christmas last year, you should have seen my uncle using it to mop up ALL the gravy. (He claims that’s the Italian half of the family coming out, but we’re pretty sure he just likes bread.)
A Few Pro Tips (Learnt the Hard Way)
- Don’t rush the rising—I tried once by blasting it next to a radiator. It rose fast, but tasted weirdly flat. Slow and steady wins the bread race.
- If your dough’s too sticky, flour your hands rather than dumping extra flour into the dough—it stays fluffier that way. Honest.
- When in doubt, more olive oil on top is better than less. Once, running low, I skimped and… it was just sad focaccia. Don’t be stingy with the oil!
People Actually Ask Me…
- Can I make focaccia ahead? Absolutely – in fact, I think it tastes better the next day (maybe because I’m less impatient?). Just rewarm it in the oven for 5 min if you like.
- What if I don’t have instant yeast? Use active dry instead, just let it proof in the warm water and sugar for 5 minutes first, then proceed the same.
- Can I skip the olive oil? Eh, you could, but honestly, it won’t be the same. The crispy edge is everything! Maybe try a drizzle of melted butter if you’re desperate.
- My focaccia came out dense—what happened? Most likely the yeast was grumpy (expired, maybe?) or the dough needed a bit more time to rise. Oh, or the water was too hot/cold. I’ve done all three, trust me.
- Is this really as easy as you say? I mean, I’ve messed up making toast, but even I can pull this off… So, yeah!
Okay, now I’m hungry. Just thinking about buttery, golden focaccia gets my stomach rumbling. Hope you enjoy making this as much as I love eating it—and if you try something totally wild with it, let me know! (Just… maybe skip the cheddar.)
Ingredients
- 2 cups (250g) all-purpose flour (sometimes I mix in whole wheat flour if I feel health-conscious… which is rare, let’s be real)
- 1 teaspoon instant yeast (any dry yeast works; my gran always swore by whatever was on sale)
- 3/4 cup (180ml) warm water (if you stick your finger in and it feels like a nice bath, you’re golden)
- 1/2 teaspoon sugar (sometimes I just grab a pinch from the sugar jar with my fingers)
- 1 teaspoon sea salt, plus extra for sprinkling (table salt works in a pinch—ha!)
- 1/4 cup (60ml) good olive oil, divided (I use whatever the supermarket has if I’m not feeling fancy)
- Optional: A few sprigs of fresh rosemary (or just a shake of dried basil—oregano in a pinch)
- Optional: 1/4 cup pitted olives, sliced (sometimes I just toss on cherry tomatoes if that’s what I’ve got)
Instructions
-
1Mix It Up: In a big-ish bowl, combine flour, yeast, sugar, and salt. Pour in the warm water and 2 tablespoons of the olive oil. Stir with a wooden spoon until it’s all shaggy and weird-looking—it always looks a bit odd here. If it feels dry, splash in another spoonful of water.
-
2Knead Time: Dump the dough onto a floured counter. Knead for about 5–8 minutes until it’s kind of smooth, but don’t stress if it’s still a tad sticky. Actually, if you’re feeling lazy, I’ve sometimes just kneaded it in the bowl and it turned out fine.
-
3The Rise & Shine: Plop the dough back in the bowl, slather the top with a tiny bit of olive oil, and cover it with a tea towel. Let it rise somewhere warm for 1 to 1.5 hours, or until doubled. I usually forget about it for closer to two hours and it’s never an issue.
-
4Shape & Rest: Drizzle some oil into a baking pan (8×8 inch square or a round cake tin both work—I’ve even used a rimmed baking sheet in a pinch). Stretch and squish the dough gently into the pan. If it springs back, cover it for 10 min and try again—don’t fight it. Let it rest for another 20 minutes.
-
5Dimple Time: Here’s the fun part. Poke your fingers into the dough and make those iconic focaccia dimples (therapeutic, truly). Drizzle the rest of the olive oil all over—it’ll look like too much but trust me, it soaks in. Scatter over rosemary, olives, or whatever extras you like, plus a sprinkle of sea salt.
-
6Bake: Into a hot oven it goes—425°F (220°C) for 20–25 minutes, till the top’s golden-bronze and the kitchen smells like heaven. (This is where I check “just in case” at 18 minutes, but it always needs the full time, honestly.)
-
7Cool & Enjoy: Let it cool for at least 10 minutes if you can stand to wait. Then cut, tear, or just attack it straight from the pan. Nobody’s judging.
CLICK FOR NUTRITION INFO
↑
Approximate Information for One Serving
Serving Size:
1 serving
Calories:
170 caloriescal
Protein:
4gg
Fat:
6gg
Saturated Fat:
0g
Trans Fat:
0g
Cholesterol:
0mg
Sodium:
0mg
Potassium:
0mg
Total Carbs:
25gg
Fiber:
0g
Sugar:
0g
Net Carbs:
0g
Vitamin A:
0
Vitamin C:
0mg
Calcium:
0mg
Iron:
0mg
Nutrition Disclaimers
Number of total servings shown is approximate. Actual number of servings will depend on your preferred portion sizes.
Nutritional values shown are general guidelines and reflect information for 1 serving using the ingredients listed, not including any optional ingredients. Actual macros may vary slightly depending on specific brands and types of ingredients used.
To determine the weight of one serving, prepare the recipe as instructed. Weigh the finished recipe, then divide the weight of the finished recipe (not including the weight of the container the food is in) by the desired number of servings. Result will be the weight of one serving.
Did you make this recipe?
Please consider Pinning it!