I still remember the first time I dragged out my (slightly battered) Dutch oven for bread. I was convinced I’d somehow burn the house down or at least end up with a floury brick. Spoiler: neither happened. In fact, this Garlic Herb Dutch Oven Bread is now my go-to whenever friends drop by, or on quiet Sundays with soup simmering away. My kitchen ends up smelling so good that even the mailman pokes his head in. Not that I blame him.
Why I Keep Coming Back to This One
I make this bread so much because my family claims it has magic powers to disappear (sometimes before I even taste it—sneaky bunch). Honestly, I could eat this for every meal. The crispy golden crust with all those herby pockets inside? It’s basically happiness in bread form. And hey, unlike some complicated loaves, this one does most of the work overnight, so even if you forget it for a few hours longer, it’s usually forgiving (unless you have a cat who likes to nap on warm dough—true story). Plus, adding garlic just makes everything better, right? Well, unless you’re my Aunt Sue, who thinks garlic is a “bit much.” We don’t listen to her opinions about bread anymore.
Here’s What You’ll Need (And What I Use When I’m in a Pinch)
- All-Purpose Flour: This is the backbone. Sometimes I’ll sneak in a cup of whole wheat if I want to feel fancy or healthy(ish). My grandma always used the cheapest bag on sale—so don’t overthink it.
- Salt: Not just for taste! I have, regrettably, forgotten it once; never again, yikes.
- Instant Yeast: My usual, but if all you’ve got is active dry, just dissolve it in the water first. Works like a charm.
- Minced Garlic: I’m heavy-handed here, but if you prefer subtle, roasted garlic works great for a gentler flavor.
- Fresh Herbs: Parsley, thyme, rosemary—whichever’s taking over your garden. If you’re out, dried herbs do the trick (I use a generous 2 teaspoons or so).
- Lukewarm Water: Don’t stress too much; just not ice-cold or boiling (that’s a yeast killer).
- Olive Oil: Optional, but my dough loves a good drizzle for extra stretchiness. Sometimes I skip it, sometimes I slop a bit extra—it’s bread, not rocket science.
-
For Serving (Optional Goodies):
- Butter: Softened, maybe even garlic-herb if you want to double down.
- Olive Oil: Drizzle or for dipping (hello, fancy bread board!).
- Cheese: Gouda, cheddar, you name it; wedges on the side make it feel like a picnic, even indoors.
Let’s Make Garlic Herb Dutch Oven Bread—My Way
-
Bring the Dough Together
Grab your biggest bowl (the one that never fits in the dishwasher) and whisk up the flour, salt, yeast, garlic, and chopped herbs so they’re mingling evenly. Pour in the lukewarm water and mix—use a wooden spoon, your hand, or really whatever feels right—until it all comes together and there’s no dry flour left. Don’t stress if it’s ugly, shaggy, and sticky; that’s what you want! -
Let Time (and Yeast) Do the Hard Work
Seal up the bowl tightly with plastic wrap. Forget about it on the counter for 12 to 18 hours (I usually do this before bed, then let it go until I remember it in the morning—give or take). When it’s doubled and has big bubbles on top, you’re set. Looks a bit wild at this point but that’s the charm. -
Shape-ish the Dough
Sprinkle your counter with a handful of flour. Flour your hands, too, or you’ll end up like Edward Scissorhands. Gently pull the dough out and coax it into a rough ball. Don’t knead; just fold it over on itself a time or two, then shape it into a round. Leave it to rest, uncovered or lightly draped with a towel, for 45 minutes to an hour. Makes all the difference for pillowy bread. -
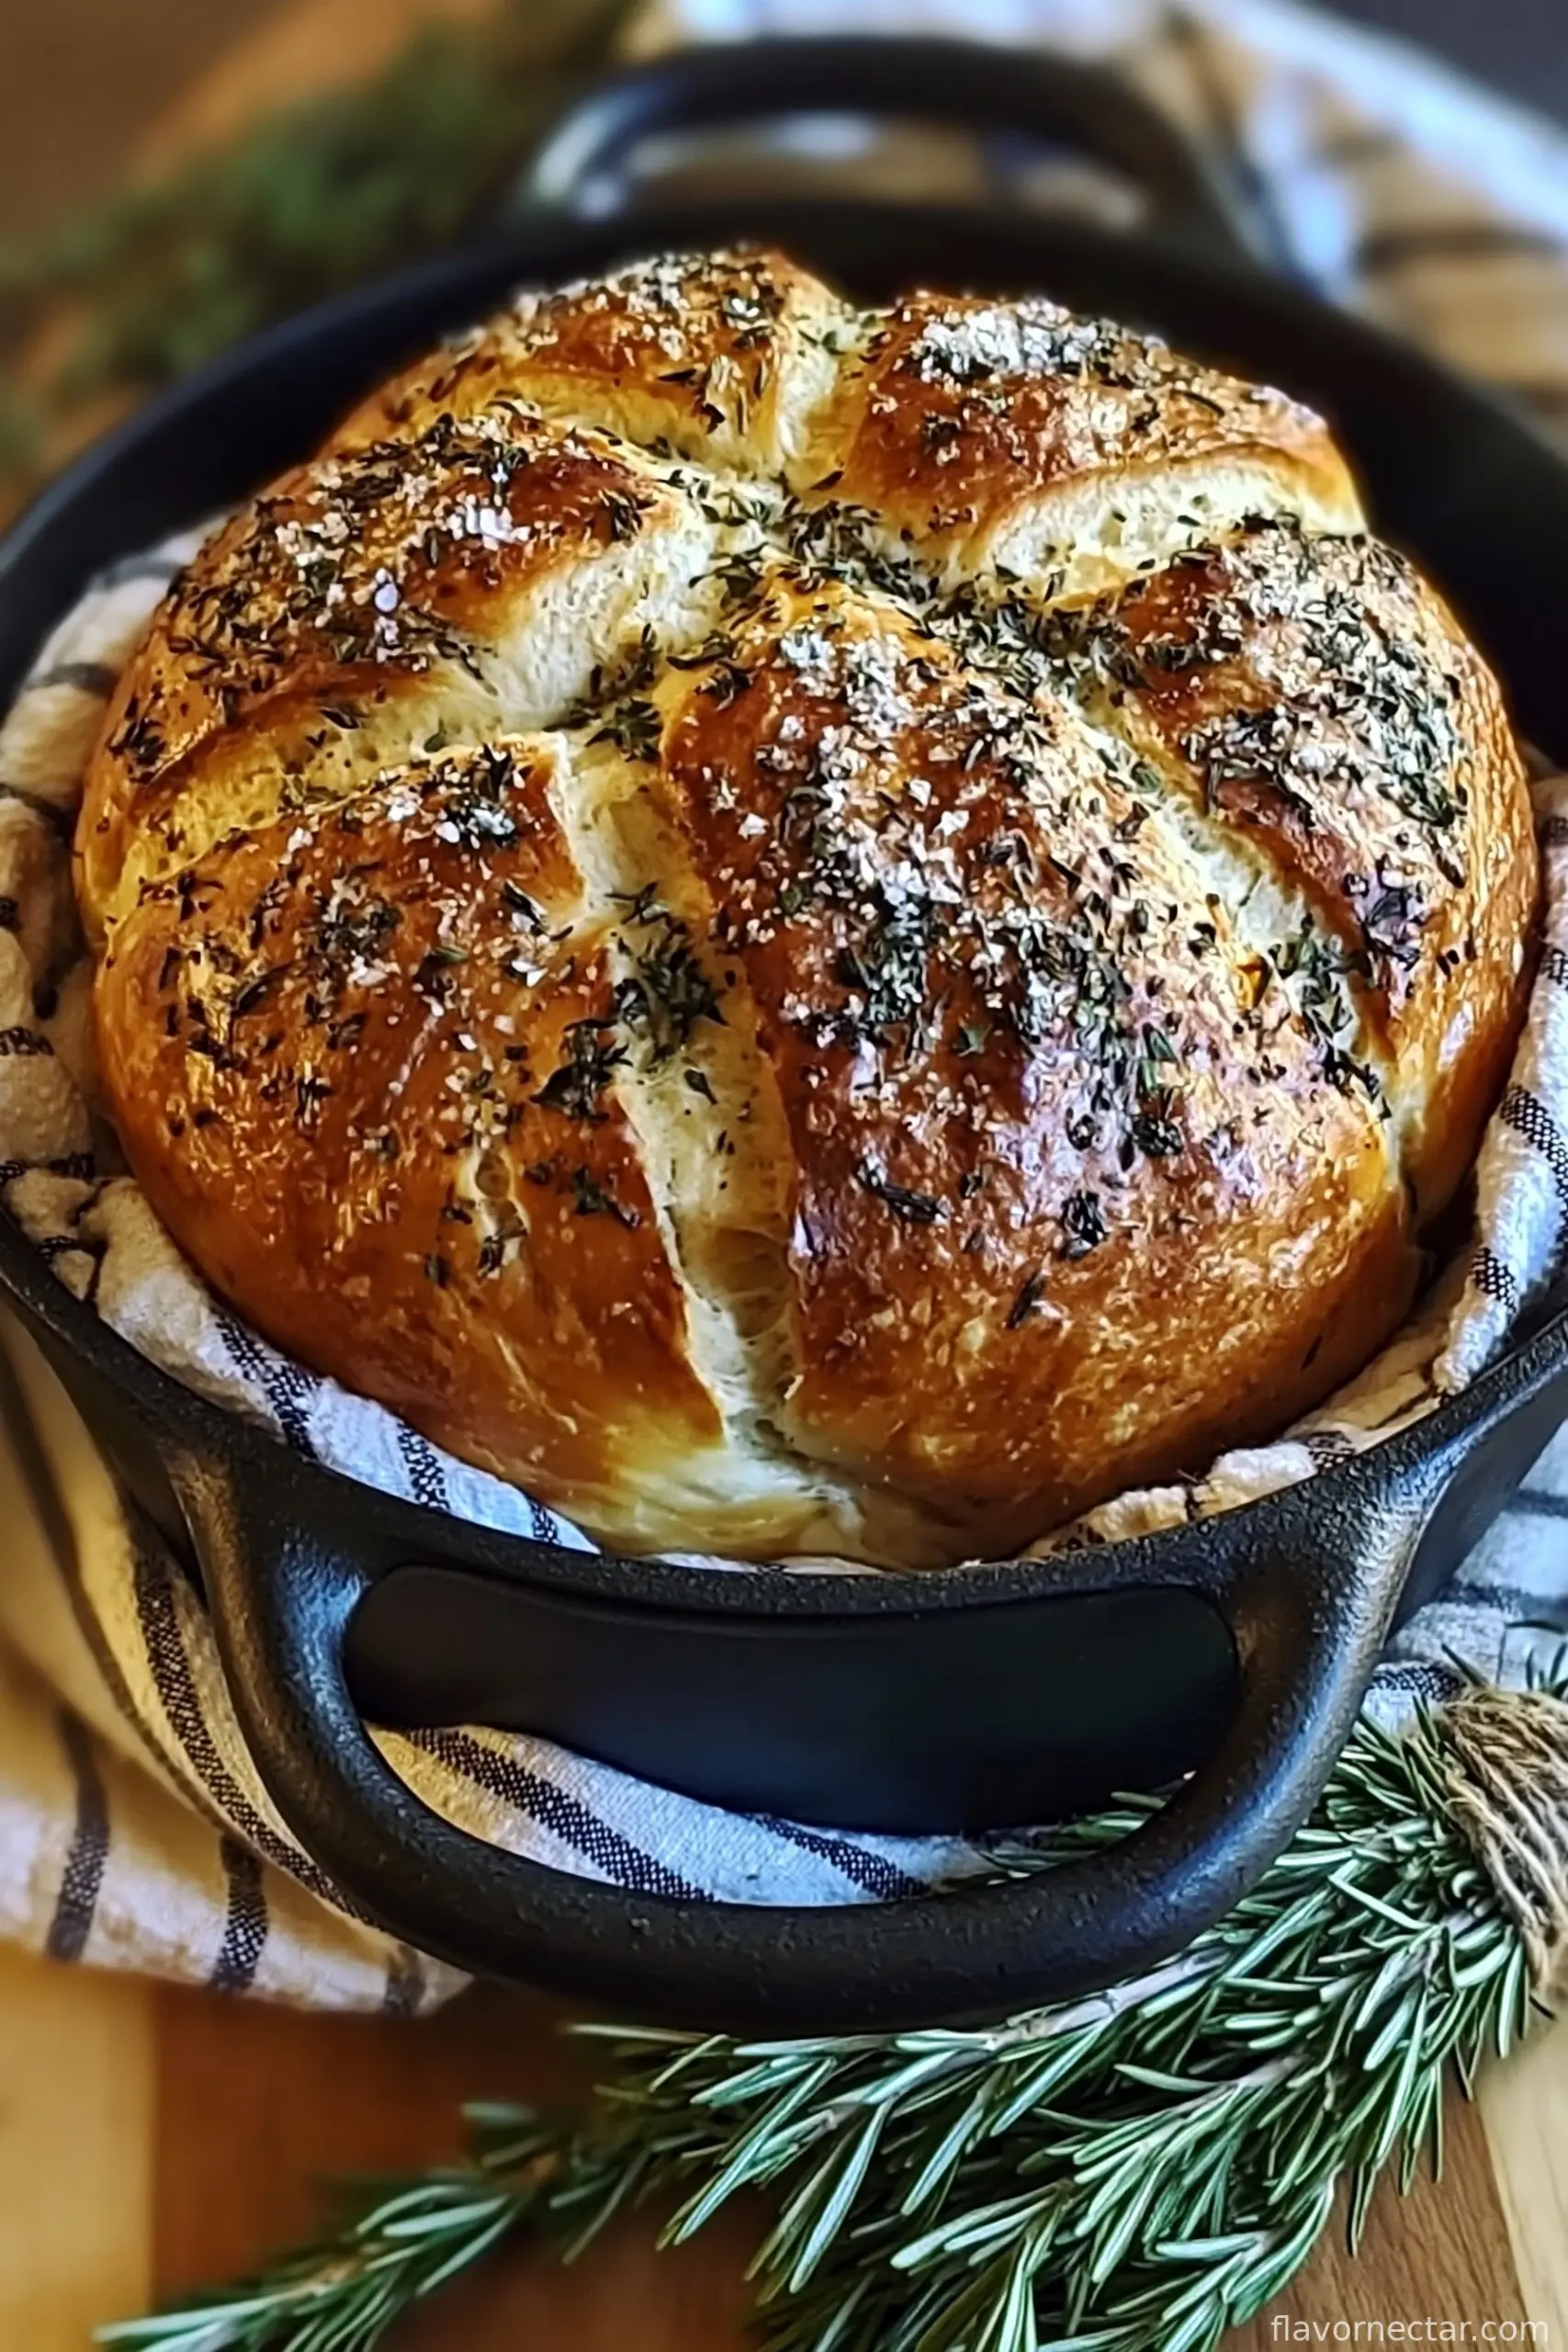
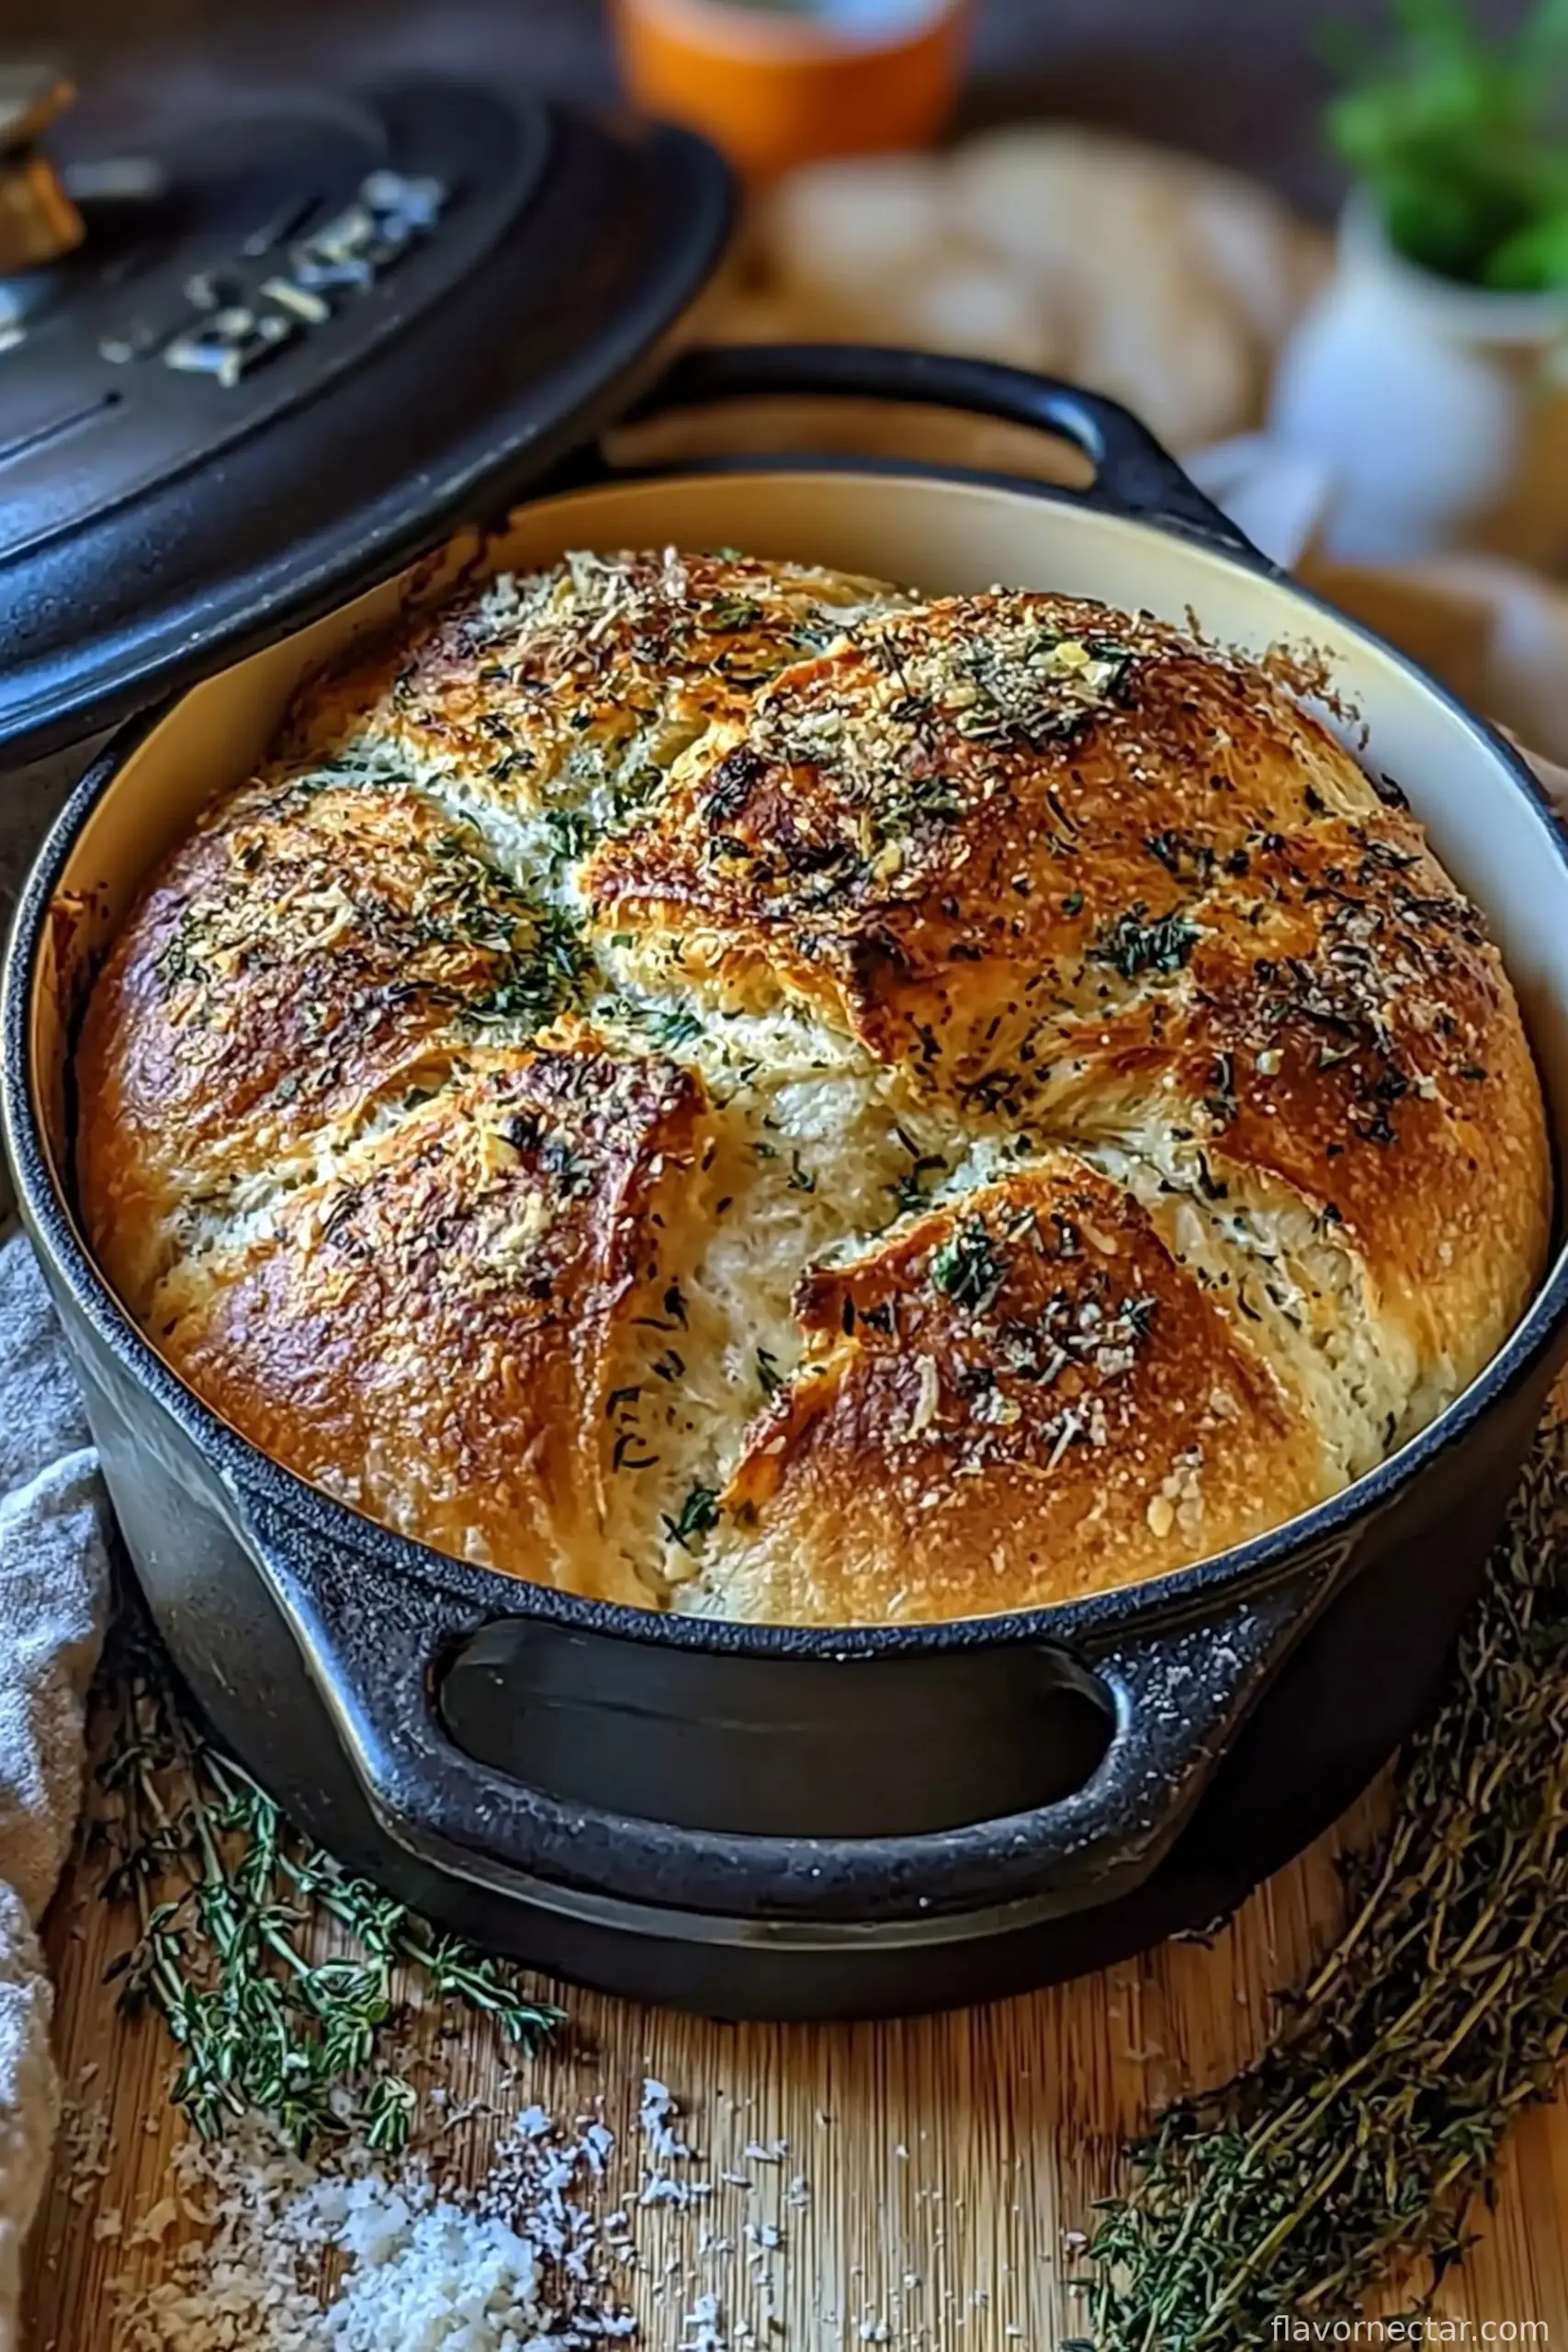
Turn Up the Heat (Dutch Oven Prepping)
Slide your Dutch oven (with lid) into your oven and blast it to 450°F (232°C). Let it preheat a good half hour—sounds excessive, but trust me, the crust owes its life to this. Sometimes I forget to start this early and wind up waiting, so set a reminder! -
Get Ready for the Oven
Cut a piece of parchment and plop your rested dough on top. (If you don’t have parchment, you can use a REALLY well-oiled pan, but taking the bread out at the end gets trickier—I’ve, uh, learned the hard way.) Use a sharp knife or even kitchen shears to slash the top—nothing fancy, just one long line so the bread doesn’t explode in weird places. -
Covered Bake: The Steamy Magic
Now, using oven mitts because this pot is lava, lift the dough by the parchment into the preheated Dutch oven and cover it tight. Bake for 30 minutes—don’t peek! The steam gets trapped and makes everything all fluff inside. -
Bake Without the Lid for a Golden Finish
After 30 minutes (set a timer or you’ll forget, like me, while scrolling your phone), whisk off the lid carefully and let the bread finish for another 15-20 minutes. It’ll be deep golden on top, maybe crackling. I check the inside with a thermometer (205-210°F is spot on), but tapping the bottom works in a pinch: should sound hollow and triumphant. -
Let It Cool—Yes, Really!
Take the loaf out and sit it on a wire rack (or just prop it on a wooden cutting board). Hold off slicing for at least half an hour; otherwise, it’s gummy. I almost always burn my fingertips picking at the crust, but you’d think I’d learn. Anyway, once cooled, slice up and enjoy!
A Few Real-Life Notes
- The dough is meant to be sticky. If it’s a pain to shape, just use wet hands—don’t keep pouring in flour, or it goes tough.
- If your bread comes out a little dense, give it more rising time next round. I learned that after a particularly squat loaf or two.
- No Dutch oven? You can bake in a heavy lidded pot or even a deep oven-safe dish covered in foil—results are a bit less pro, but still very edible.
Some Variations I’ve Tested (With Varying Success)
- Swap in roasted garlic for minced if you want that mellow, sweet thing going on. Works especially well if you’re serving with cheese.
- Gone heavy on rosemary once—and, well, my neighbor called it “Christmas in bread” (in a good way, I think?).
- Once tried adding sundried tomatoes and, honestly, wasn’t my best idea. Too oily, the loaf collapsed a bit. So maybe…don’t.
Equipment Chat—Do What You Can
- A Dutch oven is fabulous, but if you don’t have one, my friend Jo uses a heavy soup pot and it works almost as well.
- Big mixing bowl, wooden spoon, clean hands (arguably the most important tools).
Storing Leftovers (If You Have Any)
Bread keeps best wrapped in a kitchen towel, sitting cut-side down on the counter. It loses its magic after two days, but frankly, my lot eats it up on day one. If it goes a bit stale (rare), toast fixes everything. Or make croutons!
How I Serve It Up
Honestly, this bread shines with just a pat of butter, but I’ve also dunked slices in hot soup, or put out a board with cheese, olives, and a bottle of red for “picnic on the couch” nights, which are a thing in our house.
If I Could Offer One Pro Tip…
I’ve regretted every time I rushed the cooling—I know it smells unreal, but waiting lets the crumb set and flavors settle. Also, start preheating your pot before you think you need to, or you’ll be drumming your fingers on the countertop for ages (been there).
Questions I Actually Get About This (And My Off-the-Cuff Answers)
- “Can I use whole wheat flour?” Yep! Maybe replace a quarter to a third; I did half once and needed more water. Little denser, but oh, that nutty flavor.
- “What herbs are best?” Whatever’s fresh—parsley, chives, basil, thyme. Dried if you must. No rules, honestly.
- “Can I double the recipe?” In theory, yes, but I always make two loaves instead (easier to handle). My oven gets crowded, but that’s a future-me problem.
- “Is this freezer-friendly?” It is, but warm slices vanish faster than I can bag them up. Wrap tight, freeze, then reheat in the oven. Still good!
- “My crust is crazy tough, what gives?” Could be overbaking uncovered or not enough steam. Try covering for the full initial bake and limit time uncovered.
If you try this, let me know if you manage to have leftovers—nobody I know does. Cheers!
Ingredients
- All-Purpose Flour – Provides structure for the bread; can be partially replaced with whole wheat flour for a heartier loaf.
- Salt – Enhances flavor and strengthens gluten; essential for that savory taste you’d expect in a Garlic Herb Dutch Oven Bread.
- Instant Yeast – Acts as the leavening agent for a nice rise; can be substituted with active dry yeast if dissolved in water first.
- Minced Garlic – Infuses delicious flavor throughout the dough; consider using roasted garlic for a sweeter, milder taste.
- Fresh Herbs – Adds aromatic flavor to the bread; if you’re out, dried herbs can work in a pinch (use about 2 teaspoons).
- Lukewarm Water – Activates the yeast and combines all the dry ingredients; ensure it’s at the exact temperature specified.
- Olive Oil – Prevents stickiness and adds a touch of richness; it’s optional but great for dough shaping!
- Butter – A comforting spread to enhance every slice; for added flavor, try herb-infused butter.
- Olive Oil – Perfect for dipping; a drizzle can amplify the dish’s Mediterranean vibe.
- Cheese – Pair with your favorite cheeses for a delightful cheese garlic herb experience!
Instructions
-
1Bring the Dough Together: Grab your biggest bowl (the one that never fits in the dishwasher) and whisk up the flour, salt, yeast, garlic, and chopped herbs so they’re mingling evenly. Pour in the lukewarm water and mix—use a wooden spoon, your hand, or really whatever feels right—until it all comes together and there’s no dry flour left. Don’t stress if it’s ugly, shaggy, and sticky; that’s what you want!
-
2Let Time (and Yeast) Do the Hard Work: Seal up the bowl tightly with plastic wrap. Forget about it on the counter for 12 to 18 hours (I usually do this before bed, then let it go until I remember it in the morning—give or take). When it’s doubled and has big bubbles on top, you’re set. Looks a bit wild at this point but that’s the charm.
-
3Shape-ish the Dough: Sprinkle your counter with a handful of flour. Flour your hands, too, or you’ll end up like Edward Scissorhands. Gently pull the dough out and coax it into a rough ball. Don’t knead; just fold it over on itself a time or two, then shape it into a round. Leave it to rest, uncovered or lightly draped with a towel, for 45 minutes to an hour. Makes all the difference for pillowy bread.
-
4Turn Up the Heat (Dutch Oven Prepping): Slide your Dutch oven (with lid) into your oven and blast it to 450°F (232°C). Let it preheat a good half hour—sounds excessive, but trust me, the crust owes its life to this. Sometimes I forget to start this early and wind up waiting, so set a reminder!
-
5Get Ready for the Oven: Cut a piece of parchment and plop your rested dough on top. (If you don’t have parchment, you can use a REALLY well-oiled pan, but taking the bread out at the end gets trickier—I’ve, uh, learned the hard way.) Use a sharp knife or even kitchen shears to slash the top—nothing fancy, just one long line so the bread doesn’t explode in weird places.
-
6Covered Bake: The Steamy Magic: Now, using oven mitts because this pot is lava, lift the dough by the parchment into the preheated Dutch oven and cover it tight. Bake for 30 minutes—don’t peek! The steam gets trapped and makes everything all fluff inside.
-
7Bake Without the Lid for a Golden Finish: After 30 minutes (set a timer or you’ll forget, like me, while scrolling your phone), whisk off the lid carefully and let the bread finish for another 15-20 minutes. It’ll be deep golden on top, maybe crackling. I check the inside with a thermometer (205-210°F is spot on), but tapping the bottom works in a pinch: should sound hollow and triumphant.
-
8Let It Cool—Yes, Really!: Take the loaf out and sit it on a wire rack (or just prop it on a wooden cutting board). Hold off slicing for at least half an hour; otherwise, it’s gummy. I almost always burn my fingertips picking at the crust, but you’d think I’d learn. Anyway, once cooled, slice up and enjoy!
CLICK FOR NUTRITION INFO
↑
Approximate Information for One Serving
Serving Size:
1 serving
Calories:
185cal
Protein:
5 gg
Fat:
3.5 gg
Saturated Fat:
0g
Trans Fat:
0g
Cholesterol:
0mg
Sodium:
0mg
Potassium:
0mg
Total Carbs:
33 gg
Fiber:
0g
Sugar:
0g
Net Carbs:
0g
Vitamin A:
0
Vitamin C:
0mg
Calcium:
0mg
Iron:
0mg
Nutrition Disclaimers
Number of total servings shown is approximate. Actual number of servings will depend on your preferred portion sizes.
Nutritional values shown are general guidelines and reflect information for 1 serving using the ingredients listed, not including any optional ingredients. Actual macros may vary slightly depending on specific brands and types of ingredients used.
To determine the weight of one serving, prepare the recipe as instructed. Weigh the finished recipe, then divide the weight of the finished recipe (not including the weight of the container the food is in) by the desired number of servings. Result will be the weight of one serving.
Did you make this recipe?
Please consider Pinning it!