Let’s Talk About These No-Bake Biscoff Cheesecake Cups
Honestly, if you asked me the number of times these cheesecake cups have rescued me from a last-minute dessert emergency… well, I’ve lost count. The first time I whipped them up was for an impromptu Friday night get-together, and my mates polished them off before I’d even finished my cup of tea. There’s just something magical about the combo of Biscoff cookies and that creamy, dreamy cheesecake filling—plus the fact you don’t even switch on the oven? Winner. (Full disclosure: I have definitely eaten the filling straight with a spoon before. Zero regrets.)
Why You’ll Love These (AKA Why I Keep Coming Back)
- I make these when I’m short on time but still want to look like I put in some real effort—because who doesn’t love a shortcut that tastes like cheating?
- My family goes bonkers for these at Sunday lunches—my dad swoops in early for the cookie layer, and my niece just picks off the garnishes. Nobody ever complains about leftovers. Mainly because there are never any.
- They’re easy to customize (if you’re the experimental type), and you get to play with cookies. Although the first time, I did drop half the pack on the floor. Whoops. Five second rule?
What You’ll Need (and a Few Cheats for the Brave)
- 30 Lotus Biscoff biscuits (If you can’t find the exact brand—any speculoos-style cookie does the trick. My granny always claimed only “Lotus” would do… but, honestly, I’ve tried others in a pinch and nobody noticed!)
- 2 tablespoons unsalted butter, melted (I have gone rogue with salted butter and, you know, it’s not bad)
- 16 oz heavy cream (that’s about 2 cups; sometimes I eyeball it… never steered me wrong)
- 8 oz cream cheese, at room temp (this part’s non-negotiable for that creamy, dreamy texture. Or, you’ll end up fighting lumps. Ask me how I know!)
- 1/2 cup powdered sugar (I once swapped in icing sugar on a whim—worked fine, but it’s basically the same thing)
- ½ cup Biscoff spread (my downfall; do NOT leave the jar unattended…)
- 1 teaspoon vanilla extract (real or the fake stuff—nobody’s judging by dessert time)
- For garnish: ½ cup Biscoff spread (for that shiny topping), 8 Biscoff cookies, cut in half (or whatever’s left after inevitable snacking)
How To Make No-Bake Biscoff Cheesecake Cups (I Promise, No Oven!)
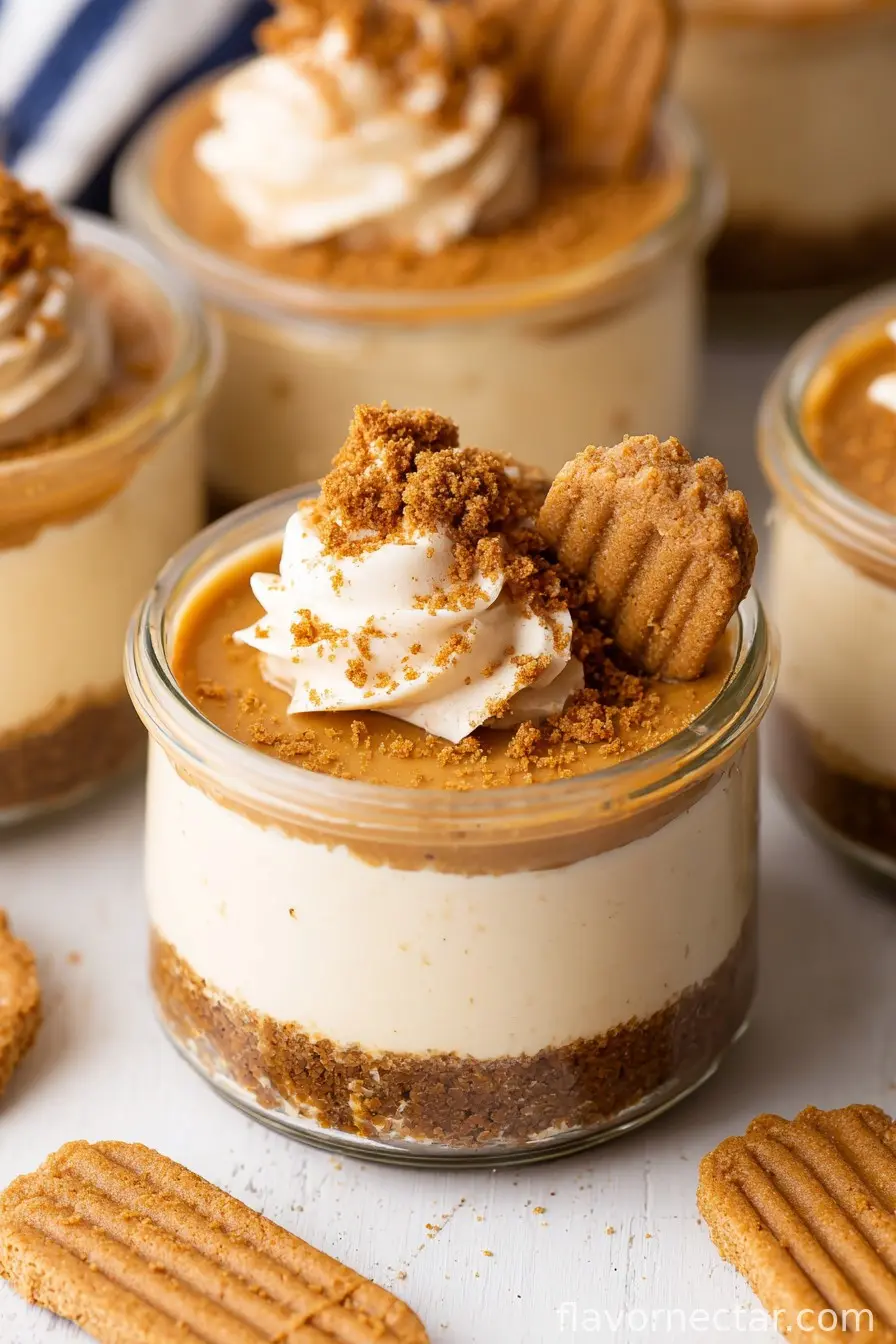
- Create That Cookie Base: Grab your pack of Biscoff biscuits and crush them into crumbs—food processor if you’ve got one, or roll up your sleeves and bash them in a zip-top bag with a rolling pin. Feels therapeutic! Mix the crumbs with your melted butter in a big bowl. Set aside a couple spoonfuls of this for a snazzy topping at the end.
- Build the Layers: Spoon out the cookie mixture into your serving cups. Depending on the size, you’ll get around 8 regular or up to 16 dinky shot glasses. About 2 to 3 tablespoons in each is good. Press down (I just use the back of a spoon) so it’s nicely packed. Set these aside for now—don’t eat them yet! Or at least try not to.
- Get Whipping (for the Cheesecake Filling): Pour your heavy cream into a separate large bowl, and whip it until you get lovely stiff peaks. No need for Olympic levels of perfection—just thick enough to hold its shape. A stand mixer is fab here, but elbow grease and a whisk work too (eventually!).
- The Fluffy Filling Awaits: In another bowl (sorry for all the washing up), blend together the room-temp cream cheese, powdered sugar, Biscoff spread, and vanilla. Make sure it’s really smooth—you might get the odd lump; that’s okay, it disappears. Gradually fold in your whipped cream. Go slowly, and I mean it—quick stirring knocks the air out and ruins that lovely fluff. Ask me why I stress this. Trust me.
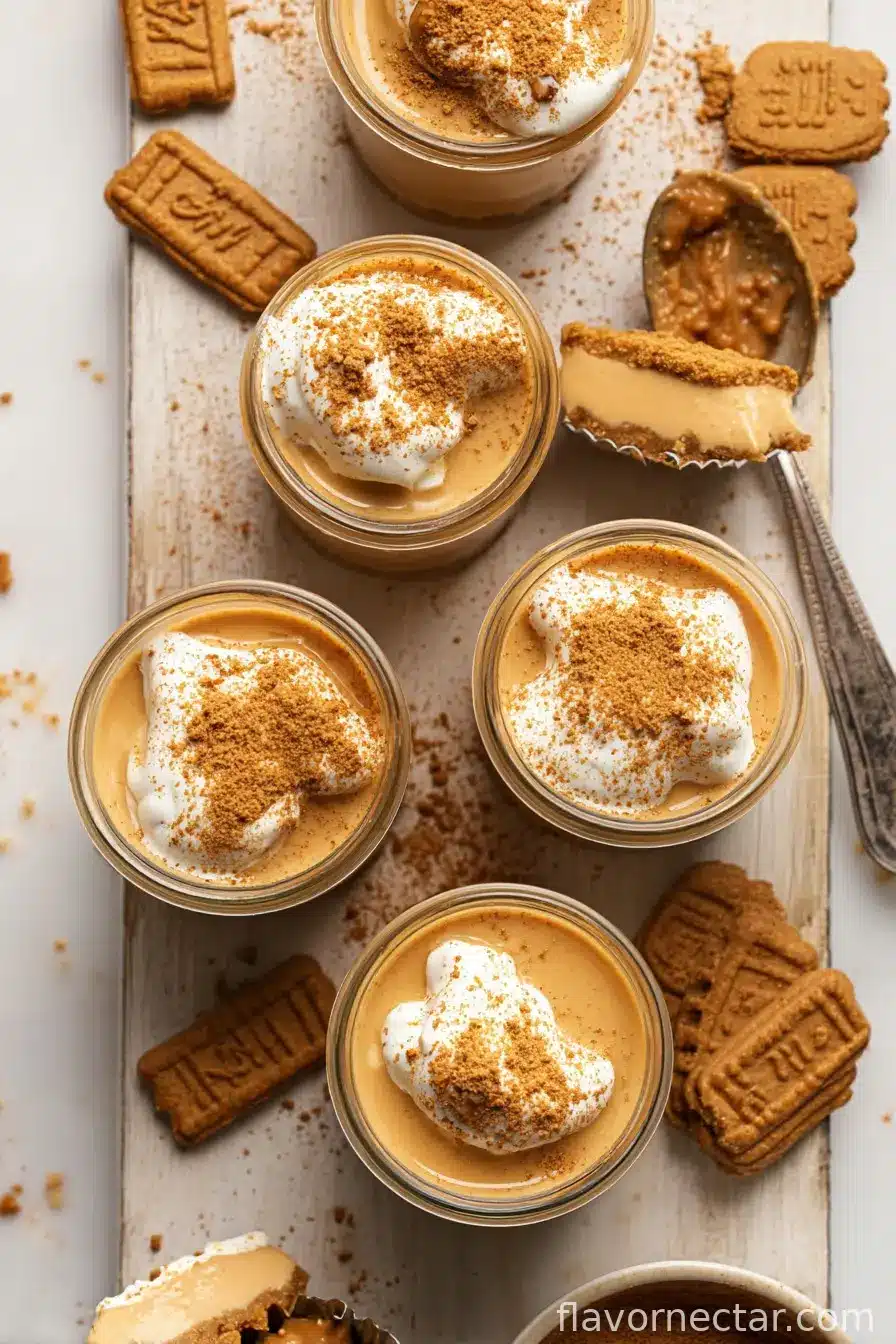
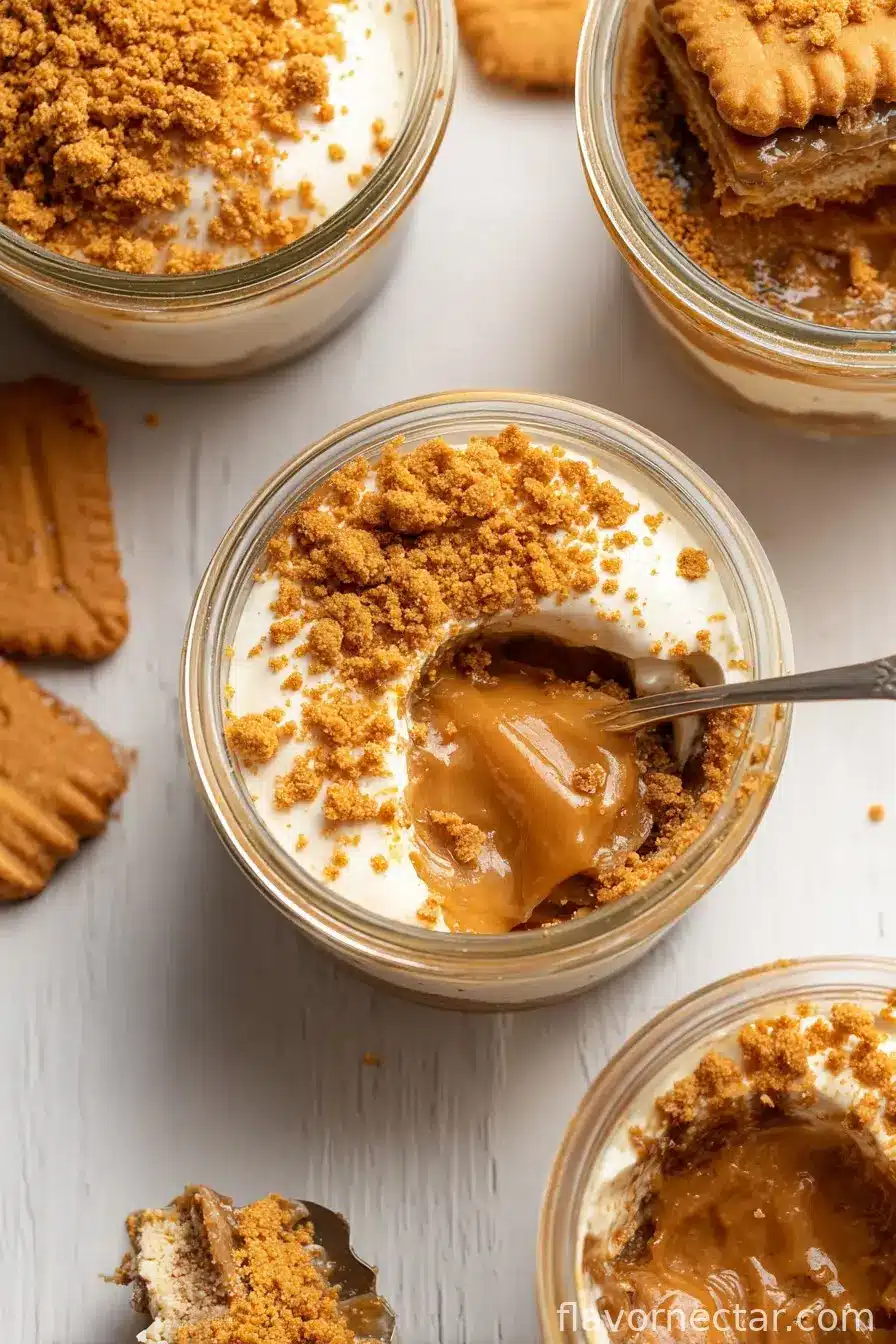
- The Fun Assembly Bit: Scoop your cheesecake mixture into a piping bag—no fancy tips needed. Or, if you’re fresh out of piping bags, a big ziplock with the corner snipped off does just fine. Squeeze the filling gently into each cup over the cookie base. Now, melt ½ cup Biscoff spread in the microwave for 20 seconds so it turns glossy and pourable. Drizzle a bit over each cup so it makes a shiny glaze. Stick in a halved Biscoff cookie for garnish, followed by a dusting of your reserved cookie crumbs. Doesn’t that look like you really tried?
- Chill Out: Pop the cups into the fridge. Give them at least 4 hours to firm up—overnight is even better if you somehow have that sort of patience. Serve them cold, straight from the fridge. (In my house, they never make it through the afternoon, let alone overnight!)
Little Things I’ve Learned (Cheesecake Wisdom, if you will)
- Let your cream cheese get truly to room temp or you’ll be chasing lumps all day.
- If you over-whip the cream, it goes grainy. Under-whip, and the filling is a bit soupy. Goldilocks levels here.
- Yes, you can assemble these an hour before serving in a true emergency, but the texture’s better if they chill longer. Patience not being my virtue, but still.
How I’d Jazz Them Up (Or, Experiments Gone Awry)
- Tried swapping Biscoff spread for Nutella once—family revolt followed. Stick with what works!
- You can fold in a bit of orange zest to the filling for a festive spin—pretty good, actually.
- Sometimes, I layer in mashed berries with the filling for color and a punch of tartness. Raspberries are best, but use what you’ve got.
Do You Really Need Fancy Equipment?
A food processor saves time on the cookie crushing, but let’s face it—a trusty old rolling pin (or glass jar) and a plastic bag work fine. If you’re piping the filling and don’t have a piping bag, just cut the end off a ziplock. I’ve even used a spoon in a pinch; not elegant, but still tastes ace.
How Do I Store These? (If You Even Need To…)
They’ll keep in the fridge for up to 3 days in an airtight container. That said, I’ve never seen them last more than a day, so I wouldn’t know about day three. The cookies will soften a bit, but honestly I like ‘em that way—sort of cake-like by day two.
How I Like To Serve Them
Usually cold, straight from the fridge, but if you want points for presentation, stick an extra blob of whipped cream and a whole cookie on top right before serving. At parties, I serve them in little jam jars—looks cute and keeps grabby hands in check. On holiday mornings, they’ve even been breakfast… but shhhh, don’t tell anyone.
Some Pro Tips (Learned The Hard Way, Of Course)
- I once tried to rush the chilling step and ended up with a goopy mess. Never again.
- If you pipe the filling too soon after mixing, it can separate—let it rest a few minutes first. Didn’t expect that, but now I always do it.
- Be generous with the garnish—it makes everyone think you worked way harder than you really did.
Questions I Get All The Time
- Can I make these ahead? Totally! Actually, I think they taste better the next day. Just don’t garnish until you’re about to serve so the cookies stay crunchy.
- What if I don’t have Biscoff biscuits? Ginger snaps or any crunchy spiced cookie works. But, just between us, Biscoff’s got its own special thing going on.
- Do I have to use a piping bag? Absolutely not. I sometimes just spoon the filling in all haphazard and call it rustic.
- Can I freeze them? Eh, technically yes, but the texture is best fresh from the fridge. Once, mine came out a bit weirdly grainy after being frozen, so I just stick to chilling.
- Is this gluten-free? Sadly no—but if you find gluten-free speculoos biscuits, let me know!
So there you have it: No-Bake Biscoff Cheesecake Cups that are creamy, crunchy, and honestly so easy, even my perpetually distracted self can pull them off. Give ’em a try and let me know how you tweak yours—I’m always curious about other people’s kitchen adventures!
Ingredients
- 30 Lotus biscoff biscuits
- 2 tablespoons unsalted butter, melted
- 16 oz heavy cream, 2 cups
- 8 oz cream cheese, at room temp
- 1/2 cup powdered sugar
- ½ cup biscoff spread
- 1 teaspoon vanilla extract
- ½ cup biscoff spread
- 8 biscoff cookies, cut in half
Instructions
-
1Create That Cookie Base: Grab your pack of Biscoff biscuits and crush them into crumbs—food processor if you’ve got one, or roll up your sleeves and bash them in a zip-top bag with a rolling pin. Feels therapeutic! Mix the crumbs with your melted butter in a big bowl. Set aside a couple spoonfuls of this for a snazzy topping at the end.
-
2Build the Layers: Spoon out the cookie mixture into your serving cups. Depending on the size, you’ll get around 8 regular or up to 16 dinky shot glasses. About 2 to 3 tablespoons in each is good. Press down (I just use the back of a spoon) so it’s nicely packed. Set these aside for now—don’t eat them yet! Or at least try not to.
-
3Get Whipping (for the Cheesecake Filling): Pour your heavy cream into a separate large bowl, and whip it until you get lovely stiff peaks. No need for Olympic levels of perfection—just thick enough to hold its shape. A stand mixer is fab here, but elbow grease and a whisk work too (eventually!).
-
4The Fluffy Filling Awaits: In another bowl (sorry for all the washing up), blend together the room-temp cream cheese, powdered sugar, Biscoff spread, and vanilla. Make sure it’s really smooth—you might get the odd lump; that’s okay, it disappears. Gradually fold in your whipped cream. Go slowly, and I mean it—quick stirring knocks the air out and ruins that lovely fluff. Ask me why I stress this. Trust me.
-
5The Fun Assembly Bit: Scoop your cheesecake mixture into a piping bag—no fancy tips needed. Or, if you’re fresh out of piping bags, a big ziplock with the corner snipped off does just fine. Squeeze the filling gently into each cup over the cookie base. Now, melt ½ cup Biscoff spread in the microwave for 20 seconds so it turns glossy and pourable. Drizzle a bit over each cup so it makes a shiny glaze. Stick in a halved Biscoff cookie for garnish, followed by a dusting of your reserved cookie crumbs. Doesn’t that look like you really tried?
-
6Chill Out: Pop the cups into the fridge. Give them at least 4 hours to firm up—overnight is even better if you somehow have that sort of patience. Serve them cold, straight from the fridge. (In my house, they never make it through the afternoon, let alone overnight!)
CLICK FOR NUTRITION INFO
↑
Approximate Information for One Serving
Serving Size:
1 serving
Calories:
550 caloriescal
Protein:
5gg
Fat:
38gg
Saturated Fat:
0g
Trans Fat:
0g
Cholesterol:
0mg
Sodium:
0mg
Potassium:
0mg
Total Carbs:
46gg
Fiber:
0g
Sugar:
0g
Net Carbs:
0g
Vitamin A:
0
Vitamin C:
0mg
Calcium:
0mg
Iron:
0mg
Nutrition Disclaimers
Number of total servings shown is approximate. Actual number of servings will depend on your preferred portion sizes.
Nutritional values shown are general guidelines and reflect information for 1 serving using the ingredients listed, not including any optional ingredients. Actual macros may vary slightly depending on specific brands and types of ingredients used.
To determine the weight of one serving, prepare the recipe as instructed. Weigh the finished recipe, then divide the weight of the finished recipe (not including the weight of the container the food is in) by the desired number of servings. Result will be the weight of one serving.
Did you make this recipe?
Please consider Pinning it!