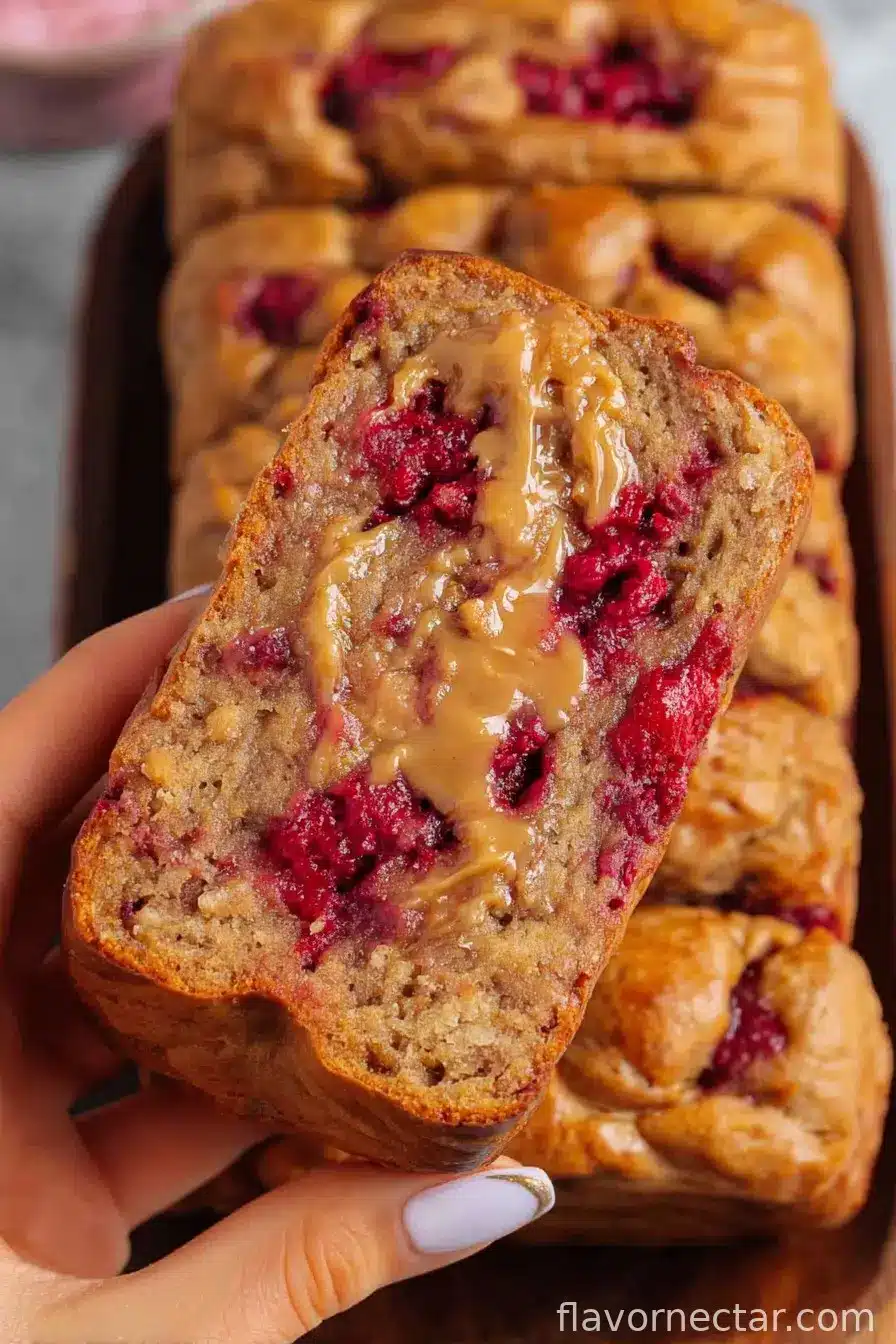
Alright friend, let me just say: whenever I make this Healthy Peanut Butter and Jelly Banana Bread, I’m basically chasing that school lunchbox nostalgia but, you know, pretending like I’m a responsible adult. I first cooked this up during a classic kitchen experiment, when I had too many spotty bananas giving me the side eye and not quite enough patience for another plain Banana Bread. My little one has a PB&J obsession (don’t we all?), so that’s where the lightbulb popped on. Also, you can thank my roommate for accidentally dropping her coffee into the first batch—don’t worry, no coffee in this version. Unless you want it, I suppose.
Why You’ll Honestly Love This (Really, Though)
I tend to make this when my week’s been extra bonkers and I need something that tastes like a treat but won’t leave me feeling like I need to nap all afternoon. Kids (and, let’s be honest, grown-ups) go wild for the swirls of jam. Sometimes I even make it just for myself and hide the last slice. I used to always be scared that Peanut Butter in bread would make it too dense; turns out, it’s just happiness in loaf form. And the best part: it smells ridiculous while it bakes. People wander into the kitchen like cats if you let this one cool on the counter too long.
Here’s What You’ll Need (Plus Some Make-Dos)
- 3 very ripe bananas (the spotty-er the better; honestly any size works—I just chuck in whatever looks sad)
- 1/3 cup creamy peanut butter (or crunchy, but I prefer creamy unless I’m feeling rebellious)
- 1/4 cup honey or maple syrup (I switch between, depending on what’s lurking in the pantry—granulated sugar works too, in a pinch)
- 2 eggs (if you’re out, a “flax egg” somehow works, though the bread’s a bit moister and denser)
- 1 teaspoon vanilla extract (my grandmother always insisted on Madagascar vanilla, but I just use store brand—shhh…)
- 1 cup white whole wheat flour (all-purpose is fine if that’s what you’ve got, or even half oat flour if you want things extra hearty)
- 1/2 teaspoon baking soda
- 1/2 teaspoon baking powder (don’t panic if you’re out of one—I’ve skipped the baking powder before and it was ok, though not as fluffy!)
- 1/2 teaspoon salt (table, sea, whatever’s nearby)
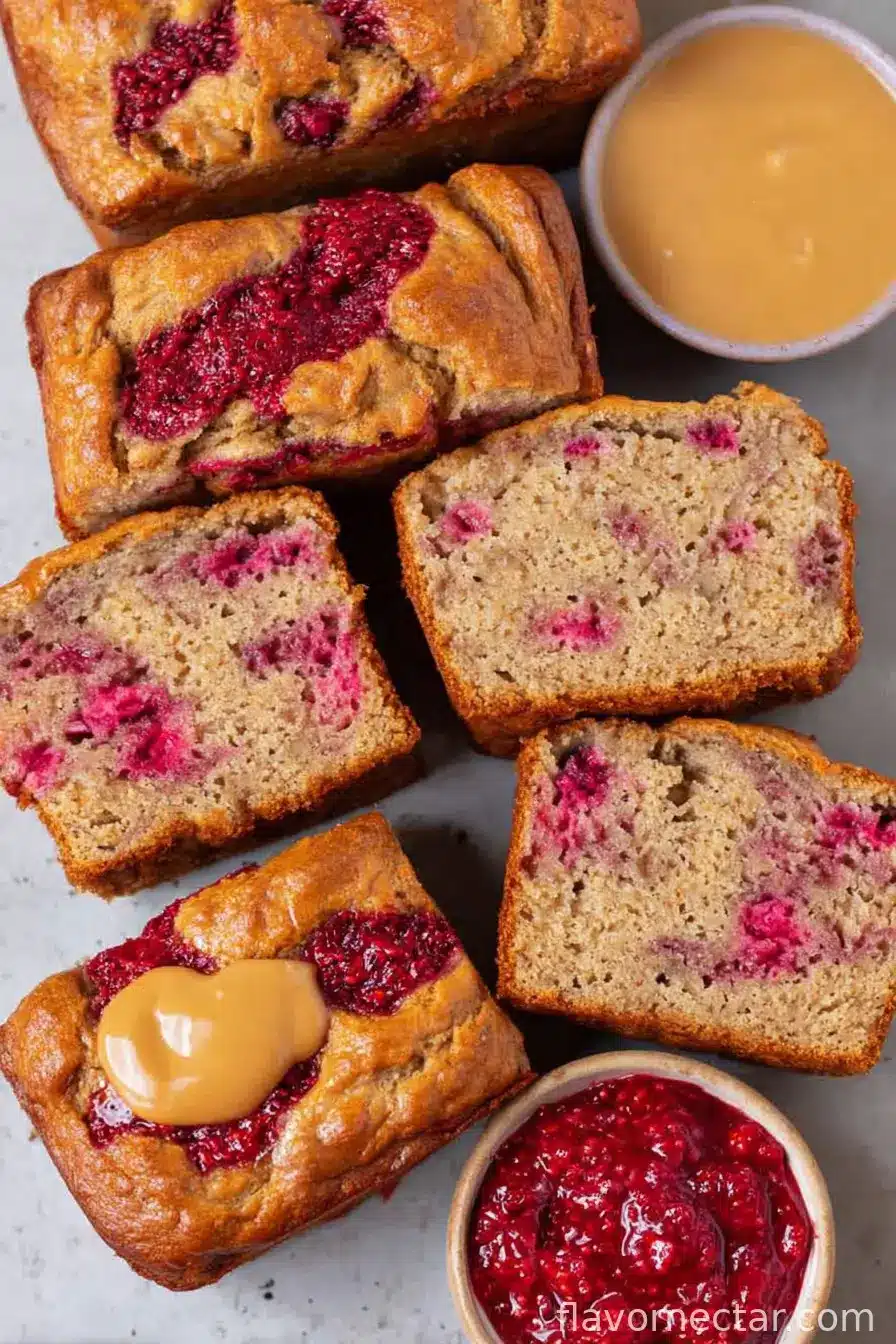
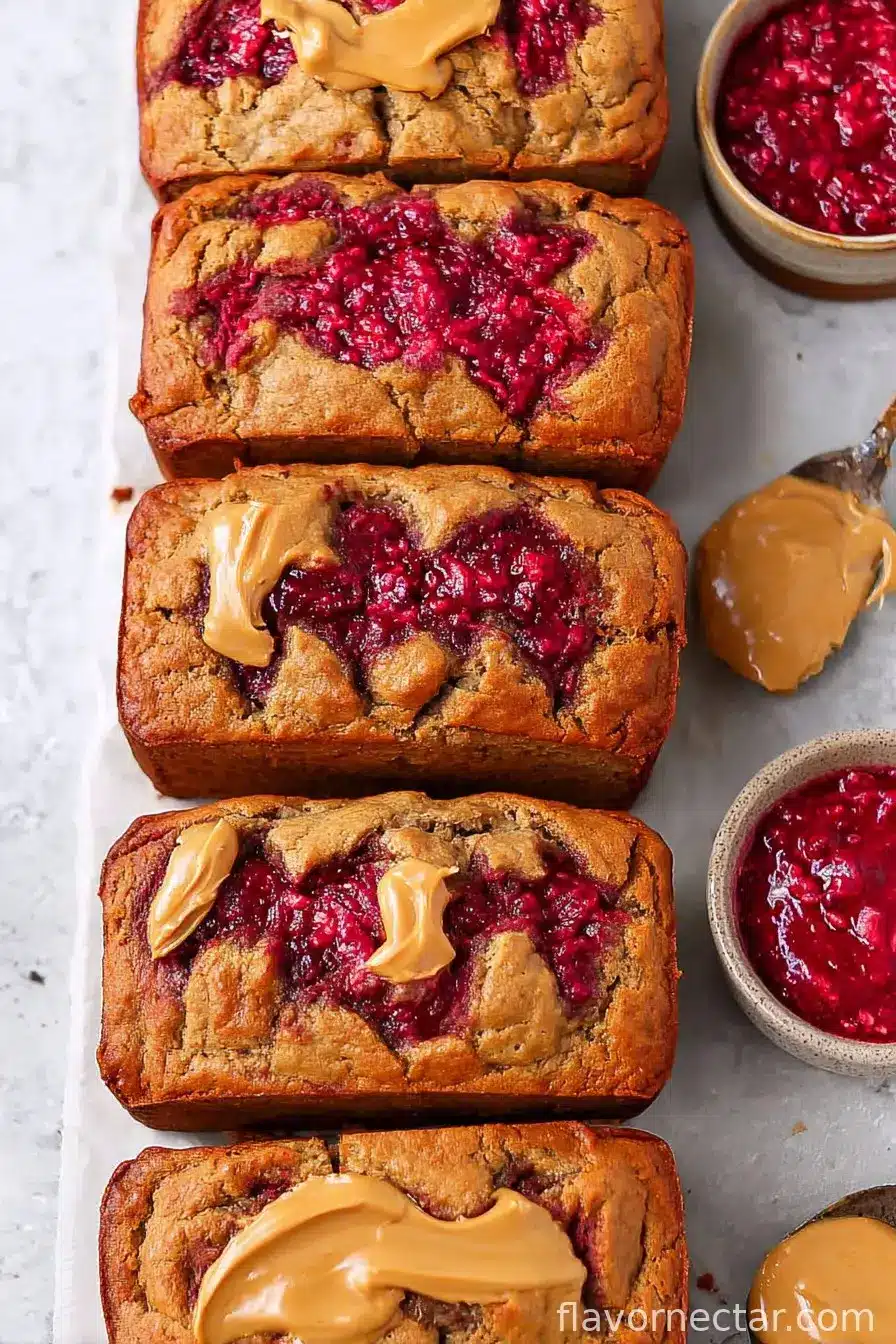
- 1/2 cup fruit jam or jelly (I go classic grape, but strawberry, raspberry, blueberry—whatever’s knocking around in your fridge—will do)
- Cooking spray or a smidge of butter for the pan
How To Make This Magic Happen
- Start by heating your oven to 350°F (175°C). Grease a standard loaf pan with cooking spray or rub it with butter. Sometimes, I just use parchment paper as a sling because getting the bread out later can be a bit tricky otherwise.
- Peel your bananas and mash them in a large bowl with a fork (or potato masher—whatever’s clean). Don’t worry if it’s a bit lumpy; rustic is the vibe.
- Add the peanut butter, honey or maple syrup, eggs, and vanilla. Stir until everything looks like a thick, glossy mess. This is where I usually sneak a taste—no shame.
- Dump in the flour, baking soda, baking powder, and salt (I just sprinkle them over the top rather than fussing with another bowl). Mix it just until it looks combined—no need to beat it to death. If it looks a bit streaky, that’s okay.
- Pour about half the batter into your loaf pan. Dot half the jam over the batter spoon by spoon—no need to get precious about the design.
- Spread the rest of the batter over top, then drop the remaining jam by spoonfuls. Use a butterknife or chopstick to swirl it around (swirling is fun, but if you go overboard, it’ll just mix in—that’s fine too)
- Pop the pan into the oven and bake for about 45–55 minutes, or until a skewer poked into the middle comes out mostly clean (except maybe some gooey jam). If your oven’s got a hot spot or you like the top less brown, check on it after 40 min.
- Let it cool in the pan for 10–15 min, then carefully lift it out and cool completely on a rack. If you can wait, that is—sometimes we just slice it up warm. It’s messy, but who cares?
Some Notes I Wish I Knew Sooner
- If you use natural peanut butter (runny kind), your batter may be looser. Not a bad thing—just a heads-up.
- I once added too much jam and, whoops, the center never set. So don’t get carried away (though the pudding-like middle was actually kind of awesome with ice cream).
- I think it tastes even better the next morning, toasted with a tiny bit of butter. But honestly, that’s if there’s any left to make it to morning.
Variations to Keep Things Fun
- I’ve swapped out peanut butter for almond butter—delish, just a bit more subtle.
- Did an all-blueberry jam version last summer; tasted like early July holidays.
- Tried chocolate chips once, but honestly, the flavors fought a little (maybe it was just an off day for my tastebuds).
- Got a nut allergy in the house? Sunflower seed butter works fine, if a tad “earthy.”
Equipment (But Don’t Sweat the Details)
- 1 loaf pan (8.5×4.5 or 9×5 both work—I once used a round cake tin, and it came out a little squat, but hey, still tasty)
- Mixing bowl (I use a big salad bowl—less flour on the counter that way)
- Fork or potato masher (if all else fails, your clean hands do the trick—slightly messy fun)
- Butter knife or chopstick for swirling
- An oven, obviously (if you don’t have one, I guess a toaster oven in batches might work, but I haven’t tried it… yet)
How To Store This (If It Lasts That Long!)
Wrap cooled bread in plastic or, if you’re feeling fancy, keep it in an airtight container at room temp for about 3 days (ha, like mine’s ever lasted past 24 hours). You can freeze slices in parchment and pull one out for a busy morning, too.
How We Love to Serve It
Honestly, thick cut, slightly warm, maybe with an extra smear of peanut butter, cup of tea nearby. My cousin insists on a scoop of vanilla ice cream on top—bit over the top, but I admire her spirit. If we’ve got company, sometimes I just dust some powdered sugar and call it a “brunch treat”—people seem impressed.
Lessons Learned the Hard Way
- Don’t overmix—one time I thought I could whip out all the lumps, and yeah, ended up with something closer to a brick than bread.
- I once rushed the cooling step—too eager! It completely fell apart. So now I (try to) wait. Mostly.
- If the jam sinks to one side (happened when my oven shelf was crooked!), just call it an artisan swirl and move on.
Some Questions I’ve Actually Gotten
- Can I make this vegan? Yep! Use flax eggs and vegan yogurt works in place of eggs (about 1/4 cup per egg). Tastes slightly different, but still lovely.
- Can you use crunchy peanut butter? I do, sometimes! Just gives you little nutty surprises in every bite. Not a problem at all.
- What if my bananas aren’t super ripe? Stick ’em in the oven (in the skin) for about 10 minutes at 300°F—works a treat. Or microwave for a quick cheat.
- Help, it’s sunk in the middle! Could be too much jam or underbaking (or both). Still tasty, though—maybe call it pudding bread?
- Can I add protein powder? I mean, you can. I tried it once, but it did get a bit dense. Add a splash more liquid if you go this route.
Anyway, give this a crack and let me know what wild combos you try. And if your bread’s wonky looking or the swirls don’t cooperate, just remember—it’s probably still going to taste flipping fantastic. Happy baking!
Ingredients
- 3 very ripe bananas (the spotty-er the better; honestly any size works—I just chuck in whatever looks sad)
- 1/3 cup creamy peanut butter (or crunchy, but I prefer creamy unless I’m feeling rebellious)
- 1/4 cup honey or maple syrup (I switch between, depending on what’s lurking in the pantry—granulated sugar works too, in a pinch)
- 2 eggs (if you’re out, a “flax egg” somehow works, though the bread’s a bit moister and denser)
- 1 teaspoon vanilla extract (my grandmother always insisted on Madagascar vanilla, but I just use store brand—shhh…)
- 1 cup white whole wheat flour (all-purpose is fine if that’s what you’ve got, or even half oat flour if you want things extra hearty)
- 1/2 teaspoon baking soda
- 1/2 teaspoon baking powder (don’t panic if you’re out of one—I’ve skipped the baking powder before and it was ok, though not as fluffy!)
- 1/2 teaspoon salt (table, sea, whatever’s nearby)
- 1/2 cup fruit jam or jelly (I go classic grape, but strawberry, raspberry, blueberry—whatever’s knocking around in your fridge—will do)
- Cooking spray or a smidge of butter for the pan
Instructions
-
1Start by heating your oven to 350°F (175°C). Grease a standard loaf pan with cooking spray or rub it with butter. Sometimes, I just use parchment paper as a sling because getting the bread out later can be a bit tricky otherwise.
-
2Peel your bananas and mash them in a large bowl with a fork (or potato masher—whatever’s clean). Don’t worry if it’s a bit lumpy; rustic is the vibe.
-
3Add the peanut butter, honey or maple syrup, eggs, and vanilla. Stir until everything looks like a thick, glossy mess. This is where I usually sneak a taste—no shame.
-
4Dump in the flour, baking soda, baking powder, and salt (I just sprinkle them over the top rather than fussing with another bowl). Mix it just until it looks combined—no need to beat it to death. If it looks a bit streaky, that’s okay.
-
5Pour about half the batter into your loaf pan. Dot half the jam over the batter spoon by spoon—no need to get precious about the design.
-
6Spread the rest of the batter over top, then drop the remaining jam by spoonfuls. Use a butterknife or chopstick to swirl it around (swirling is fun, but if you go overboard, it’ll just mix in—that’s fine too)
-
7Pop the pan into the oven and bake for about 45–55 minutes, or until a skewer poked into the middle comes out mostly clean (except maybe some gooey jam). If your oven’s got a hot spot or you like the top less brown, check on it after 40 min.
-
8Let it cool in the pan for 10–15 min, then carefully lift it out and cool completely on a rack. If you can wait, that is—sometimes we just slice it up warm. It’s messy, but who cares?
CLICK FOR NUTRITION INFO
↑
Approximate Information for One Serving
Serving Size:
1 serving
Calories:
190 caloriescal
Protein:
5gg
Fat:
6gg
Saturated Fat:
0g
Trans Fat:
0g
Cholesterol:
0mg
Sodium:
0mg
Potassium:
0mg
Total Carbs:
30gg
Fiber:
0g
Sugar:
0g
Net Carbs:
0g
Vitamin A:
0
Vitamin C:
0mg
Calcium:
0mg
Iron:
0mg
Nutrition Disclaimers
Number of total servings shown is approximate. Actual number of servings will depend on your preferred portion sizes.
Nutritional values shown are general guidelines and reflect information for 1 serving using the ingredients listed, not including any optional ingredients. Actual macros may vary slightly depending on specific brands and types of ingredients used.
To determine the weight of one serving, prepare the recipe as instructed. Weigh the finished recipe, then divide the weight of the finished recipe (not including the weight of the container the food is in) by the desired number of servings. Result will be the weight of one serving.
Did you make this recipe?
Please consider Pinning it!