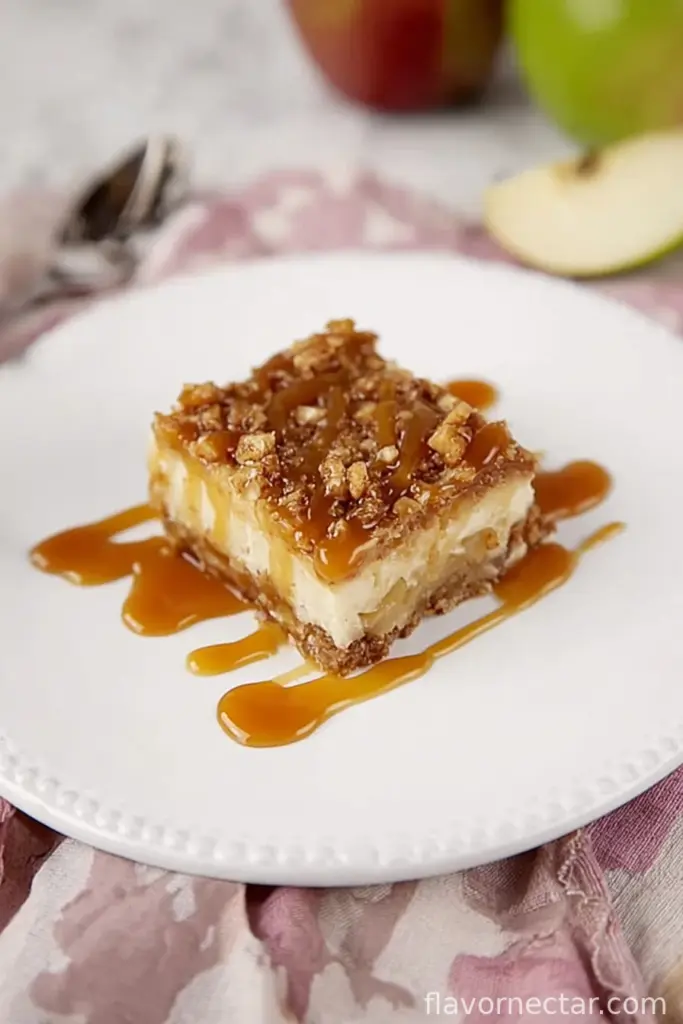
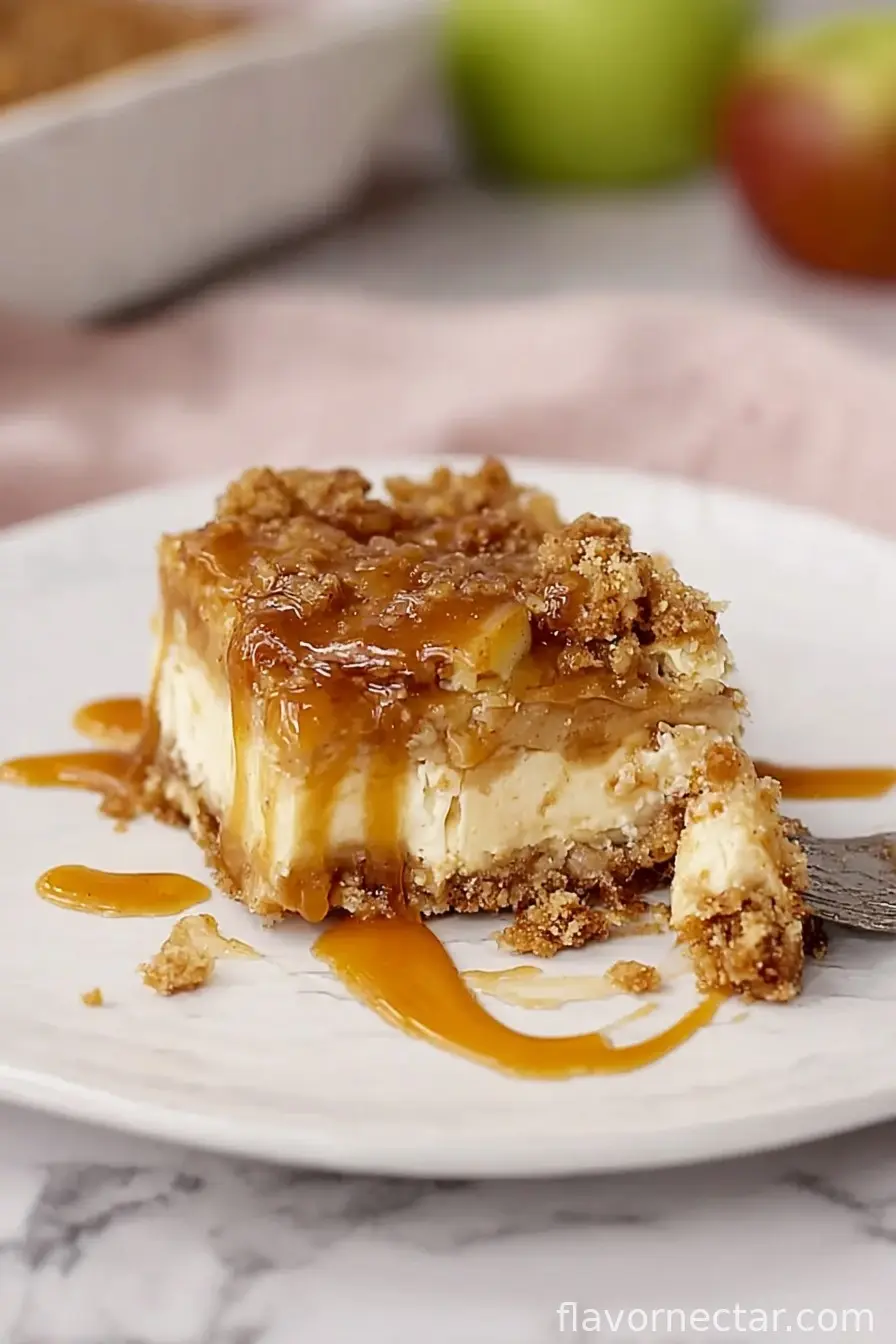
Let’s Talk About These Caramel Apple Cheesecake Bars
Alright, so, first off: if you’ve never had one of these bars before, you’re in for a treat—and honestly, possibly a slightly sticky kitchen counter. The first time I baked these Caramel Apple Cheesecake Bars, it was for my cousin’s fall potluck—it was one of those chilly evenings where you just want to eat something cozy (also, someone brought store-bought brownies and, I mean, why?). I remember scrambling because I couldn’t find my 9×13 pan and ended up using a tin foil tray form the store, and, well, let’s just say wobbly hands plus hot caramel equals drama. But the smell, oh boy, it made up for it. Think warm apples, brown sugar, that hint of tang from the cheesecake layer—honestly, it’s like an apple pie and a cheesecake decided to get married at a county fair.

Why You’ll Actually Want to Make This (Not Just Pin It)
I make these when I want something that looks more impressive than it actually is; plus, my family goes absolutely bonkers for the caramel drizzle (the kids usually try to sneak more on their pieces when I’m not looking). There’s something about the crumbly base, a creamy tang, and then the apples—seriously, it just feels right when the weather cools down. Also, if you’re nervous about cheesecakes in general, this recipe is way more forgiving than a big ol’ classic round cheesecake—I’ve had those crack on me (ugh).
What You’ll Need—But Not in a Stressful Way
- 1 1/2 cups all-purpose flour (sometimes I sub half whole wheat; works just fine, if a bit nuttier)
- 1/2 cup packed light brown sugar (my grandmother swore by dark brown, to be honest I can’t tell much difference here)
- 1/2 cup (1 stick) unsalted butter, cold and cubed (salted? Sure, just scale back the added salt)
- 1/4 teaspoon fine sea salt (table salt if you must—just don’t overdo it)
- 2 smallish apples, peeled and diced (I use Granny Smith usually, but honestly any apples lounging in your crisper will do)
- 1/2 teaspoon ground cinnamon
- 1 tablespoon granulated sugar
- 1 (8 oz) block cream cheese, softened (full-fat is best but I’ve used the Neufchâtel; works well enough)
- 1/4 cup granulated sugar (I sometimes use a little less for a more tart taste)
- 1 large egg (I used a pullet egg once—smaller eggs—needed to crack a second to make up the difference, lesson learned)
- 1 teaspoon vanilla extract
- 1/2 cup old-fashioned oats (quick oats in a pinch, not instant though, please)
- 1/4 cup packed light brown sugar (again, dark if it’s what you’ve got)
- 1/4 cup unsalted butter, cold and cubed
- Pinch of cinnamon (completely optional—I like the warmth)
- 1/3 cup caramel sauce, plus more for drizzling (homemade is lovely, but the stuff in a squeeze bottle is just fine—don’t stress it)
How To Wrestle These Together
- First, preheat your oven to 350°F (175°C). Line a 9×13-inch pan with parchment or foil—leave some hanging over the side for easy lifting. (Remember, the time I used foil without enough overhang—never again. At least foil comes off your teeth, right?)
- Grab a bowl, mix together 1.5 cups flour, 1/2 cup brown sugar, 1/4 teaspoon salt. Toss in 1/2 cup cold butter cubes. Either use a pastry cutter (I never find mine, so just use your fingers—squish till it sort of looks like damp sand). Pat this into the pan for your crust; press it down fairly well. Pop it in the oven—bake for 15 minutes. It won’t look like much yet.
- Meanwhile, dice your apples (I don’t get too fussy, rustic chunks are fine). Toss them in a small bowl with 1/2 teaspoon cinnamon and 1 tablespoon sugar. Set aside to mingle.
- For the cheesecake layer, grab another bowl (I know—another bowl, sorry). Beat together the softened cream cheese and 1/4 cup sugar until smoothish—no big lumps, but a few streaks are okay. Add in the egg and vanilla. Beat again—but not too crazy. Pour this over the par-baked crust (it’s okay if it’s still warm—I’ve done it both ways).
- Spoon your apple bits all over the cheesecake layer. Spread ‘em out, but don’t worry if a few clump up; artful, right?
- Quickly, let’s do the oat topping: combine 1/2 cup oats, 1/4 cup brown sugar, 1/4 cup cold butter cubes, and that extra pinch of cinnamon. Use the same hands from before—clean them off first (no one likes butter under their nails). Pinch and work it until clumpy. Sprinkle on top of the apples.
- Bake another 30-35 minutes until the top looks golden and the cheesecake doesn’t jiggle aggressively when you shake the pan. If you’re not sure, err on the side of more golden—underbaked bars are a fork-and-bowl situation.
- Let it cool at room temp at least an hour, then into the fridge for another couple hours (or overnight if you’ve got the patience of a saint). Lift out, drizzle generously with caramel sauce, slice, and—finally—devour.
Things I Wish I’d Known From The Start (A.K.A. Notes)
- The chilling step? Not optional, at least if you want bars, not cheesecake soup. (I once tried to rush it using the freezer. Regretted it.)
- If you overmix the cheesecake, it goes gummy. Just beat it enough to combine; learn form my mistakes.
- Apples get juicier the longer they sit. If you prep them too early, they’ll be a bit soft. Not necessarily a bad thing.
Fun Variations I’ve Actually Tried (and One Not So Great One)
- Swap pears for apples—nice, floral twist.
- Add chopped walnuts to the oat topping for crunch. My uncle claims it’s better, but honestly I prefer it nut-free.
- Salted caramel drizzle: I once used a sprinkle of flaky salt on top with the caramel. Big flavor, just go easy unless you really like salt.
- Once I tried shredded coconut mixed into the topping. Meh—not my favorite. Something about texture wars.
Essential (Well, Sort Of) Equipment
- 9×13-inch baking pan (mine is slightly warped and it’s fine!)
- Several bowls—if you’re short, clean as you go, or just reuse without washing (I don’t tell anyone)
- Pastry cutter—but honestly, your fingers work just as well for the crust.
- Mixing spoon or hand mixer for the cheesecake layer (elbow grease works; be stubborn!)
- Parchment paper or foil (if you only have wax, that’s not gonna work… trust me, oozy mess)
How to Store—and How Long They Last in My House
Tuck any leftovers in an airtight box, fridge for up to 4 days. (Though honestly, in my house, they’re gone by breakfast the next day, so maybe you’ll never know.) If they get a little soft, eat with a fork. Oh, and do not freeze with the caramel drizzle—makes for an icy mess.
Serving Ideas (or, How Our Family Eats Them)
Straight from the fridge is classic, but I love them at barely cool, with extra caramel and—occasionally—a small scoop of vanilla ice cream on the side. My mom likes them with coffee, but I think they’re just fine with a tall glass of milk or, if we’re feeling fancy, warm apple cider. Fridays, we’ve been known to plop them right into lunchboxes.
Pro Tips (Learned the Hard Way)
- Pouring caramel too soon—it melts into everything, so wait till the bars are cool.
- Once, I didn’t line my pan…and spent twenty minutes chipping stuck bits off with a spatula. Do the lining; you won’t regret it.
- I tried to slice them warm. No. Just—don’t. Everything slides and it’s more cobbler than bar.
FAQ—for Real People (Not Robots)
- Can I use store-bought caramel? Heck yes—I do half the time! If you want to get fancy, homemade is lovely, but honestly, do what makes life easier.
- What apples should I use? Pretty much any fresh, crisp ones. Granny Smith for tart, Galas for sweeter—I’ve even used old Pink Ladies. Just avoid those mealy Red Delicious types; they get weird.
- Can I make ahead? Yes—actually, I think it tastes even better after chilling overnight. Flavors meld a bit more, you know?
- Do I need a pastry cutter? Nope. I use my hands half the time—less to wash. If you have a food processor, whiz away (but pulsing is key, or it gets pasty).
- Pan size isn’t exact—is that okay? Honestly, yes! 9×13 is classic, but I’ve used 11×7; just bake a bit longer since they come out thicker (or shorter if it’s a thinner layer). Start checking 5 minutes early.
And, oh! If you wander into eating a bar for breakfast, you’re in good company…
Ingredients
- 1 1/2 cups all-purpose flour (sometimes I sub half whole wheat; works just fine, if a bit nuttier)
- 1/2 cup packed light brown sugar (my grandmother swore by dark brown, to be honest I can’t tell much difference here)
- 1/2 cup (1 stick) unsalted butter, cold and cubed (salted? Sure, just scale back the added salt)
- 1/4 teaspoon fine sea salt (table salt if you must—just don’t overdo it)
- 2 smallish apples, peeled and diced (I use Granny Smith usually, but honestly any apples lounging in your crisper will do)
- 1/2 teaspoon ground cinnamon
- 1 tablespoon granulated sugar
- 1 (8 oz) block cream cheese, softened (full-fat is best but I’ve used the Neufchâtel; works well enough)
- 1/4 cup granulated sugar (I sometimes use a little less for a more tart taste)
- 1 large egg (I used a pullet egg once—smaller eggs—needed to crack a second to make up the difference, lesson learned)
- 1 teaspoon vanilla extract
- 1/2 cup old-fashioned oats (quick oats in a pinch, not instant though, please)
- 1/4 cup packed light brown sugar (again, dark if it’s what you’ve got)
- 1/4 cup unsalted butter, cold and cubed
- Pinch of cinnamon (completely optional—I like the warmth)
- 1/3 cup caramel sauce, plus more for drizzling (homemade is lovely, but the stuff in a squeeze bottle is just fine—don’t stress it)
Instructions
-
1First, preheat your oven to 350°F (175°C). Line a 9×13-inch pan with parchment or foil—leave some hanging over the side for easy lifting. (Remember, the time I used foil without enough overhang—never again. At least foil comes off your teeth, right?)
-
2Grab a bowl, mix together 1.5 cups flour, 1/2 cup brown sugar, 1/4 teaspoon salt. Toss in 1/2 cup cold butter cubes. Either use a pastry cutter (I never find mine, so just use your fingers—squish till it sort of looks like damp sand). Pat this into the pan for your crust; press it down fairly well. Pop it in the oven—bake for 15 minutes. It won’t look like much yet.
-
3Meanwhile, dice your apples (I don’t get too fussy, rustic chunks are fine). Toss them in a small bowl with 1/2 teaspoon cinnamon and 1 tablespoon sugar. Set aside to mingle.
-
4For the cheesecake layer, grab another bowl (I know—another bowl, sorry). Beat together the softened cream cheese and 1/4 cup sugar until smoothish—no big lumps, but a few streaks are okay. Add in the egg and vanilla. Beat again—but not too crazy. Pour this over the par-baked crust (it’s okay if it’s still warm—I’ve done it both ways).
-
5Spoon your apple bits all over the cheesecake layer. Spread ‘em out, but don’t worry if a few clump up; artful, right?
-
6Quickly, let’s do the oat topping: combine 1/2 cup oats, 1/4 cup brown sugar, 1/4 cup cold butter cubes, and that extra pinch of cinnamon. Use the same hands from before—clean them off first (no one likes butter under their nails). Pinch and work it until clumpy. Sprinkle on top of the apples.
-
7Bake another 30-35 minutes until the top looks golden and the cheesecake doesn’t jiggle aggressively when you shake the pan. If you’re not sure, err on the side of more golden—underbaked bars are a fork-and-bowl situation.
-
8Let it cool at room temp at least an hour, then into the fridge for another couple hours (or overnight if you’ve got the patience of a saint). Lift out, drizzle generously with caramel sauce, slice, and—finally—devour.
CLICK FOR NUTRITION INFO
↑
Approximate Information for One Serving
Serving Size:
1 serving
Calories:
290cal
Protein:
3 gg
Fat:
13 gg
Saturated Fat:
0g
Trans Fat:
0g
Cholesterol:
0mg
Sodium:
0mg
Potassium:
0mg
Total Carbs:
40 gg
Fiber:
0g
Sugar:
0g
Net Carbs:
0g
Vitamin A:
0
Vitamin C:
0mg
Calcium:
0mg
Iron:
0mg
Nutrition Disclaimers
Number of total servings shown is approximate. Actual number of servings will depend on your preferred portion sizes.
Nutritional values shown are general guidelines and reflect information for 1 serving using the ingredients listed, not including any optional ingredients. Actual macros may vary slightly depending on specific brands and types of ingredients used.
To determine the weight of one serving, prepare the recipe as instructed. Weigh the finished recipe, then divide the weight of the finished recipe (not including the weight of the container the food is in) by the desired number of servings. Result will be the weight of one serving.
Did you make this recipe?
Please consider Pinning it!