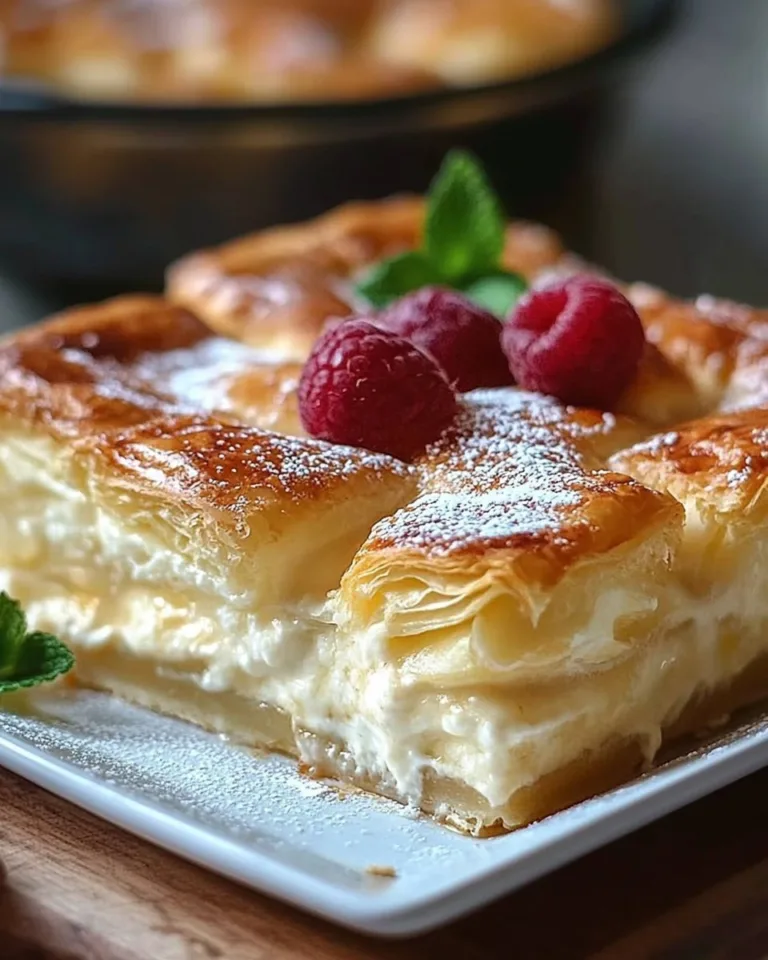
So, You Want to Make White Forest Cake? Let Me Tell You a Story…
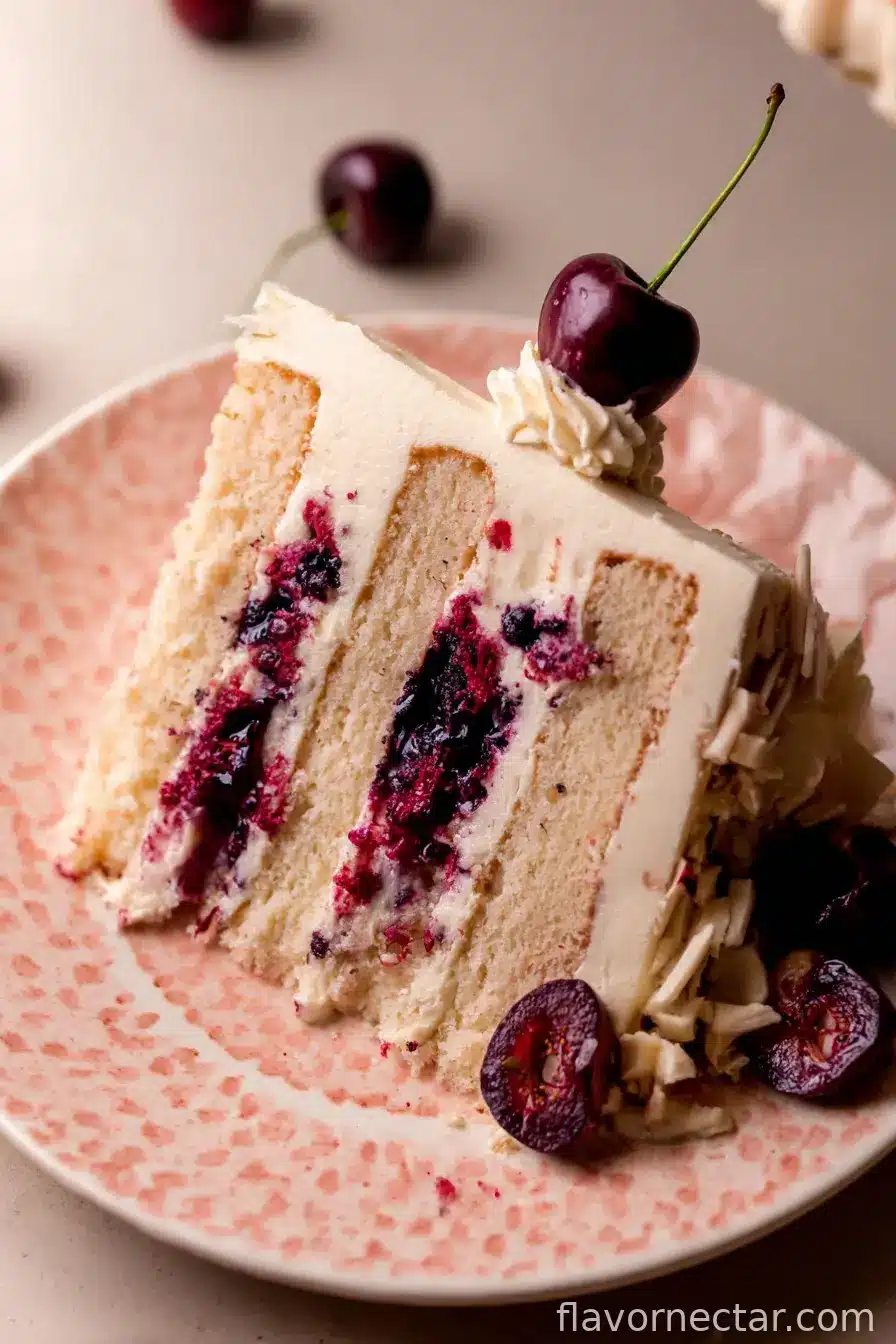
Oh boy, the first time I tried to bake a White Forest cake, I ended up with more flour in my hair than in the mixing bowl. My sister laughed so hard, she nearly snorted coffee through her nose (lovely family bonding, right?). But when we finally sat down to a slice, it was pure magic: pillowy-soft cake, sweet and tart cherries, a snowdrift of white chocolate frosting. Since then, it’s kind of become my “fancy cake” for birthdays and show-off moments—yet, it still feels like comfort food. And in case you were wondering, yes, the cherry filling always manages to sneak out the sides. Every. Single. Time. But isn’t that part of the fun?

Why You’ll Love This One (Or At Least, Why My Crew Does)
- I make this whenever I need something dramatic but don’t want to fuss to the high heavens (well, maybe just a little… there’s layers involved).
- My family goes absolutely bonkers for the combo of fluffy white cake, that homemade cherry filling (good luck not eating it out of the saucepan), and the richest, dreamiest white chocolate frosting ever.
- You ever have a dessert where people fight over the last slice? This is that cake. But honestly, the best part is that moment right after assembling it, when it’s all yours for a split second (before the hungry mob descends).
- Actually, the smell of the baking sponges alone is enough to make you want to move in with your oven.
- Only caveat: it’s not a 15-min cake. There’s a bit of faffing about. But hey, the cherry stains on your shirt will tell a fine story later.
Gather Up These Ingredients (or My Semi-Cheat Swaps)
- 3 1/2 cups cake flour (Sometimes, I use plain flour and take out a tablespoon per cup… don’t tell the cake purists!)
- 2 tsp baking powder
- 1 tsp baking soda
- 1 tsp salt
- 3/4 cup unsalted butter, room temp (my grandma insisted on plugging it into the sun, I just use the counter)
- 1/4 cup oil – canola or vegetable, whatever’s closest
- 1 1/2 cups white sugar
- 3/4 cup sour cream, room temp (“room temp” just means I remembered to take it out before I started… usually)
- 1 TBSP pure vanilla extract (I like the real deal, but the knock-off works alright)
- 5 egg whites, room temp (I’ve tried bottled; real is better, but you do you)
- 1 cup buttermilk, room temp
- Cherry Filling:
- 1 lb cherries – fresh or frozen, pit them unless you want a dentist bill
- 1/2 cup white sugar
- 1 TBSP cornstarch
- 1 TBSP water
- 1/4 tsp almond extract (don’t overdo it, trust me… got a little carried away once)
- White Chocolate Frosting:
- 2 cups unsalted butter, room temp
- 8 oz cream cheese, room temp
- 8 oz white chocolate bars (just about any decent bar works, though Lindt if you’re feeling posh)
- 5 cups powdered sugar, sifted (okay, sometimes I don’t sift… the world does not end!)
- 1 tsp pure vanilla extract
How to Actually Make This (The Unfiltered Version)
- Get your cake tins ready & oven preheating: Crank your oven to 350°F. Grab three 8-inch cake pans (mine are a bit battered—no one cares), coat with baking spray, pop some parchment on the bottoms, and give ‘em another light spritz just to be sure (because who likes stuck cake?).
- Mix your dry squad: In a good-sized bowl, sift your cake flour in—sifting keeps things lighter! Toss in baking powder, baking soda, and salt, then just set it aside while you think about what you’ll do with leftover egg yolks (like, really, what do we do with them?).
- Start the base: In your mixer (or use a bowl, strong arms, and patience), beat the butter, oil, and sugar hard for about 2 mins—should turn kinda pale and fluffy. Seriously, don’t skimp here; aeration sets the tone for your sponges.
- Add the fun stuff: Dollop in sour cream, pour in vanilla, and slosh in egg whites. Mix it at medium until it all comes together. If it looks a little split, no worries, it’ll sort itself out.
- Now, make a mess: Start mixing in your dry ingredients, alternating with buttermilk (in 2 or 3 rounds). Go slow; just barely mix until you can’t see streaks. Overbeating equals tough cake… trust me, I learned the hard way (the rubber spatula is your friend now).
- Bake! Pour the batter into your pans as evenly as you possibly can—I just eyeball, though a kitchen scale is nice if you’re feeling precise. Slide those pans into the oven. Bake for 22-25 mins (start checking at 22). A toothpick in the middle should come out with only a few crumbs.
- Let them cool in the pans for 10 mins (I use this time for a ‘quality control’ snack of cherry filling). After that, run a knife around the edges and gently flip onto a rack to finish cooling. Seriously, let ‘em cool all the way.
- Cherry magic time: If using fresh cherries, deal with the pitting (good luck!). In a saucepan over medium heat, add your cherries, sugar, cornstarch, water, and almond extract. Stir as it blends—don’t wander off; this can thicken up quick. When the juices are flowing and cherries are soft, grab a masher and let out some frustration. Keep cooking till it looks thick (about 10 mins in total); you’ll end up with about 1 1/2 cups of glorious, jammy filling. Cool it down (I spread mine on a plate for speedy cooling; impatient much?).
- White chocolate frosting time: Sift your powdered sugar into a big bowl. Melt your chocolate in the microwave—just 20 seconds at a time, stirring each go, until smooth (don’t scorch it, please!).
- Beat butter till super light and fluffy (about 2 mins on high if you like a mini arm workout). Add cream cheese, beat a minute more. Scrape down the sides because lumps aren’t welcome at this party.
- Mix in your melted chocolate on high speed—that’s always my favorite part. Start adding your powdered sugar in halves, mixing slowly, or you’ll look like a snow globe. Last, add vanilla and go to town on high speed until you have creamy magic.
- Assembly Station (You’re Nearly There!): If your cake layers aren’t level, carefully trim the domes with a serrated knife—save the scraps for snacking (or, as I call it, the chef’s fee). Smear a dab of frosting on your cake board so nothing slips around.
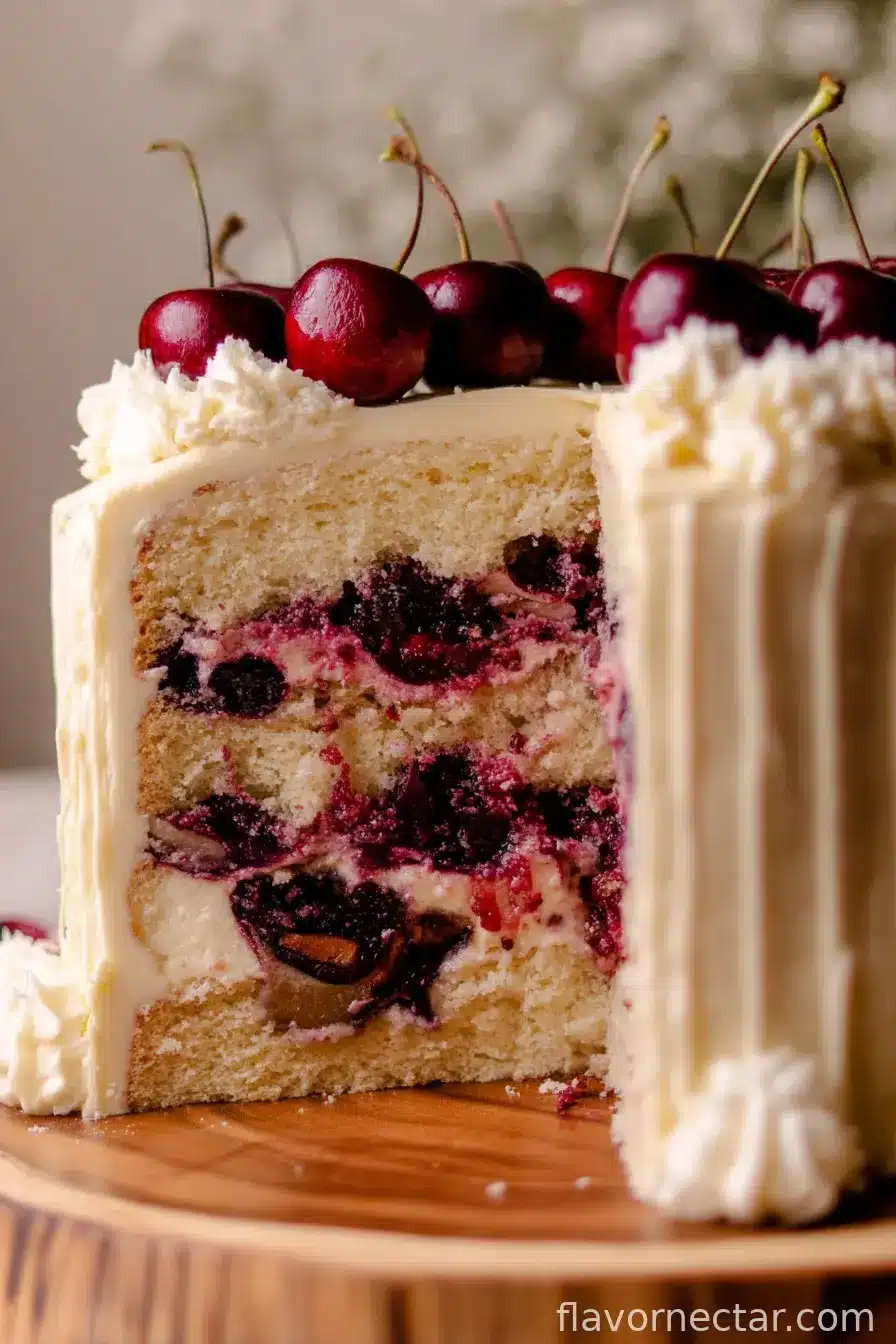
- Lay down the first cake layer. Spread a heaping 3/4 cup of frosting over the top. Pipe a thick frosting border around the edge (this basically fences in the cherries). Spoon half the cherry filling into the middle and spread gently. If you get leakage, call it rustic.
- Repeat with the next layer—frosting, a border, the rest of the cherry filling—then finish with the third cake layer, bottom side up for smoothness (or not, if you forget like I do).
- Tidy up the sides, squishing frosting into any cracks. If cherry filling starts making a run for it, plug any leaks with more frosting and pop the whole thing in the freezer for 15 mins. This helps set things before the final frost.
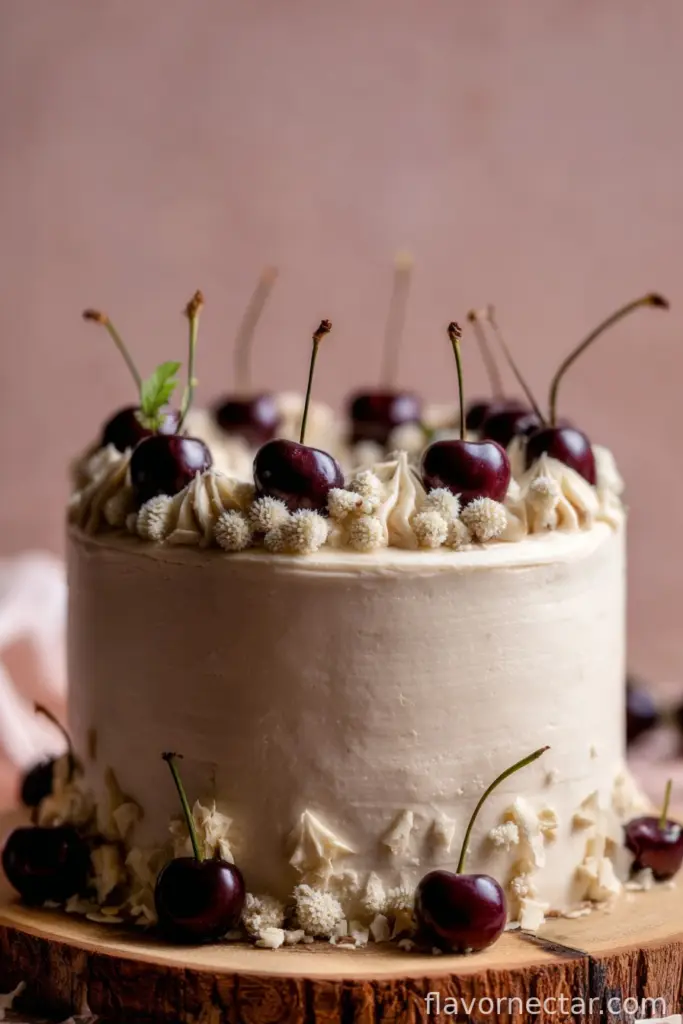
- Slap on a really thin coat of frosting (that’s the crumb coat—nothing fancy), then chill again for 10 mins. Go for the proper frosting after—it’ll look 100% better, and if you have a Wilton 1M tip, pipe some swirls on top. Pile on extra cherries if you’re feeling festive. Freeze for another 10 (if you can wait that long).
A Few Real-World Notes I’ve Learned (Sometimes the Hard Way)
- If you forget to sift the flour or sugar, don’t panic—it’ll taste just as good (maybe a touch denser).
- Patience is your friend for cooling and chilling layers, lest the whole thing slides off the plate.
- Extra cherry filling? Stir into yogurt, eat with a spoon, or just declare yourself a hero and serve over pancakes.
My Experiments & Variations (Some Brilliant, Some…Not)
- Once tried adding a hint of rosewater to the frosting. Honestly, not my best idea. It tasted a bit like grandma’s soap. Stick with vanilla!
- If you’re feeling adventurous, swap half the cherries for raspberries. It gets very tart, but the color is unreal—just warn people first.
- I once tinted the frosting pink for Valentine’s Day—kids loved it, but it looked like a unicorn exploded.
Equipment (And What To Do If Yours Runs Away)
- Stand mixer or electric hand mixer makes life easy (or just brute force and a big wooden spoon if your gym membership isn’t up to date).
- Parchment paper circles—the kind you can reuse are my favorite (but honestly, I’ve cut them form old grocery bags before… don’t tell anyone).
- A cake turntable is pure luxury, but a lazy Susan works in a pinch!
Stash and Storage (It’s Never Lasted More Than a Day Here!)
- This cake will keep, loosely covered, in the fridge for up to 3 days. It probably tastes even better on day 2 (something about letting all the flavors meld).
- Freezes well, but wrap slices tightly. FYI, cream cheese frosting always gets a bit weird in the freezer (or is that just me?).
How I Serve It (and Family Quirks)
- I love serving big slices with extra fresh cherries on the side and a mug of black coffee—goes down a treat! My uncle insists on vanilla ice cream, rain or shine.
- For holidays, I’ve crowned it with white chocolate curls. Looks super-fancy, but takes, like, 10 seconds if your chocolate isn’t melting everywhere.
What I Wish I Knew (Pro Tips I Learned the Clumsy Way)
- I once tried assembling while the cakes were still warm. Absolute chaos. Let everything cool—seriously. Otherwise, frosting just slides off in a sort of delicious landslide.
- If you overwhip the frosting, a splash of milk (or more melted chocolate!) brings it back from the brink.
- Don’t stress over uneven layers; a higgledy-piggledy cake is still totally dreamy.
FAQ (Okay, These Are Actually From My Friends)
- Can I use jarred cherries? Yeah, you can, but drain and rinse them first. The cake’s a bit sweeter—still yummy!
- How do I make it gluten-free? Use a good 1:1 GF flour blend—though, it’s definitely more delicate. Maybe bake for a couple minutes less, but I can’t promise perfection; still edible though!
- What’s the best way to get egg whites separated? I just crack eggs cold straight from the fridge and separate by hand—it’s less slippery than when they’re room temp. Then I leave the whites to warm up while I fiddle with dry ingredients.
- Will people notice if I use store-bought frosting? Ha! Some might, but honestly, no shame. Shortcuts keep us sane.
- My cherry filling looks runny, what did I do? Just simmer it a touch longer; cornstarch works magic but needs time and heat. Or serve it on the side as a coulis and pretend it was meant to be fancy all along.
Ingredients
- 3 1/2 cups Cake flour
- 2 tsp Baking powder
- 1 tsp Baking soda
- 1 tsp Salt
- 3/4 cup Unsalted butter, room temperature
- 1/4 cup Oil, canola or vegetable oil
- 1 1/2 cups White granulated sugar
- 3/4 cup Sour cream, room temperature
- 1 TBSP Pure vanilla extract, or pure vanilla extract
- 5 Egg whites, room temperature
- 1 cup Buttermilk, room temperature
- 1 lb Cherries, fresh or frozen
- 1/2 cup White granulated sugar
- 1 TBSP Cornstarch
- 1 TBSP Water
- 1/4 tsp Almond extract
- 2 cups Unsalted butter, room temperature
- 8 oz Cream cheese, room temperature
- 8 oz White chocolate bars, 2 bars lindt chocolate
- 5 cups Powdered sugar, sifted
- 1 tsp Pure vanilla extract
Instructions
-
1Crank your oven to 350°F. Grab three 8-inch cake pans (mine are a bit battered—no one cares), coat with baking spray, pop some parchment on the bottoms, and give ‘em another light spritz just to be sure (because who likes stuck cake?).
-
2In a good-sized bowl, sift your cake flour in—sifting keeps things lighter! Toss in baking powder, baking soda, and salt, then just set it aside while you think about what you’ll do with leftover egg yolks (like, really, what do we do with them?).
-
3In your mixer (or use a bowl, strong arms, and patience), beat the butter, oil, and sugar hard for about 2 mins—should turn kinda pale and fluffy. Seriously, don’t skimp here; aeration sets the tone for your sponges.
-
4Dollop in sour cream, pour in vanilla, and slosh in egg whites. Mix it at medium until it all comes together. If it looks a little split, no worries, it’ll sort itself out.
-
5Start mixing in your dry ingredients, alternating with buttermilk (in 2 or 3 rounds). Go slow; just barely mix until you can’t see streaks. Overbeating equals tough cake… trust me, I learned the hard way (the rubber spatula is your friend now).
-
6Pour the batter into your pans as evenly as you possibly can—I just eyeball, though a kitchen scale is nice if you’re feeling precise. Slide those pans into the oven. Bake for 22-25 mins (start checking at 22). A toothpick in the middle should come out with only a few crumbs.
-
7Let them cool in the pans for 10 mins (I use this time for a ‘quality control’ snack of cherry filling). After that, run a knife around the edges and gently flip onto a rack to finish cooling. Seriously, let ‘em cool all the way.
-
8If using fresh cherries, deal with the pitting (good luck!). In a saucepan over medium heat, add your cherries, sugar, cornstarch, water, and almond extract. Stir as it blends—don’t wander off; this can thicken up quick. When the juices are flowing and cherries are soft, grab a masher and let out some frustration. Keep cooking till it looks thick (about 10 mins in total); you’ll end up with about 1 1/2 cups of glorious, jammy filling. Cool it down (I spread mine on a plate for speedy cooling; impatient much?).
-
9Sift your powdered sugar into a big bowl. Melt your chocolate in the microwave—just 20 seconds at a time, stirring each go, until smooth (don’t scorch it, please!).
-
10Beat butter till super light and fluffy (about 2 mins on high if you like a mini arm workout). Add cream cheese, beat a minute more. Scrape down the sides because lumps aren’t welcome at this party.
-
11Mix in your melted chocolate on high speed—that’s always my favorite part. Start adding your powdered sugar in halves, mixing slowly, or you’ll look like a snow globe. Last, add vanilla and go to town on high speed until you have creamy magic.
-
12If your cake layers aren’t level, carefully trim the domes with a serrated knife—save the scraps for snacking (or, as I call it, the chef’s fee). Smear a dab of frosting on your cake board so nothing slips around.
-
13Lay down the first cake layer. Spread a heaping 3/4 cup of frosting over the top. Pipe a thick frosting border around the edge (this basically fences in the cherries). Spoon half the cherry filling into the middle and spread gently. If you get leakage, call it rustic.
-
14Repeat with the next layer—frosting, a border, the rest of the cherry filling—then finish with the third cake layer, bottom side up for smoothness (or not, if you forget like I do).
-
15Tidy up the sides, squishing frosting into any cracks. If cherry filling starts making a run for it, plug any leaks with more frosting and pop the whole thing in the freezer for 15 mins. This helps set things before the final frost.
-
16Slap on a really thin coat of frosting (that’s the crumb coat—nothing fancy), then chill again for 10 mins. Go for the proper frosting after—it’ll look 100% better, and if you have a Wilton 1M tip, pipe some swirls on top. Pile on extra cherries if you’re feeling festive. Freeze for another 10 (if you can wait that long).
CLICK FOR NUTRITION INFO
↑
Approximate Information for One Serving
Serving Size:
1 serving
Calories:
610 caloriescal
Protein:
6gg
Fat:
34gg
Saturated Fat:
0g
Trans Fat:
0g
Cholesterol:
0mg
Sodium:
0mg
Potassium:
0mg
Total Carbs:
74gg
Fiber:
0g
Sugar:
0g
Net Carbs:
0g
Vitamin A:
0
Vitamin C:
0mg
Calcium:
0mg
Iron:
0mg
Nutrition Disclaimers
Number of total servings shown is approximate. Actual number of servings will depend on your preferred portion sizes.
Nutritional values shown are general guidelines and reflect information for 1 serving using the ingredients listed, not including any optional ingredients. Actual macros may vary slightly depending on specific brands and types of ingredients used.
To determine the weight of one serving, prepare the recipe as instructed. Weigh the finished recipe, then divide the weight of the finished recipe (not including the weight of the container the food is in) by the desired number of servings. Result will be the weight of one serving.
Did you make this recipe?
Please consider Pinning it!