Let Me Tell You Why These Lemon Bars Are My Go-To
Alright, pull up a chair—I’ve got tea and, you guessed it, a tray of these Lemon bars. It all started with me trying to copy a lemony square I used to hunt for at this tiny bakery in my hometown (seriously, you’d blink and miss the place). I never did get their exact recipe (probably some top secret list locked away in the owner’s sock drawer), but what I came up with after a bunch of sticky afternoons is better—well, I think so anyway! And here we are: my best classic Lemon bar recipe, a little wonky around the edges but always a crowd pleaser. Anyway, enough chit-chat, let’s bake something sunny.

Why You’ll Love Making These Bars
I make these when I’ve got extra lemons rolling around the fridge (or, if I’m honest, when I’ve just got a craving that won’t quit). My family goes a little bonkers for them, especially after dinner—my partner always sneaks two when they think I’m not looking. They’re tangy, which is perfect because I don’t love stuff that’s just sugar on sugar (y’know?). Once I forgot to let them cool all the way and they still disappeared in record time—little gooey, not gonna lie, but nobody complained. And honestly, the hardest part is not eating half the pan straight from the oven.
What You’ll Need to Make the Best Classic Lemon Bars
- For the crust:
- 1 cup (225g) unsalted butter, softened (though I sometimes just zap it in the microwave for 10 seconds when I forget to set it out)
- 2 cups (250g) all-purpose flour (My grandma swears by Gold Medal, but any flour honestly does the trick!)
- 1/2 cup powdered sugar (also called icing sugar—my friend Becky once used regular white sugar in a pinch, came out okay but a tad gritty)
- 1/4 tsp salt
- For the lemon filling:
- 2 cups granulated sugar (if you want it extra tart, scale back to 1 2/3 cups)
- 4 large eggs
- 1/3 cup all-purpose flour
- 1/2 tsp baking powder (I’ve made it without before—just a bit denser, but still tasty)
- 1/4 tsp salt
- 2/3 cup fresh lemon juice (about 3-4 lemons; no judgment if you’re using bottled juice… we all get busy)
- Zest from 2 lemons (I go heavy on the zest because that’s where the magic is)
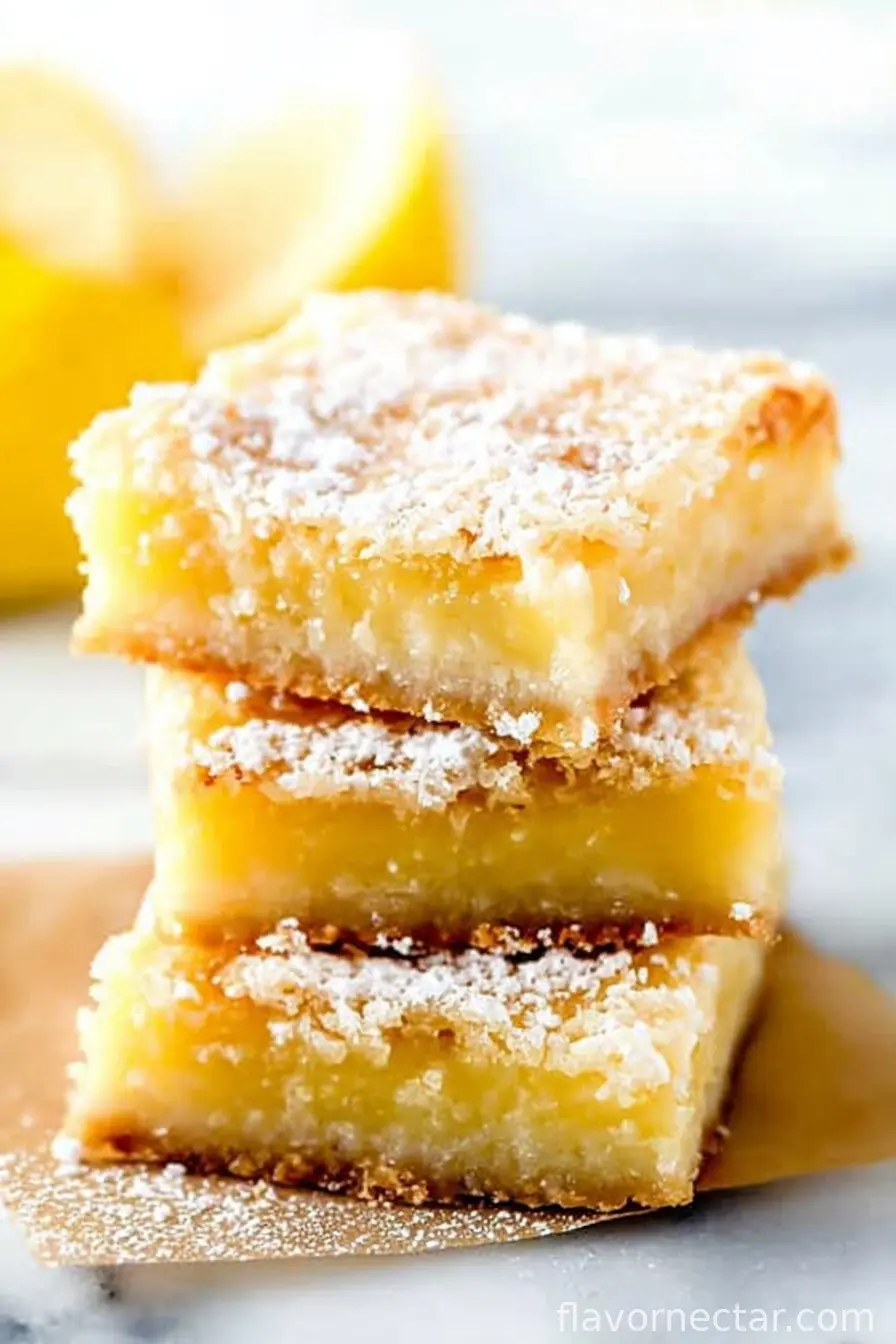
- Optional: Powdered sugar for dusting on top (Makes them look extra fancy. Sometimes I skip this, though, especially if it’s a Tuesday and who’s got the energy for garnish?)
How to Pull Off the Best Lemon Bars (Trust Me, It’s Easier Than It Looks!)
- Preheat your oven to 350°F (180°C). I always, always forget this step and end up waiting on a cold oven. Don’t be me.
- Line a 9×13-inch baking pan with parchment paper. Or just give it a good grease if you like a little crusty edge (my brother thinks that’s the best bit).
- Mix up the crust: Toss the softened butter, flour, powdered sugar, and salt in a bowl. You can use a pastry cutter, your hands, or even a fork in a pinch—I often just mash it all with clean hands until it holds together like chunky Play-Doh.
- Press the dough into your pan—don’t fuss too much, just squish it as evenly as you can. The corners always look wonky in my house. Pop it into the oven and bake 20-22 minutes, or till it’s lightly golden (not totally brown, unless you’re after a crunchy base… I did that once by accident and it wasn’t my best move).
- Meanwhile, slap together the filling: In another bowl, whisk together sugar, eggs, flour, baking powder, salt, lemon juice, and zest. I dump it all in and whisk like mad for a minute, till it’s smooth and tart as heck (This is where I usually sneak a taste. I know, raw eggs—don’t @ me).
- Pour this sunny yellow mixture over your hot crust when it comes out. It looks runny and weird, but trust—it sets up in the oven.
- Bake again for 25-28 minutes, or til it’s just barely set and not jiggling like a waterbed. If it puffs a bit, don’t panic. It settles right down as it cools.
- Let cool completely. This step is torture. If you slice too soon, it’ll look a mess but still taste dreamy. Actually, sometimes I pop it in the fridge just to speed things along.
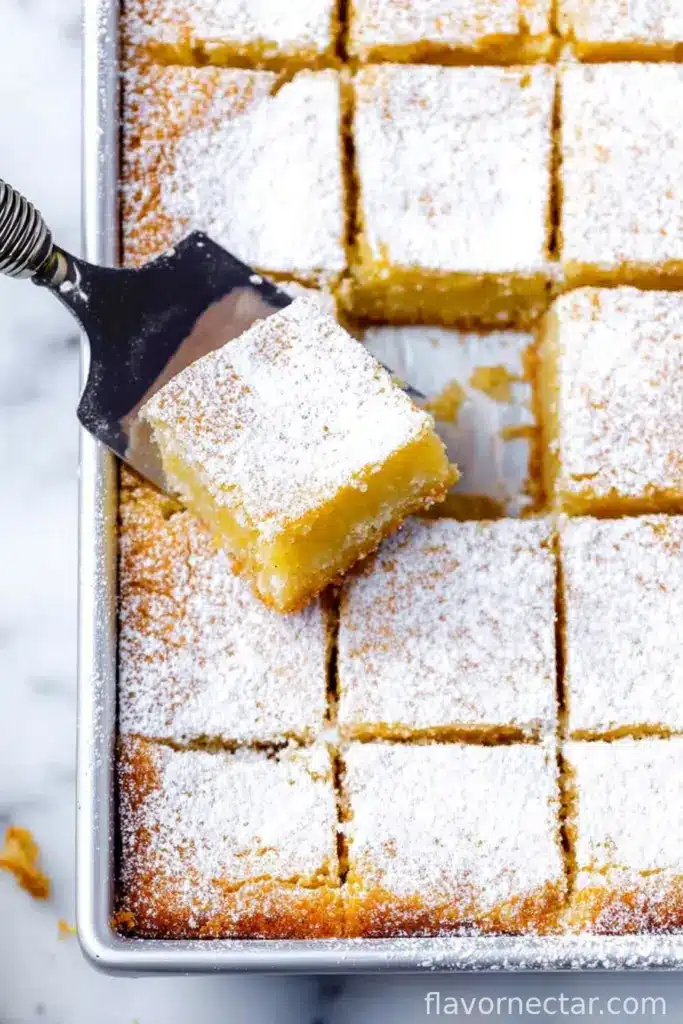
- Dust the top with more powdered sugar (optional, but I can’t resist—it’s basically snow for lemon bars).
- Cut into squares, triangles, whatever your heart fancies. Me? I’m a triangles gal, no idea why.
My Notes (Read These Before You Bake!)
- The first few times, I skimped on the zest—not worth it. Go big on zest!
- If your bars crack a tiny bit, don’t sweat it. That’s how you know they’re homemade.
- I used to underbake the crust (impatient), but it’s way better a little golden. Lesson learned.
- I tried this with gluten-free flour once. Actually, it works better if you add an extra tablespoon of butter if you do that, or it comes out a bit dry.
Things I’ve Tried (And Sometimes Regretted)
- Orange zest: Nice, but definitely not as puckery as lemon. Guess some things just can’t be swapped.
- Lime juice: Okay, now this was pretty good, especially if you sneak in a splash of coconut milk. Wild, I know.
- Half whole-wheat flour in the crust: On second thought… just stick to regular—it was a little like eating lemon bars and graham crackers at the same time.
If You Don’t Have All the Gadgets (Story of My Life)
Don’t own a zester? Use the small side of a regular cheese grater (just watch your fingers—speaking from experience). No stand mixer? Hands work just fine. You get a bonus workout, so there’s that.
How to Store ‘Em (If You Don’t Eat ‘Em All First, Ha!)
Technically, you can keep these covered in the fridge for 3-4 days, but honestly, in my house, they never last more than a day. I once froze a batch, and they thawed just fine—just give them 10 minutes on the counter and they’re grand.
Serving Them Up (My Favorite Bit)
I think these are especially killer with a mug of sweet, milky tea—though my youngest insists on vanilla ice cream with theirs. Sometimes for a party, I pile them on my old blue cake stand and let everyone help themselves (by about 10pm, it’s just sticky crumbs left).
Some Wisdom From My Mistakes—Take It Or Leave It
- If you rush the cooling, the lemon layer slides around like jelly. Let ‘em rest! (I learned this after way too many crumbly first bites.)
- Trying to slice with a blunt knife? It just gets smushed. Use a sharp one. Or, as my mum used to say, “Don’t be daft—find the bread knife!”
FAQ (Funny You Should Ask…)
-
Q: Can I use bottled lemon juice?
A: Sure, you can—though it’s a little less zingy. Fresh is fab, but not always handy. No judgment here. -
Q: My bars came out a bit runny, what gives?
A: Probably underbaked (happened to me last Easter). Just give ‘em five more minutes next time, and don’t cut when hot; let them set up first. -
Q: Do these freeze well?
A: They do! I thought they’d get soggy, but nope, as long as you wrap ‘em tight. Not that I usually have leftovers—just saying. -
Q: Can I halve the recipe?
A: Absolutely, just use an 8×8 pan. Or, go wild, make the whole batch—you’ll thank me later.
Oh, and by the way—I burned the first batch I ever made because I got distracted watching reruns of Bake Off. Guess I’m living proof: You can always start over. Enjoy, and let me know how yours turn out (bonus points for wonky edges)!
Ingredients
- 1 cup unsalted butter, softened
- 2 cups all-purpose flour
- 1/2 cup powdered sugar
- 1/4 teaspoon salt
- 2 cups granulated sugar
- 4 large eggs
- 1/2 cup fresh lemon juice
- 2 tablespoons lemon zest
- 1/4 cup all-purpose flour (for filling)
- Powdered sugar, for dusting
Instructions
-
1Preheat the oven to 350°F (175°C). Grease a 9×13-inch baking pan and line it with parchment paper for easy removal.
-
2In a bowl, combine 1 cup softened butter, 2 cups flour, 1/2 cup powdered sugar, and 1/4 teaspoon salt. Mix until a crumbly dough forms.
-
3Press the dough evenly into the bottom of the prepared pan. Bake for 18-20 minutes, or until lightly golden.
-
4While the crust bakes, whisk together granulated sugar, eggs, lemon juice, lemon zest, and 1/4 cup flour in a separate bowl until smooth.
-
5Pour the lemon mixture over the hot crust and return to the oven. Bake for an additional 15-18 minutes, or until the filling is set and slightly firm.
-
6Cool completely in the pan. Dust with powdered sugar before slicing into 16 bars and serving.
CLICK FOR NUTRITION INFO
↑
Approximate Information for One Serving
Serving Size:
1 serving
Calories:
190 caloriescal
Protein:
2gg
Fat:
7gg
Saturated Fat:
0g
Trans Fat:
0g
Cholesterol:
0mg
Sodium:
0mg
Potassium:
0mg
Total Carbs:
31gg
Fiber:
0g
Sugar:
0g
Net Carbs:
0g
Vitamin A:
0
Vitamin C:
0mg
Calcium:
0mg
Iron:
0mg
Nutrition Disclaimers
Number of total servings shown is approximate. Actual number of servings will depend on your preferred portion sizes.
Nutritional values shown are general guidelines and reflect information for 1 serving using the ingredients listed, not including any optional ingredients. Actual macros may vary slightly depending on specific brands and types of ingredients used.
To determine the weight of one serving, prepare the recipe as instructed. Weigh the finished recipe, then divide the weight of the finished recipe (not including the weight of the container the food is in) by the desired number of servings. Result will be the weight of one serving.
Did you make this recipe?
Please consider Pinning it!!