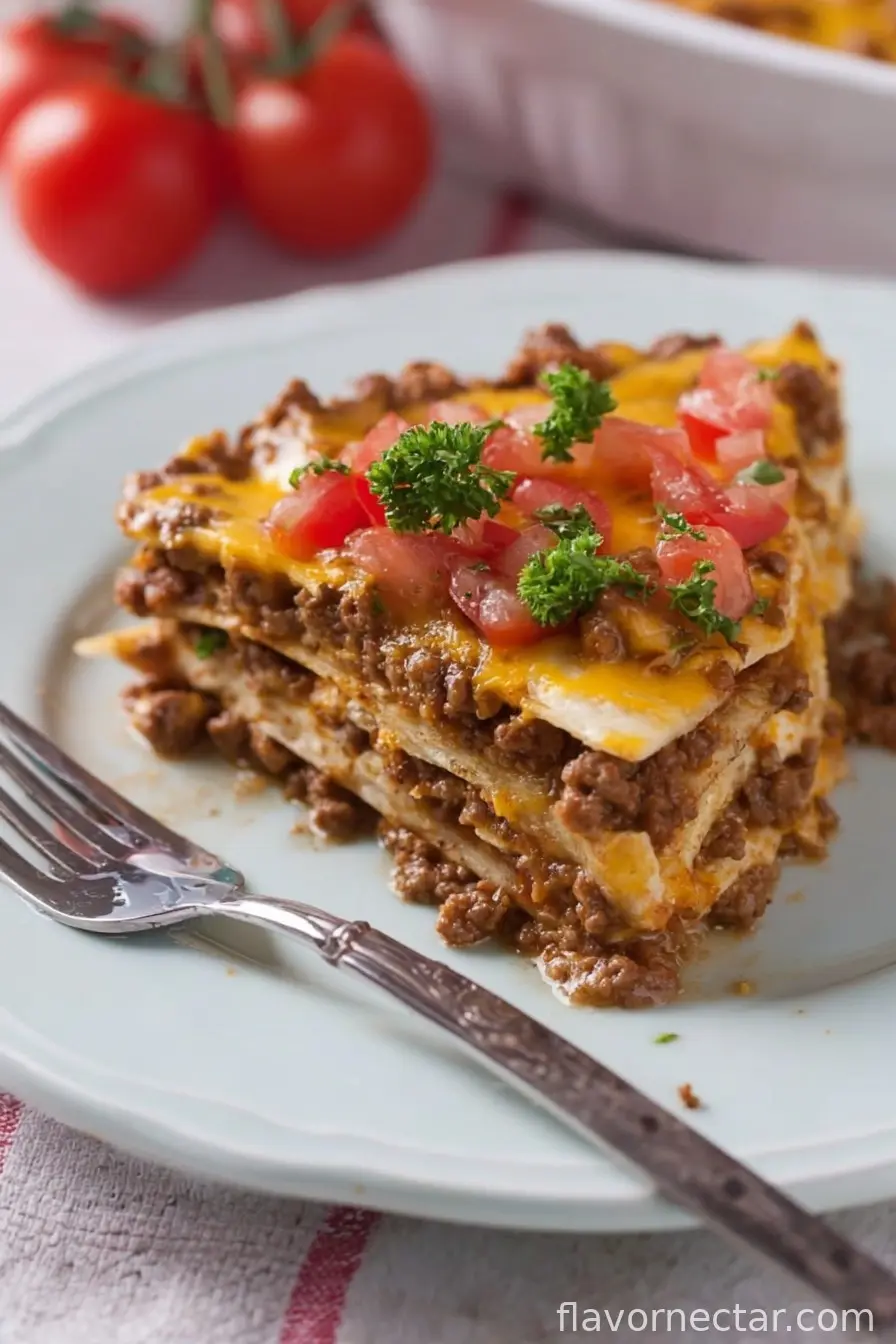
A Taco Casserole I Actually Crave (and My Family Eats…Willingly!)
You ever have one of those dishes that just shows up in your life one day and, boom, you’re making it almost every week? Taco Casserole with tortillas is like that for me. First time I made this, it was a Tuesday, I was starving, and the only thing I had in the fridge was a stack of tortillas, some ground beef, and about five sad-looking veggies that had seen brighter days. I figured, why not just pile it all together, smother it with cheese, and see what happens?… Fast forward to now, and my son still asks for “the gooey one with the tortillas”. (I mean, it’s practically foolproof. Unless you burn the cheese. Don’t do that.)

Why I Bet You’ll Want to Make This Too
I pull out this recipe when it’s cold, when I want comfort food without using every pot in the house (one casserole dish, friend!), or—let’s be honest—when tacos sound like too much hassle. My family goes a bit wild for this because it’s cheesy, it’s got that savory-spiced beef, and you get those unbeatable melty-chewy bits where the cheese hits the tortilla. Plus, I can sneak in whatever veggies I’ve got rolling around in the crisper. (Once tried zucchini. Success!) Full confession: My first attempt was a mess, because I layered everything in the wrong order, but somehow it still tasted pretty great. Just goes to show, this casserole is hard to mess up—trust me, I’ve tried.
Ingredients (With Real-World Substitutions)
- 8 small flour tortillas (sometimes I use corn if that’s what’s lurking in the pantry, and my grandma swears by homemade, but supermarket ones are more than fine)
- 1 lb (about 450g) ground beef (sometimes I use ground turkey, and if I’m feeling fancy or accidentally vego, lentils work, promise!)
- 1 medium yellow onion, diced
- 2 cloves garlic, minced (pre-minced is fine—no judgement here!)
- 1 bell pepper, diced (I actually use whatever color isn’t hiding under another veggie in my fridge)
- 1 pkt taco seasoning (or mix together 2 tsp chili powder, 1 tsp cumin, 1/2 tsp paprika, and a shake of cayenne if you want it spicy)
- 1 can (14 oz/400g) diced tomatoes, undrained
- 1 can (15 oz/425g) black beans, drained and rinsed (pinto beans swap in nicely too)
- 2 cups shredded cheddar cheese (Monterey Jack or a shredded Mexican blend if I’m being extra)
- 1/2 cup sour cream (I substitute Greek yogurt most of the time—tastes just as good, honest)
- Optional: sliced olives, diced jalapeños, chopped green onions, or a handful of corn (basically, whatever’s fun in a taco night)
How To Make This Taco Casserole—Imperfectly Perfect Steps
- Preheat your oven to 375°F (190°C). I always forget this step and end up waiting like a goose for the oven to catch up; don’t be like me!
- In a large skillet over medium heat, brown your ground beef. Break it up as you go. Once it’s about halfway cooked, toss in your diced onion, garlic, and bell pepper. Cook everything till the veggies look softened and your kitchen smells amazing—about 5-7 minutes.
- Drain any excess fat from the skillet (I’m clumsy so sometimes I just push the beef to one side and soak up the fat on the other with a wad of paper towel—don’t tell the Food Police).
- Stir in your taco seasoning, canned tomatoes (juices n’ all), and black beans. Simmer for 3-4 minutes. This is about when I start sneaking bites straight from the pan—it’s that good.
- Grab a 9×13-inch baking dish and give it a quick spritz of oil (or just rub it with butter if you’re old school like me on Sundays).
- Layer 4 tortillas over the bottom—tear them up if you need to cover all the corners. Top with half the beef mixture, then dollop and spread over half your sour cream, and sprinkle with a cup of cheese. (It looks a bit odd, but keep going.)
- Repeat: another 4 tortillas, rest of beef mix, rest of sour cream, another cup of cheese. Really pile on the cheese at the top—no regrets.
- Scatter over any optional toppings—my kids love black olives, I like a cheeky handful of corn. You do you.
- Bake uncovered for about 25–28 minutes, until it’s bubbling around the edges and just starting to brown up top. (If you like it super golden, crank up the broiler for a minute at the end, but do not walk away—burning things at this stage has ruined many a good dinner for me.)
- Let it rest for at least 10 minutes before slicing. It’ll look firmer and you won’t scald your mouth. (Well, probably.)
Some Notes and Little Discoveries
- This is even better the next day, fridge-cold or reheated. Something about leftovers just makes it taste, I dunno, more together?
- If you’re anti-onion or someone in your house is (my partner still picks them out), just skip it—the flavor lives on.
- You can totally prep this ahead, assemble in the morning, and bake at dinner—gives you time to, you know, actually talk to people after work. Or scroll your phone. No shade!
If You Want to Mix It Up (And I Always Do)
- Tried adding a layer of refried beans under the beef once. It was… dense. Wouldn’t recommend, but if you like things super hearty, maybe!
- Swapping in corn tortillas gives it an earthier, old-school flavor. My mother-in-law prefers it that way. To each their own.
- Shredded rotisserie chicken, anyone? It’s great if you’re avoiding beef.
- Vegan friends have told me it works with plant-based crumbles and vegan cheese, but I’ll admit, I haven’t nailed vegan cheese melting yet.
Gear I Used (But You Can Hack It)
- 9×13-inch baking dish. Or an old roasting pan. Once used a lasagna dish. It survived.
- Large nonstick skillet for the beef, but honestly a deep saucepan works in a pinch. Bonus points if you don’t have to wash it after.
- Mixing bowls are helpful for organizing toppings, but you can also just use the skillet or a plate.
How Long It’ll Last (Not Long in My House)
This keeps nicely in the fridge, covered up, for around 3 days. And you can absolutely zap single portions in the microwave. Freezes okay too (wrap well!), but honestly, in my house it never lasts more than a day, so what do I know?
Serving It Up (And What I Love With It)
I always serve this with a dollop of salsa and maybe a small mountain of guacamole on the side. My dad likes it with tortilla chips for scooping—makes for a really laid-back dinner. Sometimes we toss on shredded lettuce after baking for a fake taco salad vibe.
If You Only Read One Pro Tip, Make It This
Wait ten minutes before trying to slice it, seriously. I once rushed this and wound up with taco soup on my plate. Not as tasty as it sounds. And trust me, don’t skimp on the cheese at the top; it’s what gives those glorious crispy, melty bits.
Questions from Friends (and myself, if I’m honest)
- Can I make this ahead? Totally! Assemble the whole thing, stick it in the fridge wrapped up, then bake when you’re ready. Might need an extra 5 mins or so if it goes in cold.
- Does it freeze well? Eh, pretty well, but I find the tortillas get a little soggy. Still edible though! Best for next-day leftovers, if you ask me.
- Corn or flour tortillas? I’m partial to the pillowy nature of flour tortillas, but corn is great if you like a bit more texture. Truthfully, I use whatever’s on hand—and have even mixed them.
- Can I use pre-shredded cheese? Absolutely! No cheese grater clean-up. Fresh works a touch better, but not enough for me to add extra dishes.
- What if I don’t have taco seasoning? Honestly, just wing it with chili powder, cumin, and salt, plus whatever spices taste taco-ish to you.
- Feed a bigger crowd? Double it in a deeper pan, or use two dishes. Leftovers for lunch victory, too.
If you actually make this, let me know how it worked for you—or if you joined “team too much cheese” with me. Happy eating!
Ingredients
- 8 small flour tortillas (sometimes I use corn if that’s what’s lurking in the pantry, and my grandma swears by homemade, but supermarket ones are more than fine)
- 1 lb (about 450g) ground beef (sometimes I use ground turkey, and if I’m feeling fancy or accidentally vego, lentils work, promise!)
- 1 medium yellow onion, diced
- 2 cloves garlic, minced (pre-minced is fine—no judgement here!)
- 1 bell pepper, diced (I actually use whatever color isn’t hiding under another veggie in my fridge)
- 1 pkt taco seasoning (or mix together 2 tsp chili powder, 1 tsp cumin, 1/2 tsp paprika, and a shake of cayenne if you want it spicy)
- 1 can (14 oz/400g) diced tomatoes, undrained
- 1 can (15 oz/425g) black beans, drained and rinsed (pinto beans swap in nicely too)
- 2 cups shredded cheddar cheese (Monterey Jack or a shredded Mexican blend if I’m being extra)
- 1/2 cup sour cream (I substitute Greek yogurt most of the time—tastes just as good, honest)
- Optional: sliced olives, diced jalapeños, chopped green onions, or a handful of corn (basically, whatever’s fun in a taco night)
Instructions
-
1Preheat your oven to 375°F (190°C). I always forget this step and end up waiting like a goose for the oven to catch up; don’t be like me!
-
2In a large skillet over medium heat, brown your ground beef. Break it up as you go. Once it’s about halfway cooked, toss in your diced onion, garlic, and bell pepper. Cook everything till the veggies look softened and your kitchen smells amazing—about 5-7 minutes.
-
3Drain any excess fat from the skillet (I’m clumsy so sometimes I just push the beef to one side and soak up the fat on the other with a wad of paper towel—don’t tell the Food Police).
-
4Stir in your taco seasoning, canned tomatoes (juices n’ all), and black beans. Simmer for 3-4 minutes. This is about when I start sneaking bites straight from the pan—it’s that good.
-
5Grab a 9×13-inch baking dish and give it a quick spritz of oil (or just rub it with butter if you’re old school like me on Sundays).
-
6Layer 4 tortillas over the bottom—tear them up if you need to cover all the corners. Top with half the beef mixture, then dollop and spread over half your sour cream, and sprinkle with a cup of cheese. (It looks a bit odd, but keep going.)
-
7Repeat: another 4 tortillas, rest of beef mix, rest of sour cream, another cup of cheese. Really pile on the cheese at the top—no regrets.
-
8Scatter over any optional toppings—my kids love black olives, I like a cheeky handful of corn. You do you.
-
9Bake uncovered for about 25–28 minutes, until it’s bubbling around the edges and just starting to brown up top. (If you like it super golden, crank up the broiler for a minute at the end, but do not walk away—burning things at this stage has ruined many a good dinner for me.)
-
10Let it rest for at least 10 minutes before slicing. It’ll look firmer and you won’t scald your mouth. (Well, probably.)
CLICK FOR NUTRITION INFO
↑
Approximate Information for One Serving
Serving Size:
1 serving
Calories:
430 caloriescal
Protein:
23 gg
Fat:
21 gg
Saturated Fat:
0g
Trans Fat:
0g
Cholesterol:
0mg
Sodium:
0mg
Potassium:
0mg
Total Carbs:
40 gg
Fiber:
0g
Sugar:
0g
Net Carbs:
0g
Vitamin A:
0
Vitamin C:
0mg
Calcium:
0mg
Iron:
0mg
Nutrition Disclaimers
Number of total servings shown is approximate. Actual number of servings will depend on your preferred portion sizes.
Nutritional values shown are general guidelines and reflect information for 1 serving using the ingredients listed, not including any optional ingredients. Actual macros may vary slightly depending on specific brands and types of ingredients used.
To determine the weight of one serving, prepare the recipe as instructed. Weigh the finished recipe, then divide the weight of the finished recipe (not including the weight of the container the food is in) by the desired number of servings. Result will be the weight of one serving.
Did you make this recipe?
Please consider Pinning it!