Let Me Tell You About My Oven-Fried Chicken Misadventures
Okay, so I have a confession: real Fried Chicken terrifies me. As much as I love crunchy, golden Chicken, something about that splattering oil and inevitable cleanup makes me want to run screaming for takeout. But, a while back—actually, it was during a rainy Sunday when our fryer died a pitiful death—I tried this oven-fried Chicken recipe, and honestly, I never looked back. It’s become my weeknight savior (or last-minute picnic hero—just ask my cousin Joe, who once ate seven pieces before anyone else noticed). Plus, nobody misses the oil, not even the dog. She still licks the crumbs off the kitchen floor, so I guess it’s a family affair.
Why I Keep Coming Back to This Oven-Fried Chicken
I make this on school nights when everyone’s begging for something crispy but I don’t really have the energy (or desire!) to bathe in frying oil. My family goes bananas for it because a) it’s crunchy and has that deep-fried flavor, and b) it comes out of the oven, so I can read silly headlines while it bakes. Actually, my daughter likes the end pieces best, which tends to cause heated negotiations around the table. In short: it’s a weeknight win, a picnic superstar, and, on days when I just want a little bite of nostalgia, it never disappoints. Oh, and you don’t even need fancy ingredients (or, honestly, much attention span).
What You’ll Need (And What I Swap In)
- 8 pieces Chicken (drumsticks and thighs are what I usually grab, but if you’re in the mood for breast or wings, go wild—it all works)
- 1 cup buttermilk (sometimes if I’m out, a splash of regular milk with a squeeze of lemon or even plain yogurt thinned with water does the trick)
- 1 tablespoon hot sauce (Tabasco is my go-to, but if it’s too fiery for you, just leave it out or use something milder—it’s really up to your tastebuds)
- 2 cups panko breadcrumbs (my grandma always argued for crushed cornflakes; honestly, I like both, panko just gives a nice crunch)
- 1 cup all-purpose flour (I’ve even used whole wheat flour in a pinch, for that slightly nutty flavor, but nobody noticed except me)
- 1 teaspoon smoked paprika (you can skip this if you don’t like smoky things, but I think it adds a sorta barbecue vibe)
- 1 teaspoon garlic powder
- 1/2 teaspoon onion powder
- 1 teaspoon kosher salt (or really, whatever salt’s in your cupboard; I can’t tell the difference and neither can Aunt Linda)
- 1/2 teaspoon black pepper
- 3 tablespoons melted butter (sometimes I get lazy and just use a spritz of oil, but melted butter is just… better)
How To Make Oven-Fried Chicken (Because No One Needs Extra Stress)
- First, toss all your chicken pieces in a big bowl (or, when I haven’t washed enough dishes, a zip-top bag). Pour in the buttermilk and hot sauce. Give it a good massage and let it sit for at least 30 minutes. Longer is better, unless you’re starving—then do what you gotta do.
- In another shallow bowl, mix up your flour, smoked paprika, garlic powder, onion powder, salt, and black pepper. This is when the kitchen starts to smell like, well, potential.
- Set out a third bowl with panko breadcrumbs (or your favorite cereal, crushed within an inch of its life). If I’m feeling fancy, I’ll add a pinch more paprika here.
- Take one piece of chicken at a time (I like to start with the smallest to see how things are sticking) and dredge it in the flour mixture. Make sure it gets a nice, light coating.
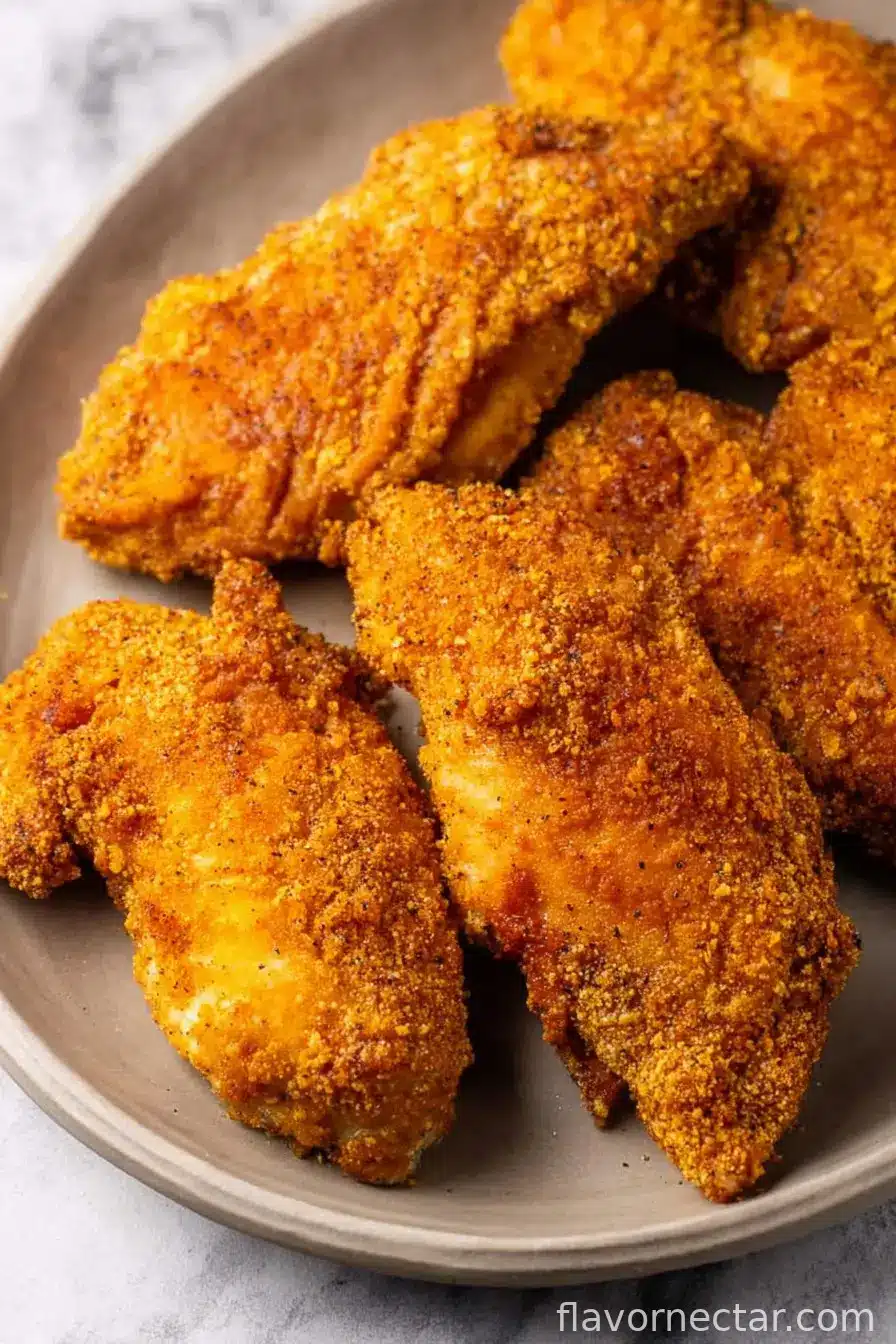
- Next, dunk the chicken back into the buttermilk bath—for extra insurance. Then into the panko, pressing so it gets a thick, craggy crust. Don’t worry if it looks a little weird; it always does at this stage.
- Arrange your breaded chicken on a wire rack set over a baking sheet. No rack? Just use a greased baking tray—you might have to flip the chicken halfway, but life’s too short for perfection.
- Drizzle or brush the melted butter on top (this step feels slightly rebellious but trust me on it).
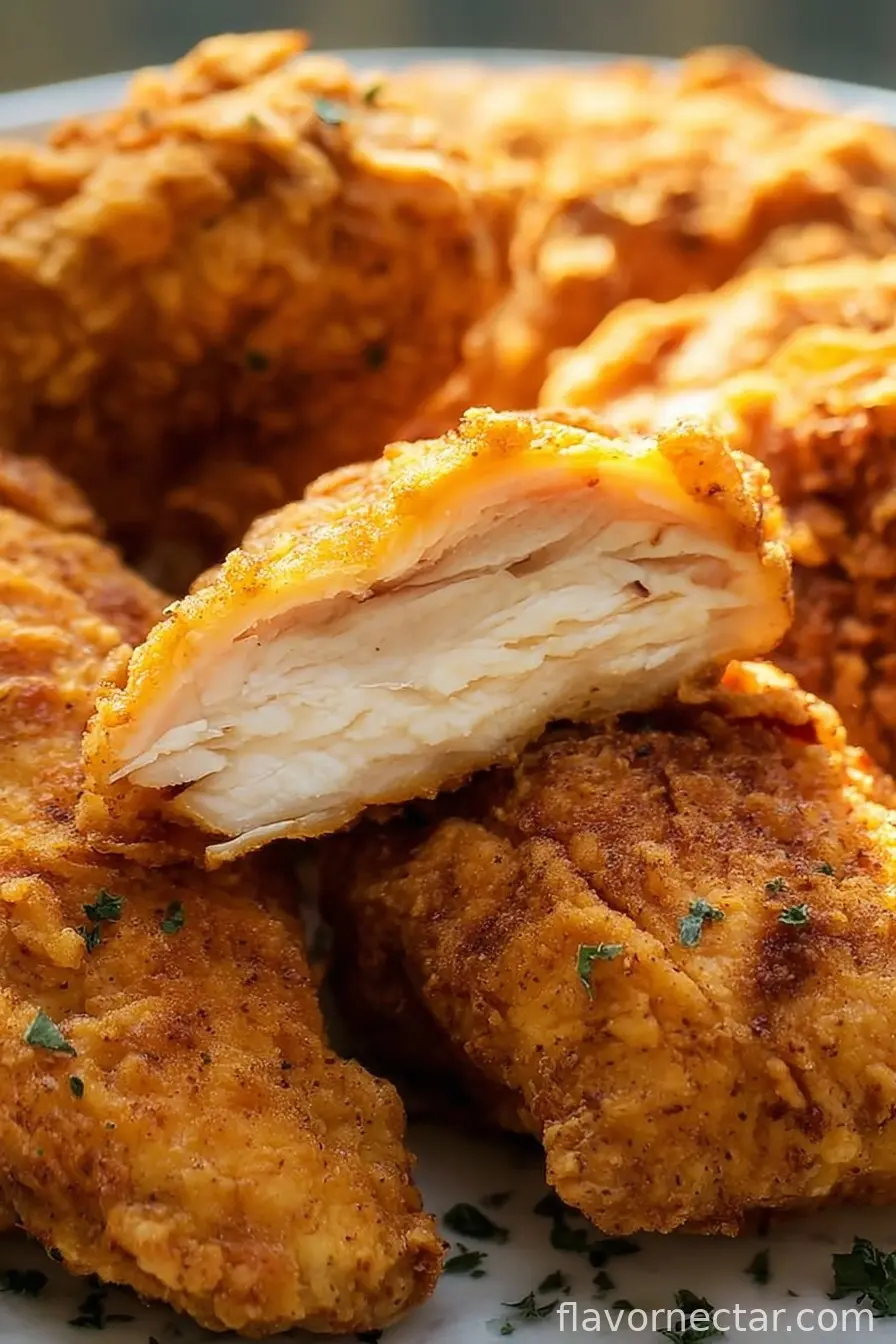
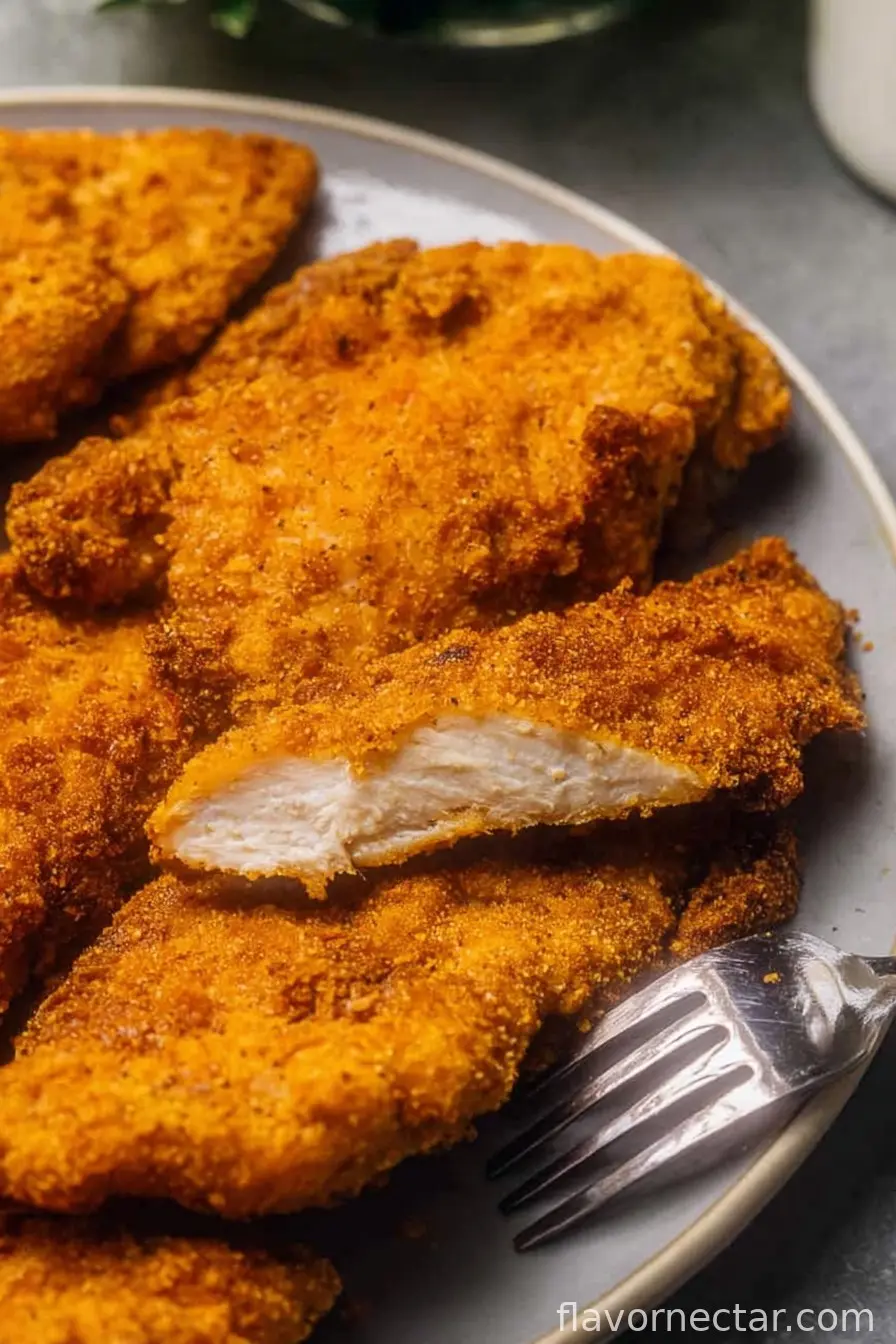
- Bake at 425°F (220°C) for about 35-40 minutes, or until the chicken is golden, crunchy, and the juices run clear when you poke a piece with a skewer or knife. Somewhere around 30 minutes, the aroma will start drawing people into the kitchen—ignore their impatience until the coating’s crisp.
Stuff I Learned the Hard Way (A.K.A. Notes)
- If you crowd your chicken on the tray, the crust goes from crispy to kinda sad. I’ve made that mistake at least a dozen times.
- Honestly, sometimes I skip preheating the oven and it still works, but it is a little less crispy. So… probably don’t be lazy like me?
- If you want the crunchiest coating, double dipping (flour, buttermilk, panko) actually IS worth the small mess.
Things I’ve Tried (Or Regretted): Variations
- Cornflake Crunch: Swapped in crushed cornflakes for the panko, and wow, that’s a good kind of breakfast-for-dinner vibe.
- Spicy Kick: Added a whole tablespoon of cayenne once… it was a little much, even for me, but the leftovers made a great chicken sandwich.
- Gluten-Free: Used gluten-free flour and panko, and honestly, could barely tell. Rice flour once made it get a bit, uh, chewy though. Wouldn’t do that again.
If You’re Short on Gadgets (Equipment)
- Wire rack for the baking sheet is best, but honestly if you don’t have one, just spray your baking tray. I’ve even gone full rustic and laid down a sheet of crumpled foil. It’s not perfect, but hey—it works.
- You’ll need three bowls or big dinner plates. If in doubt, clean-as-you-go is my only advice (but sometimes I don’t, and the kitchen looks like a breadcrumb explosion—just saying).
What About Leftovers? (Storage… If There Are Any)
If you have leftovers—and that’s a serious “if”—store them in an airtight container in the fridge. They’ll last a couple days. Reheat in the oven at 375°F for 10-15 minutes to keep things crisp (but honestly, I think this tastes better the next day, cold right form the fridge—don’t @ me).
How I Like To Serve It (And The Family Routine)
This chicken sits perfectly alongside a big bowl of coleslaw or those little roasted potatoes I make when I’ve got more energy (rare). Sometimes we go full southern and pull out honey and hot sauce for drizzling. My uncle dunks his in ranch—which is, I admit, not my thing—but I say, live and let dip.
All The Things I’ve Learned: Pro Tips
- Don’t rush the breading step. I once tried to hurry it along, and just ended up with sad little patches of crust sliding off like a bad toupee. Not the look we want.
- Test a small piece first if you’re unsure about your oven’s heat. I didn’t once (because, well, who wants to wait?), and half the chicken burned while the other half was raw. Lesson learned (sort of).
The Questions I Get All The Time
- Can I use boneless chicken? Sure thing! It won’t take as long—probably more like 25-30 minutes, but keep an eye on it. And watch the breading, it likes to escape from boneless pieces (ask me how I know!).
- Help! I’m out of buttermilk, what now? Not the end of the world; just use regular milk and squeeze in a wedge of lemon, or stir in a bit of plain yogurt with water. Or, honestly, even just milk on its own in an emergency.
- Is there a way to make this dairy-free? Yes! Swap out buttermilk for almond milk with a teaspoon of vinegar, and use olive oil instead of butter—that’s what my vegan neighbor does. She’s convinced our chickens taste better than hers, but I think she’s being polite.
- Does it actually get crispy? Yup—if you bake it hot enough, don’t crowd the pan, and let it rest on a rack. And if not? Well, it still tastes pretty fantastic.
- Why does my crust fall off? Oh, the eternal question! Usually, it’s either you didn’t press the panko on firmly enough or you moved the chicken too soon. Or both. But hey, even the crispy bits left on the pan are pretty good (I eat those straight from the tray, no shame).
So that’s it—oven-fried chicken as made by someone who loves shortcuts, hates cleanup, and enjoys the sound of a good kitchen story almost as much as the crunch of golden chicken. Give it a go and let me know how many pieces actually survive to see the next day. (I’m betting not many!)
Ingredients
- 8 pieces chicken (drumsticks and thighs are what I usually grab, but if you’re in the mood for breast or wings, go wild—it all works)
- 1 cup buttermilk (sometimes if I’m out, a splash of regular milk with a squeeze of lemon or even plain yogurt thinned with water does the trick)
- 1 tablespoon hot sauce (Tabasco is my go-to, but if it’s too fiery for you, just leave it out or use something milder—it’s really up to your tastebuds)
- 2 cups panko breadcrumbs (my grandma always argued for crushed cornflakes; honestly, I like both, panko just gives a nice crunch)
- 1 cup all-purpose flour (I’ve even used whole wheat flour in a pinch, for that slightly nutty flavor, but nobody noticed except me)
- 1 teaspoon smoked paprika (you can skip this if you don’t like smoky things, but I think it adds a sorta barbecue vibe)
- 1 teaspoon garlic powder
- 1/2 teaspoon onion powder
- 1 teaspoon kosher salt (or really, whatever salt’s in your cupboard; I can’t tell the difference and neither can Aunt Linda)
- 1/2 teaspoon black pepper
- 3 tablespoons melted butter (sometimes I get lazy and just use a spritz of oil, but melted butter is just… better)
Instructions
-
1First, toss all your chicken pieces in a big bowl (or, when I haven’t washed enough dishes, a zip-top bag). Pour in the buttermilk and hot sauce. Give it a good massage and let it sit for at least 30 minutes. Longer is better, unless you’re starving—then do what you gotta do.
-
2In another shallow bowl, mix up your flour, smoked paprika, garlic powder, onion powder, salt, and black pepper. This is when the kitchen starts to smell like, well, potential.
-
3Set out a third bowl with panko breadcrumbs (or your favorite cereal, crushed within an inch of its life). If I’m feeling fancy, I’ll add a pinch more paprika here.
-
4Take one piece of chicken at a time (I like to start with the smallest to see how things are sticking) and dredge it in the flour mixture. Make sure it gets a nice, light coating.
-
5Next, dunk the chicken back into the buttermilk bath—for extra insurance. Then into the panko, pressing so it gets a thick, craggy crust. Don’t worry if it looks a little weird; it always does at this stage.
-
6Arrange your breaded chicken on a wire rack set over a baking sheet. No rack? Just use a greased baking tray—you might have to flip the chicken halfway, but life’s too short for perfection.
-
7Drizzle or brush the melted butter on top (this step feels slightly rebellious but trust me on it).
-
8Bake at 425°F (220°C) for about 35-40 minutes, or until the chicken is golden, crunchy, and the juices run clear when you poke a piece with a skewer or knife. Somewhere around 30 minutes, the aroma will start drawing people into the kitchen—ignore their impatience until the coating’s crisp.
CLICK FOR NUTRITION INFO
↑
Approximate Information for One Serving
Serving Size:
1 serving
Calories:
420 caloriescal
Protein:
38gg
Fat:
16gg
Saturated Fat:
0g
Trans Fat:
0g
Cholesterol:
0mg
Sodium:
0mg
Potassium:
0mg
Total Carbs:
33gg
Fiber:
0g
Sugar:
0g
Net Carbs:
0g
Vitamin A:
0
Vitamin C:
0mg
Calcium:
0mg
Iron:
0mg
Nutrition Disclaimers
Number of total servings shown is approximate. Actual number of servings will depend on your preferred portion sizes.
Nutritional values shown are general guidelines and reflect information for 1 serving using the ingredients listed, not including any optional ingredients. Actual macros may vary slightly depending on specific brands and types of ingredients used.
To determine the weight of one serving, prepare the recipe as instructed. Weigh the finished recipe, then divide the weight of the finished recipe (not including the weight of the container the food is in) by the desired number of servings. Result will be the weight of one serving.
Did you make this recipe?
Please consider Pinning it!