Gather ‘Round, Friends: Let’s Chat Homemade Eggnog (The Non-Boozy Kind)
You ever have one of those recipes that just sort of snowballs every holiday? For me, it’s eggnog. But not the kind with the stuff Uncle Jim sneaks in his mug. I’m talking the rich, creamy, non-alcoholic homemade eggnog that’s about a zillion times better than the fridge-carton stuff (and doesn’t taste vaguely of plastic, oops did I say that out loud?).
Actually, the first time I made this, I totally scrambled the eggs—no lie, it looked like somebody tried to make sweet scrambled eggs in a pot. But after that hilarious disaster (and a maybe-not-totally-well-thought-out attempt to serve it anyway—bless my family’s polite faces), I finally got the hang of slow and steady. Now, this nog is a proper tradition—complete with a bit of chaos, some carols, and one cousin who always tops hers with half the cinnamon in the house.
Why You’ll Love This (Or, Why I Keep Making It Even When I’m Tired)
I make this pretty much every December or whenever someone hints at it (not so subtle, Mom). My crew loves it because it’s honestly way creamier than the boxed stuff, and you can fiddle with the sweetness. Plus, since there’s no alcohol, little ones and teetotalers—like my best mate, Pete—can join in. Bonus: no one wakes up with regrets the next day (except if you forget to clean the pot).
If I’m honest, making it from scratch is a bit of a zen moment for me now; I set the holiday tunes, and, okay, maybe I sneak a few extra cookies while I wait for it to chill. Oh, and I don’t get why store-bought is so yellow—I’ve never managed that at home, but maybe that’s for the best.
Ingredients (Plus a Few Swaps and Grandma’s Two Cents)
- 4 large eggs (fresh as possible, but I’ve used supermarket ones in a dash)
- 3/4 cup sugar (my friend Lila likes hers with coconut sugar, which is nice but different)
- 2 cups whole milk (honestly, I’ve done part-skim, though you lose some richness)
- 1 cup heavy cream (half-and-half sometimes makes it a bit lighter—suits hot Aussie summers)
- 1 tbsp vanilla extract (I use the cheap bottle when the real deal’s run out and, surprise, it’s still great)
- 1/2 tsp ground nutmeg (grate it fresh if you’re fancy, but pre-ground works fine; don’t stress)
- Pinch of salt (Grandma swore this made a difference, and… yeah, actually it does.)
- Optional: 1/4 tsp ground cinnamon for extra cosiness (my little one says it’s like Christmas toast in a mug)
Let’s Get Cooking: My Sometimes-Messy Steps
-
Whisk eggs + sugar: In a medium saucepan off the heat, whisk together the eggs and sugar until smooth. I count about a minute (or until my arm’s tired); don’t worry, it’ll look pale but not super thick.
(If you see little sugar lumps, just keep going. They totally dissolve later.) - Add milk + cream: Slowly whisk in the milk and cream. Pour a little at first so it’s not so splashy, then the rest.
- Heat gently: Set the saucepan over a low flame—seriously, don’t crank it. Stir pretty constantly. You want it steamy and just a bit thicker, but not boiling. This is the wobbly stage! If it gets too hot, you’ll get sweet egg-bits (been there). It should coat the back of a spoon after 7-10 minutes. This is always when I sneak a quick taste and burn my tongue, because I never learn.
- Cool it down: Take it off the heat. Stir in the vanilla, nutmeg, salt, and cinnamon if you’re using it. (It’ll smell amazing already—resist the urge to just drink it all now.)
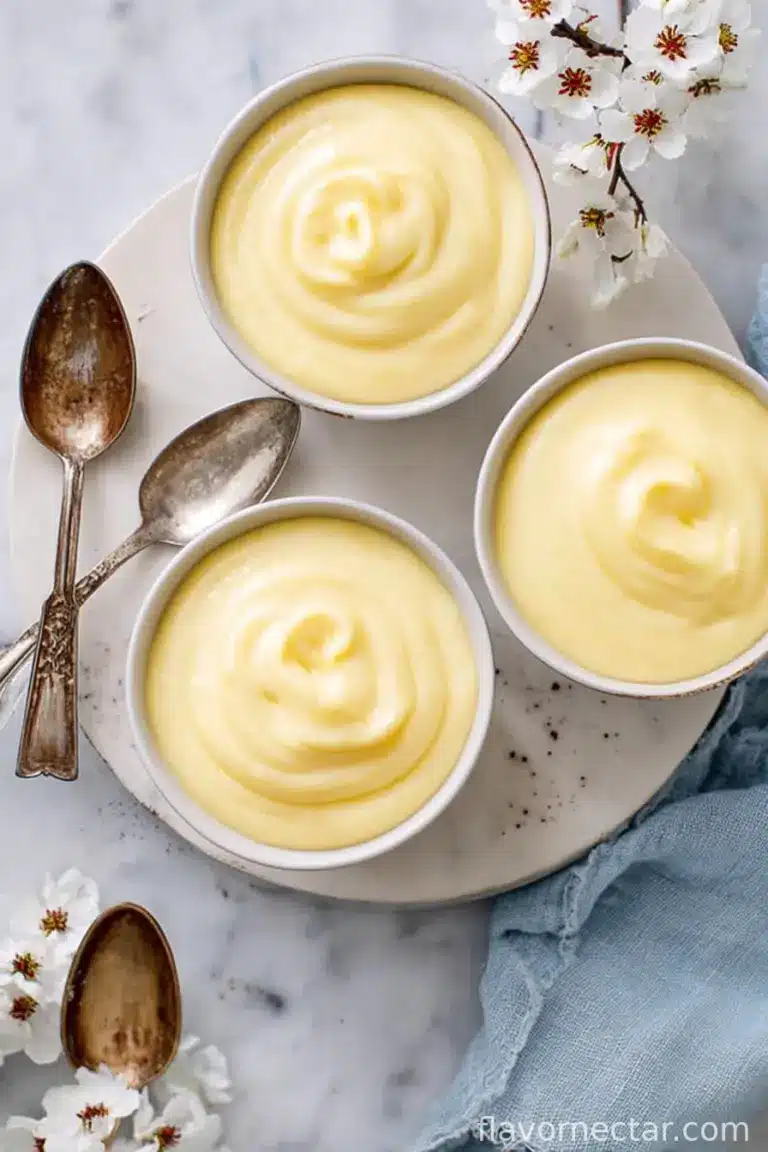
- Chill out: Pour through a sieve, just in case. Fridge for at least 2 hours. Sometimes, when life’s hectic, I forget and chill it overnight—tastes even better, in my opinion.
- Serve: Give it a good stir before pouring, since it settles sometimes. Top with more nutmeg if the spirit moves you. Or a mountain of whipped cream if you’re my cousin Ella.
Notes (a.k.a. Things I’ve Messed Up Before)
- If the eggs scramble a bit, just sieve out the lumps. Ignore them politely.
- This turns out less sweet than store stuff, so add a spoon of sugar at the end if you like—weirdly, brown sugar doesn’t blend in as well unless it’s heated a bit.
- No nutmeg? I’ve tried allspice in a pinch. Not quite right, but hey, it’s festive.
- I used to skip the pinch of salt, but honestly, it makes the flavors pop.
- Never tried it with plant milk—if you do, I’d love to know how it goes!
Try These Twists (One Not-So-Great Idea Included!)
- Chocolate Nog: Stir in a spoonful of cocoa powder before heating. I liked it, but my sister called it “confusing.”
- Spiced Citrus: Zest in some orange peel (just a teeny bit) for a fresh angle. Makes it taste weirdly grown-up.
-
Almond Extract: Tiny dash instead of vanilla. Fragrant but heavy—half a teaspoon is plenty. (Any more and it’s like drinking marzipan.
) - Soy milk swap: Once tried this for a vegan pal; didn’t really thicken, so maybe not ideal unless you like thin nog.
Gear Check (And What To Do If You Don’t Have All the Gadgets)
- Saucepan: Mine is battered and probably haunted by Christmases past. Any medium one works.
- Whisk: Don’t have one? A fork does the job—just takes longer, expect the ol’ arm workout.
- Sieve: I always say it’s essential, but, honestly, I’ve skipped it if the custard is smooth. No one’s noticed yet.
- Measuring cups: Or just sort of eyeball it. (I do when no one’s watching.)

How Long Does This Last? (Not Very, Around Here…)
Pop it in the fridge and it’ll be good for up to 3 days, covered—though honestly, in my house it never sees the sunrise of Day Two. Remember to stir before serving as it thickens a touch overnight.
How We Serve It (Our Own Silly Little Traditions)
At my place, we pop it in little glass mugs and cheer with cinnamon sticks (kids, grownups, and even gran’s ancient cat one year—don’t ask how she got it). Sometimes I freeze leftovers in pop moulds for eggnog popsicles, which are magic in July when you’re overheating.
If you want to get fancy, check out how Sally decorates hers—so pretty!
Pro Tips (Learned The Hard Way)
- Don’t rush the heating. I once turned the burner up to “get it over with” and wound up with sweet scrambled eggs.
- If you want a silkier texture, blend it with a stick blender after chilling. (Someone suggested this on Reddit and, actually, I find it works better if you blitz it cold, not hot.)
- Always taste before serving. One time I totally forgot the vanilla, and somehow no one noticed but me… but it bothered me all night.
- Adding whipped cream on top covers a multitude of wobbles.
FAQ: Genuine Questions People Have Thrown At Me
- Is it safe to use raw eggs? This recipe cooks ‘em, so they’re not raw at the end. Just don’t skip the heating step—even if you’re tempted!
- Can I make it dairy-free? Ah, so I’ve tried with almond milk. It sort of works, but doesn’t thicken up nicely. I’d recommend looking at dedicated vegan eggnogs like this one from Minimalist Baker.
- Can kids drink this? Absolutely! That’s the point. Most kids in my family just want the whipped cream swirled so high it almost tips over.
- What if it’s too thick? Stir in a splash more milk until you’re happy. Or just eat it with a spoon, I suppose.
- Can I make it in advance? Yep, tastes even better after sitting overnight. Although there’s been the odd time I’ve snuck a glass before dinner.
- How do I clean burnt egg off the pan? Hot water, baking soda, and—on second thought—maybe just soak it and ignore till tomorrow.
So, there it is: my (slightly messy) homemade non-alcoholic eggnog! Give it a go, don’t stress the details, and if you spill a little, just call it “festive flair.” Cheers!

Ingredients
- 4 large eggs
- 3/4 cup granulated sugar
- 2 cups whole milk
- 1 cup heavy cream
- 1 teaspoon pure vanilla extract
- 1/2 teaspoon ground nutmeg
- 1/4 teaspoon ground cinnamon
- Pinch of salt
Instructions
-
1In a large mixing bowl, whisk together the eggs and granulated sugar until pale and slightly thickened.
-
2In a medium saucepan, combine whole milk, heavy cream, nutmeg, cinnamon, and salt. Warm the mixture over medium heat until hot but not boiling.
-
3Slowly pour the hot milk mixture into the egg mixture, whisking constantly to avoid curdling.
-
4Return the entire mixture to the saucepan and cook over low heat, stirring constantly, until it thickens enough to coat the back of a spoon (about 5–7 minutes).
-
5Remove from heat and stir in the vanilla extract. Let cool, then refrigerate until chilled. Serve cold, garnished with extra nutmeg if desired.
CLICK FOR NUTRITION INFO
↑
Approximate Information for One Serving
Serving Size:
1 serving
Calories:
210cal
Protein:
6 gg
Fat:
12 gg
Saturated Fat:
0g
Trans Fat:
0g
Cholesterol:
0mg
Sodium:
0mg
Potassium:
0mg
Total Carbs:
20 gg
Fiber:
0g
Sugar:
0g
Net Carbs:
0g
Vitamin A:
0
Vitamin C:
0mg
Calcium:
0mg
Iron:
0mg
Nutrition Disclaimers
Number of total servings shown is approximate. Actual number of servings will depend on your preferred portion sizes.
Nutritional values shown are general guidelines and reflect information for 1 serving using the ingredients listed, not including any optional ingredients. Actual macros may vary slightly depending on specific brands and types of ingredients used.
To determine the weight of one serving, prepare the recipe as instructed. Weigh the finished recipe, then divide the weight of the finished recipe (not including the weight of the container the food is in) by the desired number of servings. Result will be the weight of one serving.
Did you make this recipe?
Please consider Pinning it!!