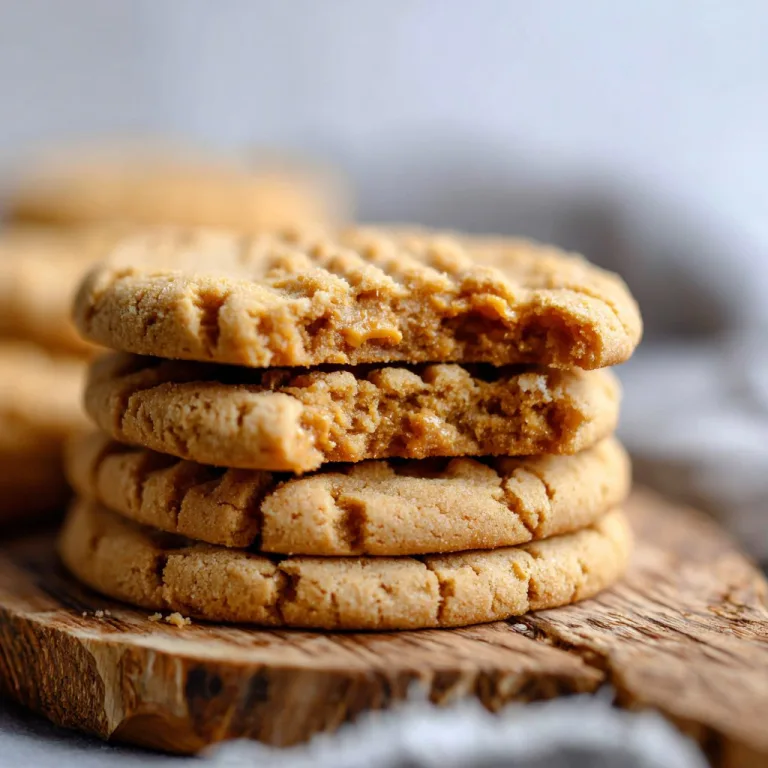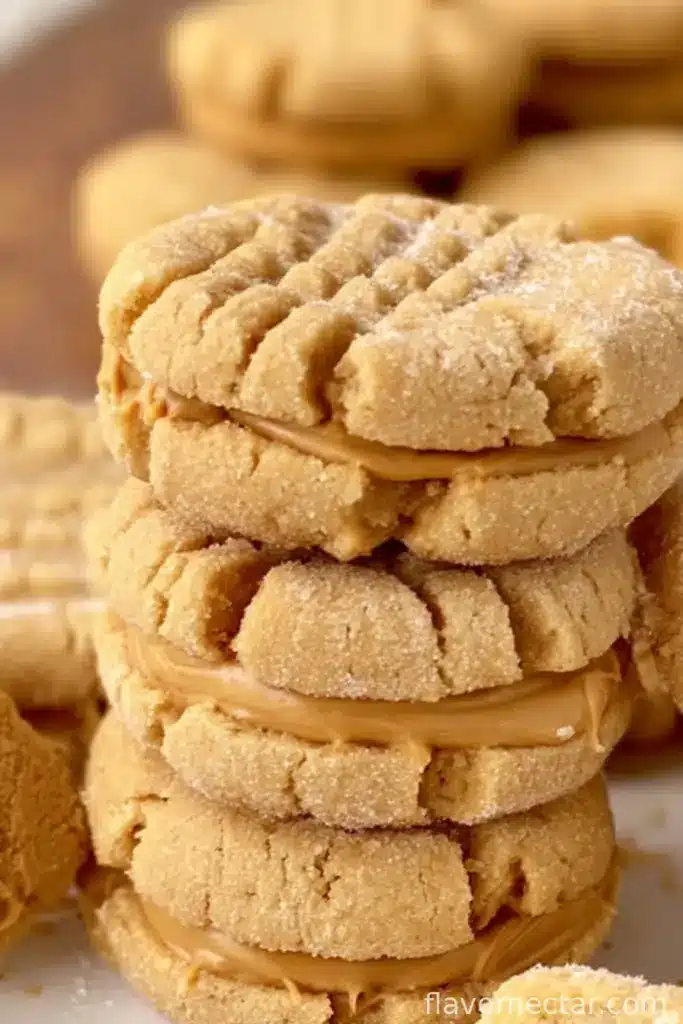
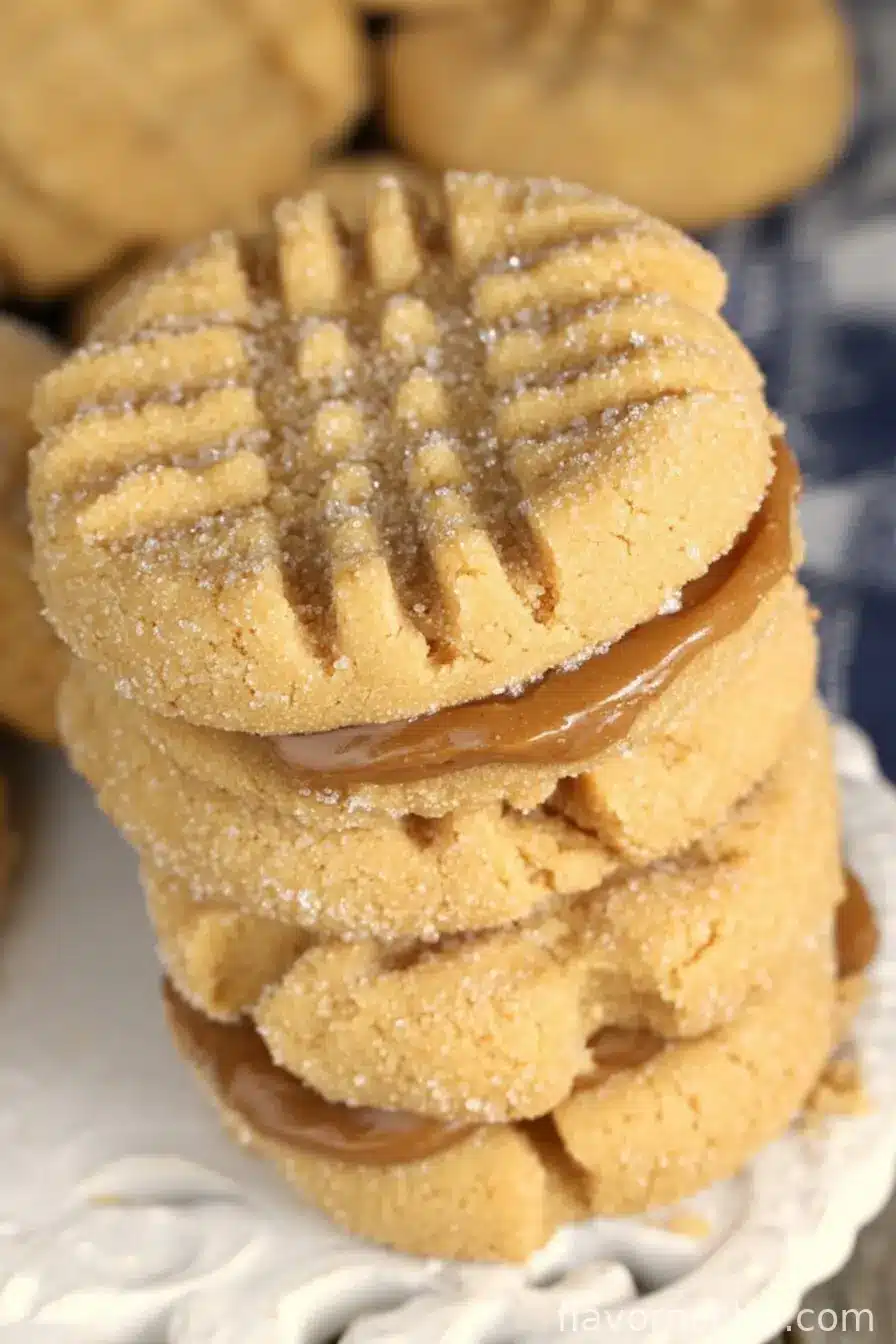
Homemade Nutter Butters: A Peanut Butter Lover’s Dream
Okay, I’ve gotta admit it: the first time I tried whipping up a batch of Nutter Butters at home, everything in the kitchen ended up dusted with flour and sugar (including me). But honestly, the smell alone—warm peanut butter cookies wafting out of the oven—was totally worth the clean-up. These little sandwich cookies taste like childhood, but better. My sister swears they’re her favorite snack, and even my skeptical neighbor nabbed a few extras “for later” (not sure they made it out the door).

Why I Keep Making These Homemade Nutter Butters
I make these when a craving hits for something nostalgic but I want to skip all the artificial stuff—plus, I can pile on extra peanut butter if the mood strikes! They’re soft, rich, just the right amount of sweet-salty. Sometimes my kid sneaks one before they’re sandwiched together (honestly, I’ve done it too). If your family is anything like mine, they’ll be gone before you know it (I’ve tried hiding a few at the back of the fridge; no luck, they’re always discovered!). If you ever got frustrated with crumbly store-bought cookies, this recipe is going to win your heart.
Ingredients (and a Few Notes From My Kitchen)
- 1 1/2 cups all purpose flour (I’ve swapped in half whole wheat once, but honestly, they were drier. Stick to all-purpose for the classic taste.)
- 1 teaspoon baking soda (don’t skip—keeps everything light and helps those adorable ridges hold their shape)
- 1/4 teaspoon kosher salt (regular table salt works fine in a pinch, but I do think kosher salt adds a little something extra)
- 1/2 cup unsalted butter, softened (once I used salted by accident and just reduced the added salt—worked fine, but unsalted is best)
- 1 cup light brown sugar (if you’re out, dark brown sugar will make things more caramelly, which is actually kinda nice)
- 1 cup creamy peanut butter (natural peanut butter turns the dough too crumbly for this; go for regular creamy, like Jif or Skippy—it’s my no-fail option)
- 1 large egg
- 1/2 teaspoon pure vanilla extract (my grandmother always insisted on real stuff, but honestly, the imitation is fine if that’s all you’ve got)
- 1/2 cup sugar (for rolling)
- For the Filling:
- 1/4 cup unsalted butter, softened
- 1/2 cup creamy peanut butter
- 1 1/2 cups powdered sugar (sometimes I start with a cup, taste, and only add more if it needs thickening or sweetening)
- 2 Tablespoons milk (whole, 2%, or even a splash of almond milk if that’s what’s open, go wild)
- 1/4 teaspoon vanilla extract
How I Throw These Together
- Get the oven ready: Set your oven to 350°F. Trust me, don’t do this after you’ve started scooping dough—speaking from experience. Line a baking sheet with parchment or one of those silicone mats if you’ve got one. Pour that 1/2 cup sugar into a small bowl and set it aside (you’ll need it soon).
- Mix up your dry stuff: In a bowl, whisk together the flour, baking soda, and salt. You just want them to be all friendly and evenly mixed, set that aside for now.
- Cream the good stuff: Grab your stand mixer or an electric hand mixer (or just a seriously strong arm). Beat together the softened butter, brown sugar, and peanut butter until it’s creamy and smooth. This is the part where I have to stop myself from taste-testing with a spoon.
- Add egg and vanilla: Toss in your egg and vanilla extract and keep mixing until it’s all combined. The dough will smell amazing at this point—try to resist eating it raw, but if a little gets on your fingers, hey, that’s just cook’s rights.
- Finish the dough: Now, slowly add your flour mixture. I usually do this in thirds to avoid that flour explosion (learned that one the hard way). Mix until everything JUST comes together—it may look a bit sticky, but that’s perfect.
- Shape ’em up: Scoop out about 1 to 1½ tablespoons of dough (I use a cookie scoop or just eyeball it—no need to be fancy). Roll each chunk into a ball, then into a little log shape. If it’s sticking to your hands, a quick dusting of flour helps.
- Roll in sugar: Drop each dough log into your bowl of sugar and coat it gently—don’t be shy; that sugary crunch is magic.
- Onto the tray: Plop your sugar-coated dough logs onto the prepared cookie sheet, making sure there’s about two inches between ’em. These will spread out a bit!
- Fork time: Now, use a fork to press a criss-cross pattern onto each log. After that, gently pinch the center of each cookie so it looks a bit like a peanut. Don’t stress perfection—they should have character!
- Bake: Slide the tray into your preheated oven and bake for 10-12 minutes. You want them golden at the edges but still a bit soft in the middle; if they look underbaked, that’s okay, they’ll firm up as they cool.
- Cool off: Once they’re done, let them hang out on the baking sheet for about 5 minutes (they’re kind of fragile!). After that, pop them onto a wire rack to cool completely. This is usually when my husband starts circling the kitchen like a vulture.
- Let’s make the filling: Grab your mixer again for this. Beat together the softened butter and peanut butter until it’s fluffy—like, really well-blended. Don’t worry if it looks weird at first, it comes together fast.
- Gradually add in the powdered sugar, milk, and vanilla extract. If it gets too thick, splash in a bit more milk. When it’s creamy but holds its shape (think thick frosting), you’re good.
- Sandwich time! Pair your cooled cookies up by size (kind of like match-making, but for cookies). Take one cookie from each pair and spread about a tablespoon of that glorious peanut butter filling on the flat side. Top with the second cookie. Press gently so the filling squishes out just a wee bit around the edges—yum.
- Repeat. Or sneak a few along the way—totally up to you. Admire your handiwork, then dig in.
Notes from My Many Attempts
- If you make the cookies big (I sometimes get lazy), just add an extra minute or two in the oven.
- Natural peanut butter doesn’t work—it makes the dough way too crumbly, which is a heartbreak after all that effort.
- If the filling is too runny, I actually add extra powdered sugar instead of more peanut butter; I’ve made a frosting swamp before!
Variations I’ve Tried (Some Winners, One Oops)
- Adding mini chocolate chips to the filling? Seriously good.
- I once drizzled half with melted chocolate. Decadent, but a bit messy to store—still tasted great.
- Swapped the peanut butter filling for Nutella once. That… was not my best idea. Tasted good but made a sloppy sandwich. Try at your own risk!
What You Need (And What You Can Get By Without)
- Stand mixer or a hand mixer. I have done the mixing by hand on a stubborn day, but my arm was ready to fall off.
- Cookie scoop. Or just a regular old spoon. Don’t have a wire rack? I’ve used the grill rack from my toaster oven—worked just fine.
- Parchment paper or a silicone mat (if you don’t have either, just grease your pan lightly—the cookies might stick a touch but they always come off with a gentle nudge).
Storing and Keeping (If They Last…)
Store these in an airtight container at room temp for up to 3 days (in my house, they last about 24 hours, tops). You can also pop them in the fridge if it’s warm, or freeze sandwiched cookies between layers of wax paper. They taste surprisingly good straight from the freezer, too!
How I Like to Serve Homemade Nutter Butters
We love dunking these in cold milk (old-school, I know). Sometimes I pack them in lunchboxes, but usually, I’ll sneak one with coffee for a mid-afternoon pick-me-up. Oh, and they look super cute on a cookie tray for parties (or just share with the neighbors—makes you look like a baking genius, ha!).
Lessons Learned (and My Pro Tips!)
- Let those cookies cool ALL the way before filling—otherwise the filling melts and escapes everywhere. Ask me how I know…
- Don’t rush the creaming step; that’s what makes the cookies tender and light. I tried hurrying once and got hockey pucks. Don’t be me!
- Pressing the fork pattern too hard? The cookies get a bit thin in the center. Just a gentle hand is all you need.
Questions Folks Have Asked Me (And My Not-So-Perfect Answers)
- Can I use chunky peanut butter? Eh, technically yes, but it messes with the smooth filling and shapes. I guess it adds “rustic charm,” if that’s your thing.
- Why are my cookies spreading too much? Probably the butter was too soft—or maybe your oven runs hot (mine’s a lying little thing). Try chilling the dough for about 15 minutes before baking.
- Can I double the recipe? Go for it! I do, especially around the holidays. Just make sure you don’t crowd the oven trays.
- Any non-dairy milk work in the filling? Yup. Almond, oat, whatever’s open—they all work, just taste as you go so it isn’t bland.
- Do these taste just like the store-bought ones? Sort of! But I think these are softer, have more peanutty flavor, and feel more “real.” Plus, you get a forkful of nostalgia—but fewer mystery ingredients.
If you end up with a bit of leftover filling, it’s amazing on graham crackers. Or, if you’ve had a long day, just grab a spoon. Nobody’s watching!
Ingredients
- 1 1/2 cups all purpose flour
- 1 teaspoon baking soda
- 1/4 teaspoon kosher salt
- 1/2 cup unsalted butter softened
- 1 cup light brown sugar
- 1 cup creamy peanut butter
- 1 large egg
- 1/2 teaspoon pure vanilla extract
- 1/2 cup sugar to roll the cookie dough in
- 1/4 cup unsalted butter softened
- 1/2 cup creamy peanut butter
- 1 1/2 cups powdered sugar
- 2 Tablespoons milk
- 1/4 teaspoon vanilla extract
Instructions
-
1Set your oven to 350°F, then line a baking sheet with parchment paper or a silicone mat if you have one. Pour the 1/2 cup of sugar into a small bowl and set it aside.
-
2Take a medium bowl and whisk together the flour, baking soda, and salt. Get everything nice and even, then put the bowl aside for now.
-
3Using a stand mixer or hand mixer, beat the softened butter, brown sugar, and peanut butter together until the mixture is creamy and fluffy—if you’re mixing by hand, it’ll take a little muscle, but you’ll get there.
-
4Add in the egg and vanilla extract, mixing until it’s fully blended. At this stage, the dough should be smooth and smell incredible; try not to eat it yet (but, hey, I won’t judge).
-
5Gradually add the dry ingredients into the wet mix—do this in a few batches to avoid flour clouds everywhere. Mix until just combined; don’t overdo it, a little bit sticky is just right.
-
6Scoop about 1 to 1½ tablespoons of dough for each cookie, rolling them first into balls and then shaping into thick little logs. You don’t need a ruler here; rustic is fine.
-
7Roll each piece of dough in your prepared bowl of sugar, making sure they’re well coated for that signature crunch.
-
8Space your sugared cookie logs about two inches apart on the baking sheet—you want room for them to spread out and not mingle too much.
-
9Use a fork to press a criss-cross pattern on each log, then pinch the center gently. It’ll look a bit like a peanut shape when you’re done. And don’t sweat it if they’re a little funny-looking—that just adds personality.
-
10Bake for 10 to 12 minutes, right till the edges are just set and golden, but the centers are still soft. If they don’t look totally done, that’s okay—they’ll firm up when they cool.
-
11Leave the cookies on the baking sheet for five minutes after pulling them from the oven (so they don’t fall apart), then transfer them carefully to a wire rack to finish cooling completely.
-
12Now for the peanut butter filling: In the (cleaned) stand mixer bowl or with a hand mixer, beat the softened butter and peanut butter together until light and creamy.
-
13Add the powdered sugar, milk, and vanilla extract to the filling and mix until it’s smooth, adding a tiny splash more milk if it’s too stiff. It should be thick but spreadable, a bit like vanilla frosting.
-
14Pair up cookies by size, turning half of them upside down. Spread about a tablespoon of filling on the bottom cookie from each pair.
-
15Top each filled cookie with its partner, gently pressing so the filling spreads just to the edge. And if some filling squishes out? All the better.
-
16Keep going until all your cookies are sandwiched. Honestly, I sample at least one before anyone else gets a chance!
CLICK FOR NUTRITION INFO
↑
Approximate Information for One Serving
Serving Size:
1 serving
Calories:
280 caloriescal
Protein:
5gg
Fat:
14gg
Saturated Fat:
0g
Trans Fat:
0g
Cholesterol:
0mg
Sodium:
0mg
Potassium:
0mg
Total Carbs:
36gg
Fiber:
0g
Sugar:
0g
Net Carbs:
0g
Vitamin A:
0
Vitamin C:
0mg
Calcium:
0mg
Iron:
0mg
Nutrition Disclaimers
Number of total servings shown is approximate. Actual number of servings will depend on your preferred portion sizes.
Nutritional values shown are general guidelines and reflect information for 1 serving using the ingredients listed, not including any optional ingredients. Actual macros may vary slightly depending on specific brands and types of ingredients used.
To determine the weight of one serving, prepare the recipe as instructed. Weigh the finished recipe, then divide the weight of the finished recipe (not including the weight of the container the food is in) by the desired number of servings. Result will be the weight of one serving.
Did you make this recipe?
Please consider Pinning it!