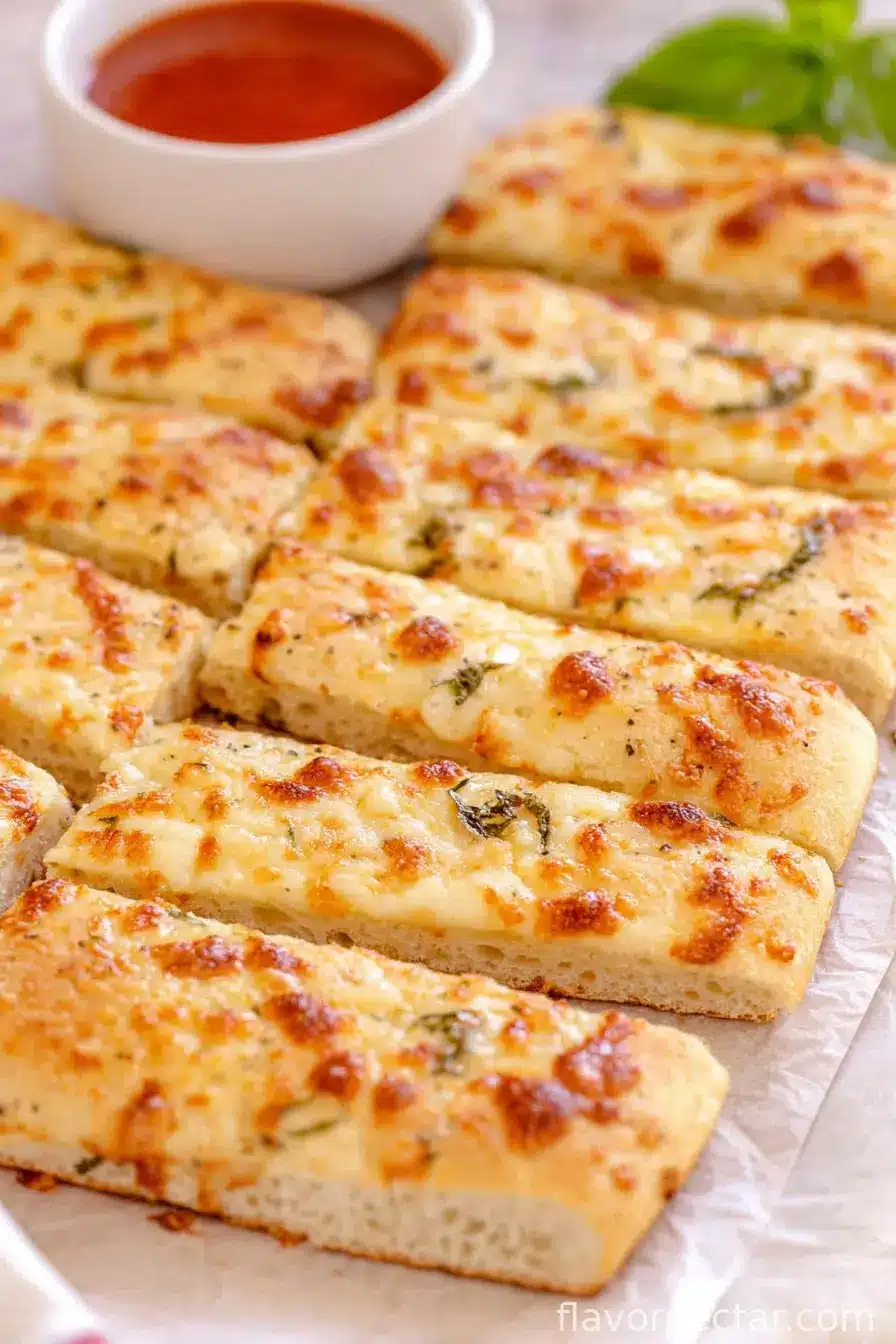
So, Breadsticks. Have You Met My Cheesy Ones?
Alright, cards on the table: I’ve made a lot of breadsticks. Sometimes they were as hard as cricket bats (sorry, Aunt Marlene!). But there’s this one version, my go-to homemade Cheesy breadsticks, that’s basically ended all family negotiations. I mean, even my brother-in-law grabs thirds. These started as a Sunday experiment when I forgot to buy garlic knots for pasta night—and now, every time someone says “let’s have pizza at home,” these hit the table first. They’re golden, a bit scruffy-looking, but trust me, the smell alone will draw everyone in from the backyard (and if you hear a weird clatter halfway through, that’s usually just the dog scrambling for fallen cheese bits—long story, but let’s get into it).
Why You’ll Actually Love This (Or, Why I Do)
I make this when the weather’s a bit rubbish, or when I just wanna snack and can’t really be bothered with fancy stuff. The best part? It’s cheesy, obviously, but also forgiving—like, if you’re out of mozzarella, just toss in whatever cheese you have. My family goes positively bonkers (especially if I add extra garlic butter). If you’re feeling lazy, using ready-made dough is totally fine. I once dropped half the Asiago on the floor and, honestly, it still tasted great—nobody even noticed. And if you’re the type to get stressed when things aren’t perfectly even or round, you’ll fit right in with this recipe.
Let’s Gather Some Stuff (You Can Mix and Match)
- 2 cups all-purpose flour (or bread flour, but I swear regular works fine)
- 1 tbsp sugar (sometimes I accidentally use a bit more and it’s never ruined it)
- 1 packet instant yeast (2 ¼ tsp) – I’ve subbed in active dry, just bloom it first in the warm water
- 3/4 cup warm water (not hot, just comfy-warm, like bathwater for a baby—don’t overthink it)
- 2 tbsp olive oil (in a pinch, veg oil is okay too, but olive is best)
- 1 tsp salt
- 1 1/2 cups shredded mozzarella (I sneak in a handful of cheddar sometimes—Aunt Alice swears by pepper jack but that’s her quirk)
- 2 tbsp grated parmesan (skip if you must, or use that green-can stuff; nobody tells the difference after baking, honestly)
- 2 tbsp butter, melted
- 2 cloves garlic, minced (Garlic powder in a rush? Yeah, it’ll do.)
- Optional: pinch of dried oregano, cracked black pepper
Alright, Here’s How I Make Them
- First off, dump the flour, sugar, salt, and yeast into a big-ish bowl. Mix with whatever you have—a fork, wooden spoon, your hands if you’re feeling rustic.
- Stir in the warm water and olive oil. If it seems a bit too dry, add a splash more water. If it’s sticky, sprinkle a bit more flour. This part’s always a little different at my house depending on the mood of my kitchen (weather, I guess?)
- Knead the dough until it smooths out, about 5 minutes. Or just poke at it until it looks unified. Cover with a clean tea towel and let it hang out for 30–40 mins (if I’m impatient, 25 minutes—just won’t puff quite as much).
- Preheat your oven to 425°F (220°C). Unless you forget. Then, just stick the dough in once it’s ready and let it catch up.
- Roll or smoosh the dough out on a floured surface into a rectangle-ish shape, about half an inch thick. If mine turns out trapezoidal? Meh, nobody complains.
- Mix your melted butter and garlic together; slather it all over the dough. Don’t be stingy—even the edges. This is where I usually sneak a taste of the butter (what? It’s good!)
- Sprinkle the mozzarella and parmesan over, give it a gentle press so it sticks. Add oregano or pepper if you fancy.
- Slice into strips (I just use a pizza cutter or even scissors sometimes), but leave them together on the pan so it bakes as one big cheesy slab.
- Transfer to a parchment-lined baking sheet, and bake for 13–16 minutes, or until golden and the cheese bubbles and takes on those brownish spots (in the best way).
- Let it cool just a tad (this is crucial—unless, like me, you burn your mouth every single time because patience isn’t a virtue I possess.)
Cut apart the breadsticks along the lines you made earlier—grab one before the rest disappear.
A Couple of Notes (learned the tasty way)
- If the dough seems stubborn, I just walk away for five minutes. It usually sorts itself out.
- I think this tastes even better the next day, cold or reheated, but honestly? I’ve only had leftovers twice.
- The cheese can bubble over and crisp on the pan. Those bits are the real treat—don’t let anyone else claim them!
Fun Experiments I’ve Tried (and One Flop)
- Adding smoked paprika to the butter—total game-changer
- Using pizza sauce as a dip (classic, but I also love ranch—not sorry)
- Once tried blue cheese; everyone got suspicious and ate around those parts. Lesson learned.
- Cutting them thinner for extra crunch—great with soup
No Fancy Gear? No Worries
- A stand mixer is nice for kneading, but elbow grease and a big spoon work just as well. If you don’t have a rolling pin, a wine bottle does the job (and then you’ve got wine!).
- Parchment paper makes life easier for cleanup, but baking straight on a greased pan works fine. Just let it cool a bit more before wiggling them up.
How I Store (Or Don’t Store) These
If you have any left (and, wow, hats off to your willpower), toss them in a zip bag or airtight container. They’re OK for up to two days, fridge is better if it’s toasty in your kitchen. But, and here’s the truth, they’re almost always gone by nightfall, so don’t stress too much about storage instructions.
How We Eat Them – Aka Serving Ideas
The classic: with a big bowl of marinara. Or soup on a lazy Sunday (it’s good for dipping!) Sometimes I just have them straight for a midnight snack—no dip, just cheesy fingers and a content heart. My cousin insists we pair them with spicy pickles. I don’t get it, but, hey, whatever floats your boat.
Pro Tips (Given With Some Regret!)
- I once tried to skip letting the dough rest. Nope, ended up with dense, chewy sticks that could double as doorstops. Don’t rush it.
- Don’t overload with cheese (I know, wild)—too much cheese and the middle stays too soggy. I learned the hard way, scraping melty ponds onto the counter. Less is actually more here.
- Oh, and actually, I find it works better if I brush more butter over the sticks right after baking—makes them extra shiny and tasty.
FAQ: Real Questions (and My Non-Expert Replies)
- Can I make these ahead? Yes, but fresh is best. You can prep the dough the night before and stash it in the fridge. Just let it warm up a bit before baking.
- Gluten free? I’ve tried with a couple blends—some work, some make it crumbly. It’s trial and error, but not impossible. If you find a blend you like, stick with it.
- Cheese alternatives? Sure, I’ve mixed mozzarella with shredded provolone or even Monterey Jack. One friend does vegan mozz—she says it’s good, but I can’t say for sure since dairy is my love language.
- Can I double the recipe? Oh, absolutely. Just use two pans or a big half-sheet and watch the baking time.
- My dough isn’t rising! Happens to all of us sometimes (humidity, old yeast, or mysterious kitchen forces). Just give it more time—if it still won’t puff, go ahead and bake; it’ll still taste fine, just a bit denser.
Oh, before I forget—last time I made these, the neighbor popped over with her dog right as I pulled them out of the oven. We ended up eating the whole batch in the backyard, not a plate in sight. Honestly, best impromptu gathering I’ve had in ages. So, if you end up making these, let me know how it goes—if nothing else, you’ll at least get a kitchen that smells like heaven. Or a cheese shop after closing time.
Ingredients
- 1 cup warm water (about 110°F)
- 2 teaspoons granulated sugar
- 2 1/4 teaspoons active dry yeast
- 2 1/2 cups all-purpose flour
- 1 teaspoon salt
- 2 tablespoons olive oil
- 2 cups shredded mozzarella cheese
- 2 tablespoons unsalted butter, melted
- 2 cloves garlic, minced
- 1 teaspoon dried Italian herbs (such as oregano and basil)
Instructions
-
1In a mixing bowl, combine warm water, sugar, and yeast. Stir gently and let sit for 5 minutes until foamy.
-
2Add flour, salt, and olive oil to the yeast mixture. Mix until a dough forms, then knead for 5-7 minutes until smooth and elastic.
-
3Place the dough in a lightly greased bowl, cover, and let rise in a warm place for 20 minutes.
-
4Preheat the oven to 400°F (200°C). Punch down the dough and roll it into a rectangle on a floured surface. Transfer to a parchment-lined baking sheet.
-
5Brush melted butter over the dough, then sprinkle evenly with minced garlic, shredded mozzarella, and Italian herbs.
-
6Bake for 16-18 minutes until the cheese is bubbly and golden. Let cool slightly, slice into breadsticks, and serve warm.
CLICK FOR NUTRITION INFO
↑
Approximate Information for One Serving
Serving Size:
1 serving
Calories:
230 caloriescal
Protein:
9gg
Fat:
9gg
Saturated Fat:
0g
Trans Fat:
0g
Cholesterol:
0mg
Sodium:
0mg
Potassium:
0mg
Total Carbs:
28gg
Fiber:
0g
Sugar:
0g
Net Carbs:
0g
Vitamin A:
0
Vitamin C:
0mg
Calcium:
0mg
Iron:
0mg
Nutrition Disclaimers
Number of total servings shown is approximate. Actual number of servings will depend on your preferred portion sizes.
Nutritional values shown are general guidelines and reflect information for 1 serving using the ingredients listed, not including any optional ingredients. Actual macros may vary slightly depending on specific brands and types of ingredients used.
To determine the weight of one serving, prepare the recipe as instructed. Weigh the finished recipe, then divide the weight of the finished recipe (not including the weight of the container the food is in) by the desired number of servings. Result will be the weight of one serving.
Did you make this recipe?
Please consider Pinning it!!