Bread | Gluten-Free | Snacks
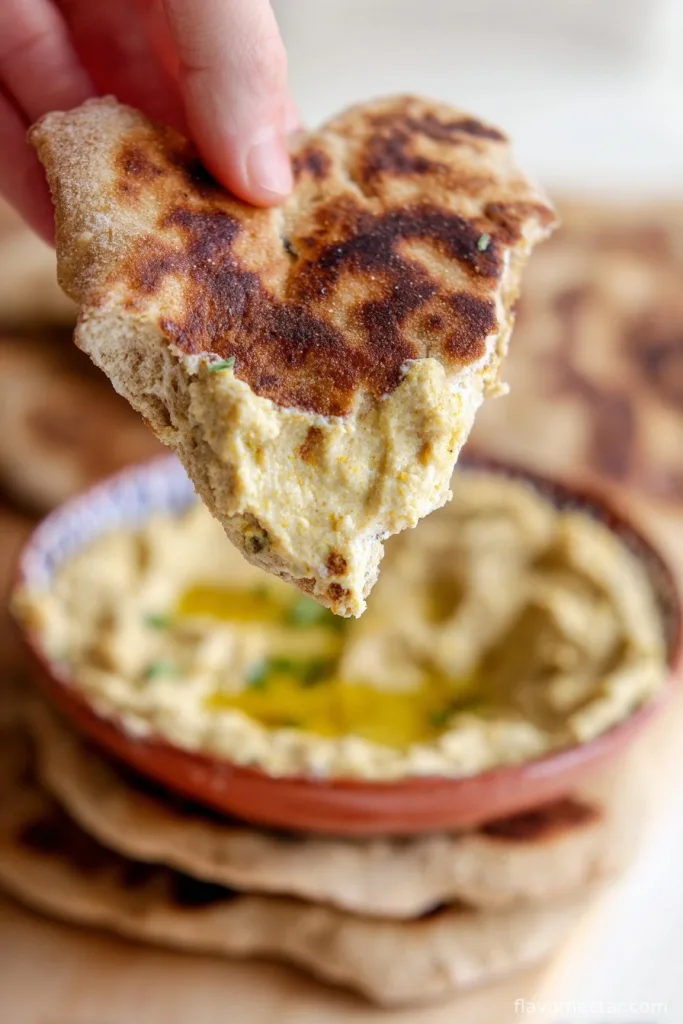
Hey y’all! If you’re searching for a soft, chewy bread that’s both gluten-free and bursting with tangy sourdough flavor, you’re in the right place. This Gluten-Free Sourdough Flatbread is a total game-changer—perfect for dipping, topping, wrapping, or just enjoying as-is. It’s ideal for weeknight dinners, lunch wraps, or those spontaneous snack cravings. Let’s get cooking!
Why You’ll Love This Gluten-Free Sourdough Flatbread
- Soft and chewy texture pairs perfectly with any topping or dip.
- Made entirely gluten-free, making it suitable for celiac and gluten-sensitive eaters.
- Uses active gluten-free sourdough starter for a subtle tang and extra nutrition.
- Quick-cooking on the stovetop—no oven required!
- Customizable with your favorite herbs, spices, or mix-ins.
Ingredients for Gluten-Free Sourdough Flatbread
- 1 cup (240g) active gluten-free sourdough starter (learn how to make one here)
- 1 cup (120g) gluten-free all-purpose flour blend (with xanthan gum)
- 1/2 cup (120ml) filtered water (plus more as needed)
- 1 tablespoon olive oil (plus extra for cooking)
- 1 teaspoon fine sea salt
- 1/2 teaspoon baking powder
- Optional: 1 tablespoon chopped fresh herbs (like rosemary or chives)
How to Make Gluten-Free Sourdough Flatbread: Step-by-Step Directions
Step 1: Mix the Dough
In a large mixing bowl, combine your active gluten-free sourdough starter, gluten-free flour, water, olive oil, salt, and baking powder. Stir until a sticky but workable dough forms. Add a splash more water if the dough feels dry or crumbly. Fold in any optional herbs.
Step 2: Rest and Hydrate
Cover the bowl with a clean kitchen towel and let the dough rest at room temperature for 30 minutes. This allows the flour to hydrate and the flavors to meld.
Step 3: Shape the Flatbreads
Dust your hands and work surface with gluten-free flour. Divide the dough into 6 equal portions. Roll each portion into a ball, then flatten with your hands or a rolling pin to about 1/4-inch thick, 6-inch rounds.
Step 4: Cook the Gluten-Free Sourdough Flatbread
Heat a nonstick or cast iron skillet over medium heat. Brush with a little olive oil. Cook each flatbread for 2-3 minutes per side, or until golden brown spots appear and the bread is cooked through. Repeat with remaining dough, adding more oil as needed.
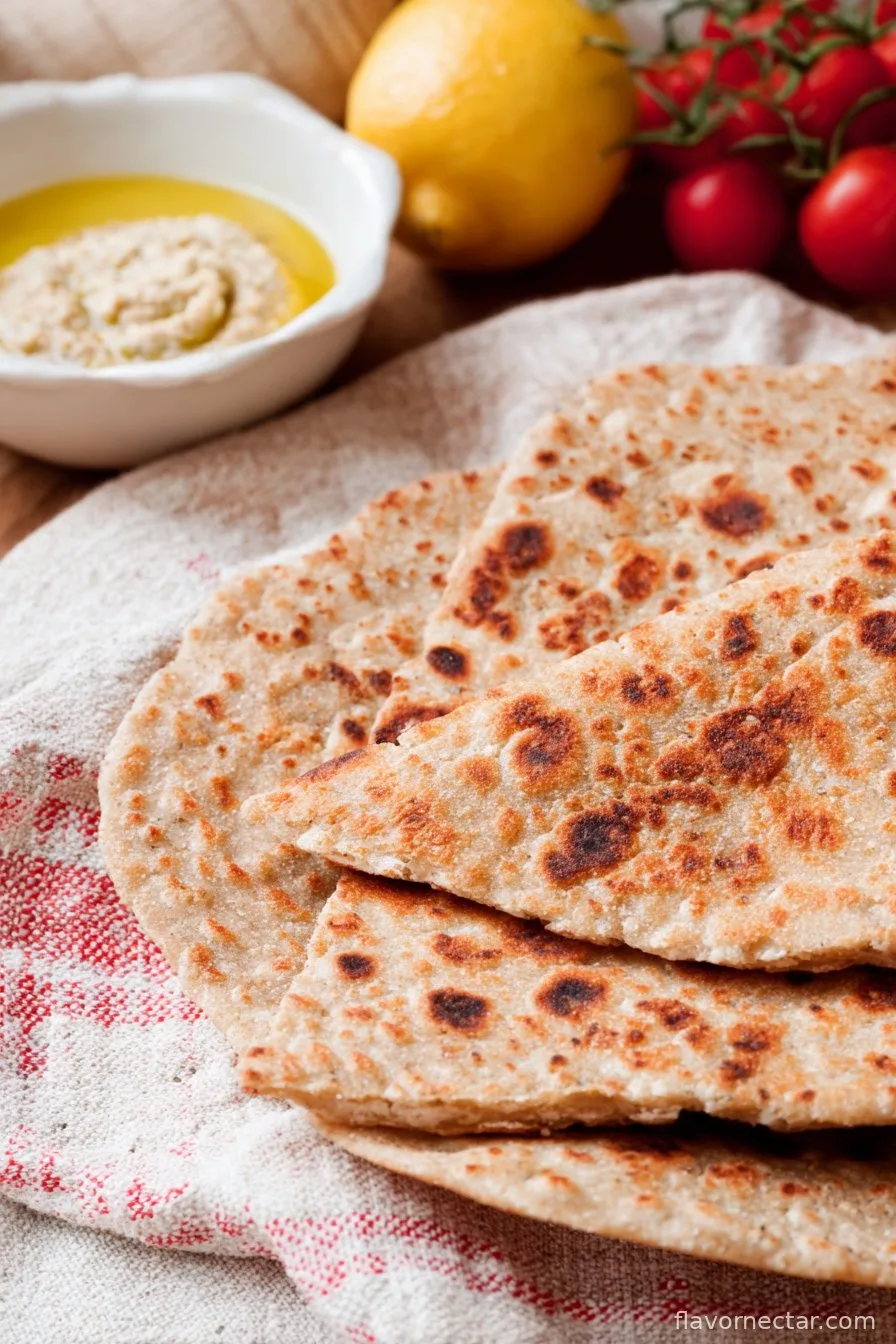
Step 5: Serve and Enjoy!
Stack the cooked flatbreads in a clean kitchen towel to keep them warm and soft. Serve immediately or let cool and store for later.
Notes for Perfect Gluten-Free Sourdough Flatbread
- Use an active, bubbly sourdough starter for best flavor and rise (more info here).
- If the dough is too sticky, lightly flour your hands and work surface, but avoid adding too much flour.
- For extra-soft flatbread, cover cooked breads with a towel right away to trap steam and retain moisture.
Gluten-Free Sourdough Flatbread Variations
- Garlic & Herb: Mix minced garlic and Italian herbs into the dough before shaping.
- Cheesy Flatbread: Sprinkle shredded Parmesan or mozzarella over the tops just before flipping.
- Seeded Flatbread: Add 2 tablespoons of sesame or poppy seeds to the dough for crunch.
Required Equipment for Gluten-Free Sourdough Flatbread
- Large mixing bowl
- Measuring cups and spoons
- Nonstick or cast iron skillet
- Rolling pin (optional)
- Spatula
Gluten-Free Sourdough Flatbread Storage Instructions
Cool flatbreads completely, then store in an airtight container at room temperature for up to 2 days, or refrigerate for up to 5 days. For longer storage, freeze flatbreads separated by parchment paper for up to 2 months.
Suggested Pairings & Serving Recommendations
- Serve as a wrap for grilled veggies, chicken, or falafel.
- Pair with dips like hummus, baba ganoush, or tzatziki.
- Use as a base for gluten-free pizzas or flatbread sandwiches.
Pro Tips for Gluten-Free Sourdough Flatbread Success
- For extra fluffiness, let the dough rest a bit longer (up to 1 hour) if you have time (see more tips here).
- Don’t skip the baking powder—it helps the flatbreads puff up for a lighter bite.
- Cook one at a time and keep finished flatbreads wrapped in a towel to keep them warm and pliable.
Gluten-Free Sourdough Flatbread FAQ
- Can I use a store-bought gluten-free sourdough starter?
- Yes! Just make sure it’s active and bubbly before use for the best results.
- Why is my flatbread tough or dry?
- This usually means too much flour was added, or they cooked too long. Keep the dough sticky and don’t overcook.
- Can I make these flatbreads ahead of time?
- Absolutely. Reheat in a skillet or microwave, and they’ll be soft and delicious again.
Prep Time: 10 minutes
Rest Time: 30 minutes
Cook Time: 15 minutes
Total Time: 55 minutes
Yield: 6 flatbreads

Ingredients
- 1 cup active gluten-free sourdough starter
- 1 cup gluten-free all-purpose flour
- 1/2 cup water
- 2 tablespoons olive oil
- 1 teaspoon salt
- 1/2 teaspoon baking powder
- 1 teaspoon dried herbs (optional, such as rosemary or thyme)
- Extra olive oil for cooking
Instructions
-
1In a large bowl, combine the gluten-free sourdough starter, gluten-free flour, water, olive oil, salt, and baking powder. Mix until a smooth, sticky dough forms.
-
2If desired, stir in dried herbs for extra flavor. Cover the bowl and let the dough rest for 10 minutes.
-
3Divide the dough into 6 equal portions. With wet hands, shape each portion into a ball and flatten into a round flatbread about 1/4 inch thick.
-
4Heat a non-stick skillet or griddle over medium heat and brush lightly with olive oil.
-
5Cook each flatbread for 2-3 minutes per side, or until golden brown spots appear and the bread is cooked through. Repeat with remaining dough.
-
6Serve warm as a wrap, side, or with your favorite dips.
CLICK FOR NUTRITION INFO
↑
Approximate Information for One Serving
Serving Size:
1 serving
Calories:
140cal
Protein:
2 gg
Fat:
4 gg
Saturated Fat:
0g
Trans Fat:
0g
Cholesterol:
0mg
Sodium:
0mg
Potassium:
0mg
Total Carbs:
23 gg
Fiber:
0g
Sugar:
0g
Net Carbs:
0g
Vitamin A:
0
Vitamin C:
0mg
Calcium:
0mg
Iron:
0mg
Nutrition Disclaimers
Number of total servings shown is approximate. Actual number of servings will depend on your preferred portion sizes.
Nutritional values shown are general guidelines and reflect information for 1 serving using the ingredients listed, not including any optional ingredients. Actual macros may vary slightly depending on specific brands and types of ingredients used.
To determine the weight of one serving, prepare the recipe as instructed. Weigh the finished recipe, then divide the weight of the finished recipe (not including the weight of the container the food is in) by the desired number of servings. Result will be the weight of one serving.
Did you make this recipe?
Please consider Pinning it!!