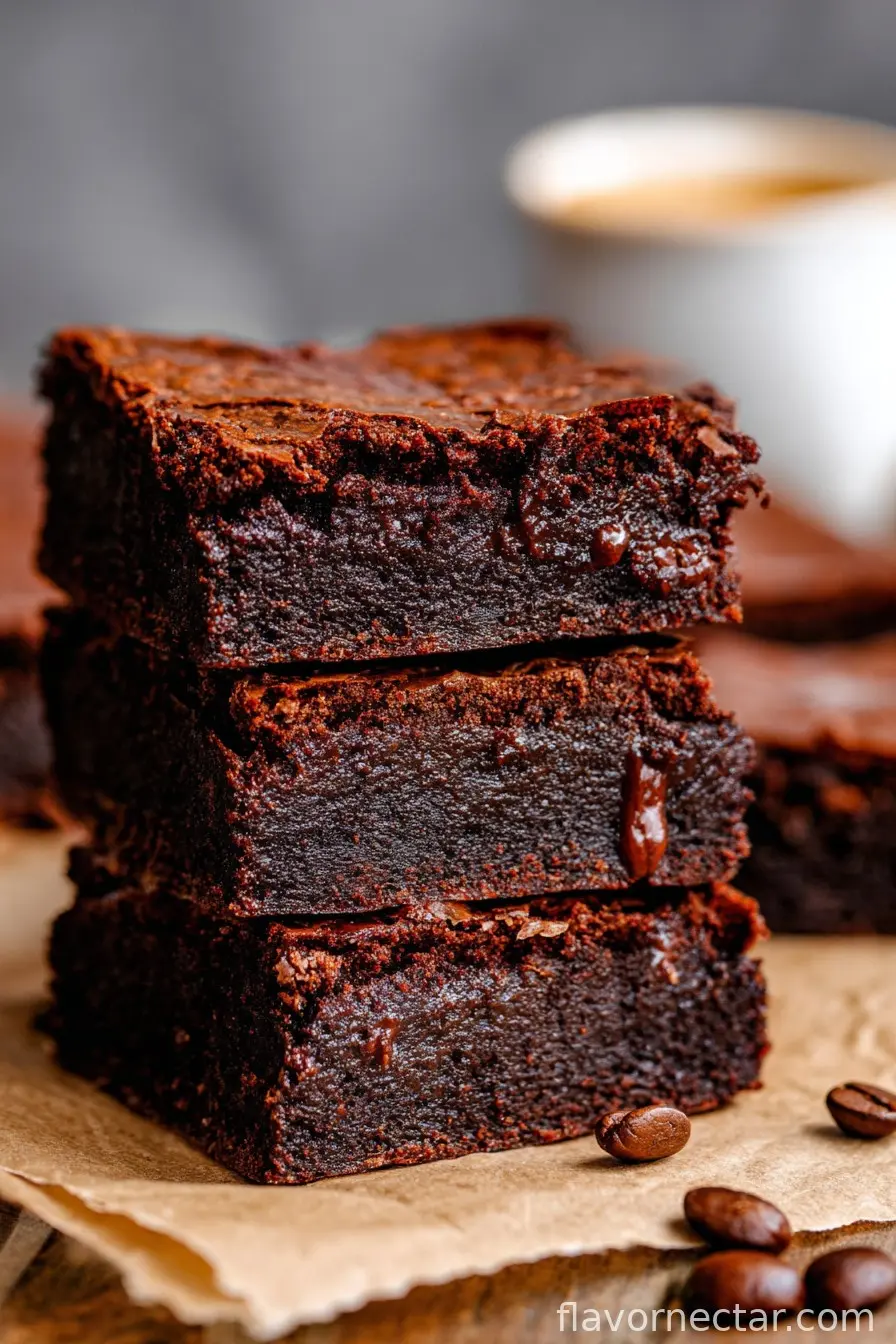
Let Me Tell You About These Espresso Brownies
I know everyone claims their Brownies are the best; honestly, I’m not going to get into an arm-wrestling contest about it, but when you need both a chocolatey hit and a jolt of coffee, these espresso Brownies are my go-to. They started as a solution to mid-afternoon energy slumps years ago (plus, coffee and chocolate together just make me grin). One time, I forgot to lock the tin, and my husband polished off the lot before I got home. Not bitter. Okay, a little bit.
Also: somehow, every time I make these, I end up covered in cocoa powder. So if you turn up to the school run looking dusted with chocolate, you’re in good company.
Why You’ll Love This (Well, At Least Why I Do)
I make these when I need to bribe myself to finish work or when my family’s hinting around for a treat (my teenager once called them “dangerously moreish”). These Brownies don’t mess around with subtlety—the espresso is there, not lingering somewhere in the background pretending to be chocolate.
Actually, if I’m craving coffee more than chocolate, I just add extra espresso powder. And, not going to lie: melting chocolate in the microwave is sometimes the only way to get it done if I’m juggling a zillion things at once.
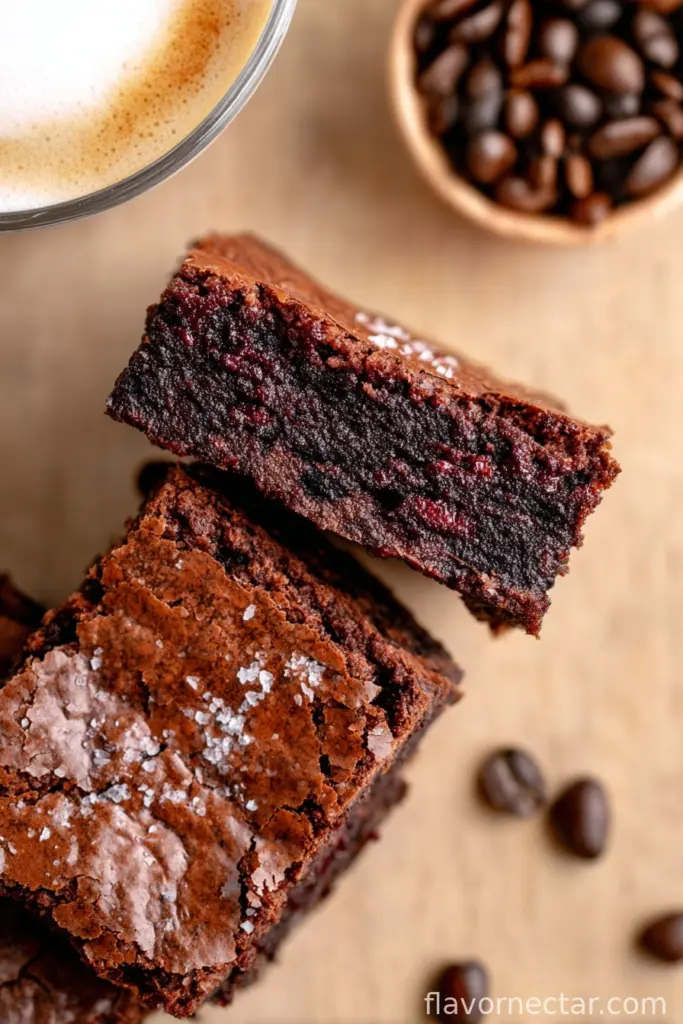
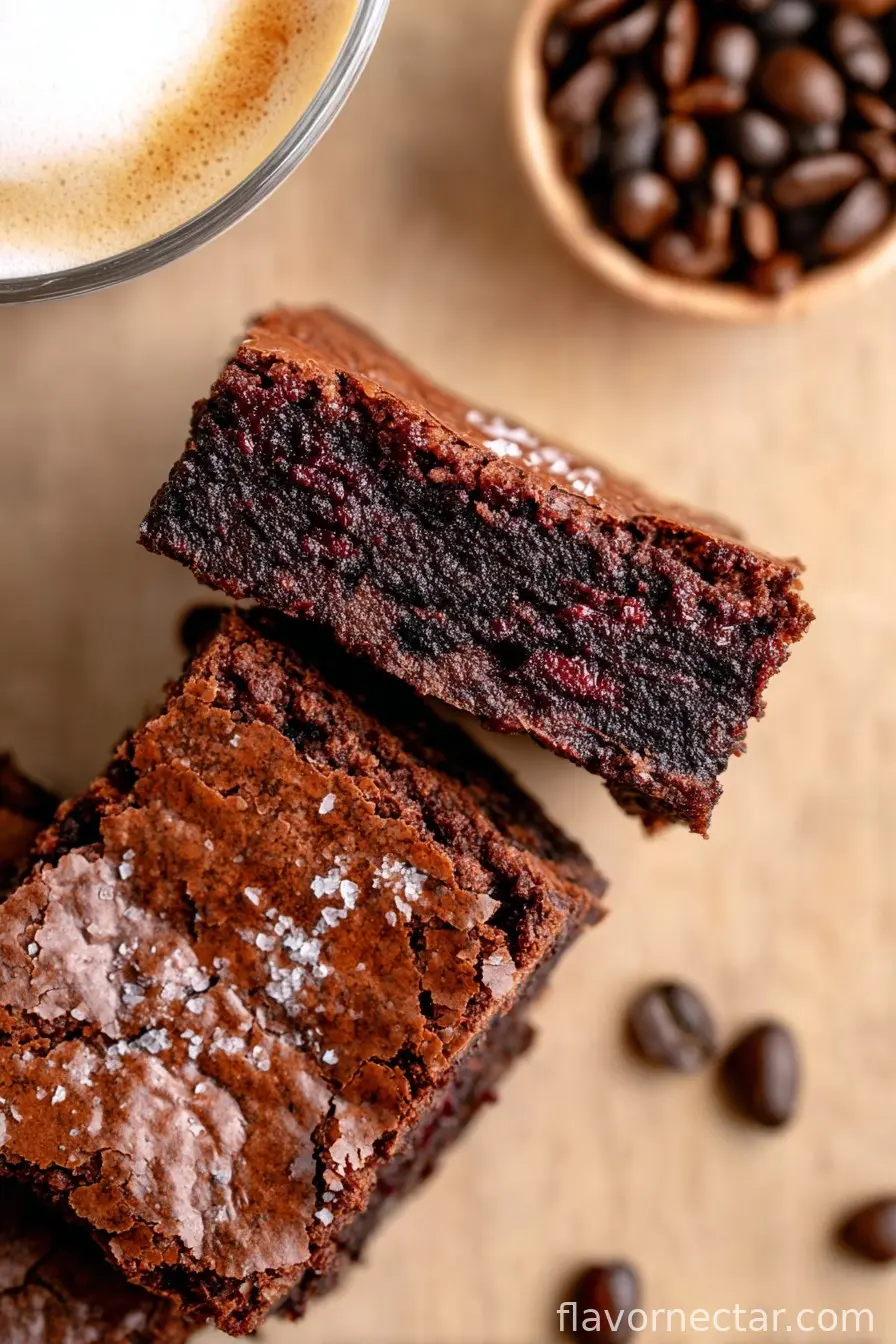
Oh, and if you ever struggled with dry brownies (worst fate), this version stays fudgy. Trust me, I hate dry brownies.
What You’ll Need (And Substitutions—Because Real Life)
- 200g dark chocolate (at least 70%—but I have totally mixed in some milk chocolate bits if cupboard stocks are low; my gran swore by Green & Black’s, but any dark stuff works)
- 115g unsalted butter (sometimes I grab salted by mistake; it’s honestly fine, just skip the extra pinch of salt)
- 3 heaped tsp instant espresso powder (I use whatever’s on offer—no need for fancy stuff; espresso granules work if you bash them up well)
- 180g granulated sugar (white or golden caster works—never tried brown, so you could experiment?)
- 2 large eggs (I once ran out and used 1 egg + 2 yolks—was richer, but a bit dense)
- 80g plain flour (just a handful—don’t overpack it; I’ve used gluten-free blend too, seemed okay)
- 30g cocoa powder (go Dutch-process if you can—supermarket stuff is fine though)
- 1 tsp vanilla extract (the good stuff if you can, otherwise, the cheapie bottle is fine)
- 1/2 tsp flaky sea salt (table salt if it’s all you have—or just skip if using salted butter)
- Optional: big handful of chocolate chips or roughly chopped hazelnuts (because, why not?)
How To Make Espresso Brownies (aka My Organized Chaos)
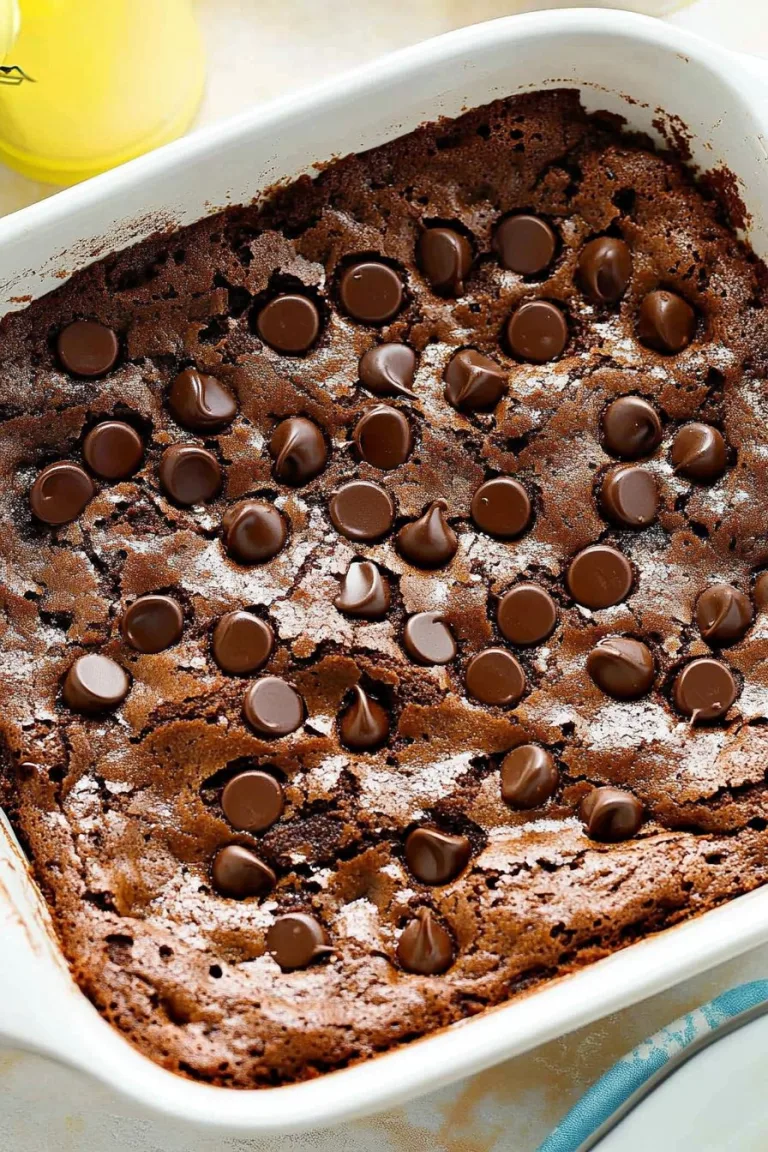
- Preheat your oven to 180°C (350°F if you’re state-side). Grease and line a 20cm square tin. Or, you know, whatever pan you can dig out from the back of the cupboard—just keep the layer thick-ish.
- Melt butter and chocolate together. Usually, I whack them in the microwave for 40-second blasts; stir between each. Or use a saucepan over low heat, then let it cool. (This is where I sometimes get impatient and burn the chocolate. Don’t be like me—keep the heat low.)
- Stir in your espresso powder—inhale deeply, it just smells so good at this point—then add in the sugar and vanilla. Here’s where I sneak a spoonful, just to, you know, check for quality.
- Beat in the eggs, one at a time. It’ll go glossy. If it looks a bit weirdly thick, don’t panic, it loosens with flour.
- Dump in flour, cocoa powder, and salt. Fold gently just until you can’t see streaks. We’re not kneading bread here, so go easy. Add in nuts or chips if you fancy.
- Pour into your tin, try to resist eating too much batter (I usually fail at this step, honestly).
- Bake for about 22-26 mins. You want a toothpick to come out with sticky crumbs (never fully clean). The middle might look a touch wobbly, but it sets as it cools. Overbake and they’re dry—done that, regretted it!
- Let cool fully in the tin before slicing (no, I don’t always wait, but it really helps with fudgy squares).
Notes: Stuff I Learned the Hard Way
- The type of sugar really does change the fudginess level, but not massively—so use what you have.
- If your espresso powder is a bit stale (happened to me once), use a smidge extra—does the job.
- I think these brownies taste better chilled the next day, but my family disagrees and eats them warm straight from the pan.
- Sometimes edges rise unevenly; just trim them off and pretend you planned to make “brownie sticks.”
Variations I’ve Tried (Some Worked, Some…Yikes)
- Swapped hazelnuts for pecans once—good, but lost the coffee vibe a bit.
- Tried a dulce de leche swirl on a whim, but it sort of melted in and looked like a mistake. Maybe it was?
- Added a teaspoon of chili powder—honestly, not my best move, unless spicy chocolate is your thing.
- Used chopped white chocolate chunks once; friends loved it, I thought it looked a bit like marble cake gone rogue!
Equipment (But Not All Strictly Necessary)
- Square baking tin—mine’s 20x20cm, but a loaf tin works in a pinch
- Microwave or saucepan for melting (done it in a bowl over a pot of simmering water too—just means more washing up)
- Big mixing bowl, spatula, whatever old wooden spoon you’ve got, and some baking paper if you actually want to get the brownies out of the tin in one piece
How to Store Them (If They Last That Long!)
Keep in an airtight tin up to 4 days at room temp (though, honestly, in my house they never last more than a day!). If you stash some in the freezer—good luck remembering where you hid them—just defrost at room temp.
Serving These Up (aka The Best Bit)
I love these with a scoop of vanilla ice cream, or, if I’m in a British mood, just a glug of warm custard. Sometimes my son stacks two with peanut butter in the middle and calls it a “brownie sandwich.” Weirdo, but it’s kind of genius.
Stuff I Wish I’d Known (Pro Tips)
- Letting the brownies cool—seriously, it’s worth it. I once rushed and ended up with a goopy mess that looked like pond mud.
- Don’t overmix the batter after adding flour unless you want cakey brownies (which is fine if that’s your jam, but I like ’em fudgy).
- And make sure you taste the batter before baking; if it’s not quite coffeeish enough, just bump up that espresso powder.
People Actually Ask Me…
Can I use brewed espresso instead of instant espresso powder?
Heh, I get this a lot. Sure, you could, but honestly it’s never coffee-strong enough unless you really reduce it—plus, your batter gets too runny. Instant’s weirdly better here.
Can I make these gluten-free?
Yep, just use a gluten-free flour blend. I don’t really notice the difference, but again, my taste buds might be odd.
Do these work with white chocolate?
Tried it. Not terrible, just a lot sweeter—not sure it’s my cup of tea (or mug of coffee, ha!).
Why do my brownies sink in the middle?
Oh man, mine do that too if I bake them too much or not enough. Just embrace the gooeyness, or slice off the edges and eat those while pretending it was intentional.
Can I leave out the espresso?
Well, you can—but then they’re just brownies, aren’t they? Which honestly is still a win.
Side note: speaking of wins, last time I made these we ate them while binge-watching a random docuseries about cheese heists. 10/10 would recommend.
Ingredients
- 1 cup unsalted butter, melted
- 1 1/4 cups granulated sugar
- 3/4 cup packed brown sugar
- 4 large eggs
- 2 tsp vanilla extract
- 1/4 cup brewed espresso, cooled
- 1 cup all-purpose flour
- 3/4 cup unsweetened cocoa powder
- 1/2 tsp salt
- 1/2 tsp baking powder
- 1 cup semisweet chocolate chips
Instructions
-
1Preheat your oven to 350°F (175°C). Grease and line an 8×8-inch baking pan with parchment paper.
-
2In a large bowl, whisk together melted butter, granulated sugar, and brown sugar until well combined.
-
3Beat in eggs one at a time, then stir in vanilla extract and cooled espresso.
-
4In a separate bowl, sift together flour, cocoa powder, salt, and baking powder. Gradually fold dry ingredients into the wet mixture until just combined.
-
5Fold in chocolate chips, then pour batter into the prepared baking pan and smooth the top.
-
6Bake for 28–32 minutes or until a toothpick inserted in the center comes out with a few moist crumbs. Allow to cool completely before slicing.
CLICK FOR NUTRITION INFO
↑
Approximate Information for One Serving
Serving Size:
1 serving
Calories:
340 caloriescal
Protein:
4gg
Fat:
17gg
Saturated Fat:
0g
Trans Fat:
0g
Cholesterol:
0mg
Sodium:
0mg
Potassium:
0mg
Total Carbs:
45gg
Fiber:
0g
Sugar:
0g
Net Carbs:
0g
Vitamin A:
0
Vitamin C:
0mg
Calcium:
0mg
Iron:
0mg
Nutrition Disclaimers
Number of total servings shown is approximate. Actual number of servings will depend on your preferred portion sizes.
Nutritional values shown are general guidelines and reflect information for 1 serving using the ingredients listed, not including any optional ingredients. Actual macros may vary slightly depending on specific brands and types of ingredients used.
To determine the weight of one serving, prepare the recipe as instructed. Weigh the finished recipe, then divide the weight of the finished recipe (not including the weight of the container the food is in) by the desired number of servings. Result will be the weight of one serving.
Did you make this recipe?
Please consider Pinning it!!