Let’s Talk Comfort: Why These Freezer Bowls Are My Weekday Savior
So, the honest truth? This recipe came to life on a week I was buried in work emails and could barely see my kitchen counter. One hectic Tuesday, I managed to toss together a few ingredients (okay, half the fridge) and the kids declared it “way better than cereal again!” Ever since, these Easy High Protein Freezer Friendly Bowls have been my go-to whenever life feels—well, more like a stampede than a gentle stroll. Plus, there’s something oddly comforting about having breakfast sorted for days. Oh, and don’t even get me started on how the dog circles my feet whenever I crisp the potatoes—pretty sure he thinks it’s snack time for him, too!
Why You’ll Love This (Or, Reasons I Make It On Repeat)
I throw these bowls together after a workout, or when my partner’s news app is firing off headlines and nobody has the energy to Discuss Dinner. My family actually gets excited (yes, excited) about eating leftovers, and that’s no small feat. I mean, it’s hearty, filling, and keeps its dignity whether it’s been in the fridge or freezer. Plus, the whole thing can be reheated by anybody who can find the microwave (a low bar in my house, trust me). And if you’ve ever suffered through bland meal prep, I swear this sausage-cheesy combo will remind you food can be fun. (Unless, of course, someone in the house “forgets” to save you a bowl. Looking at you, Sarah.)
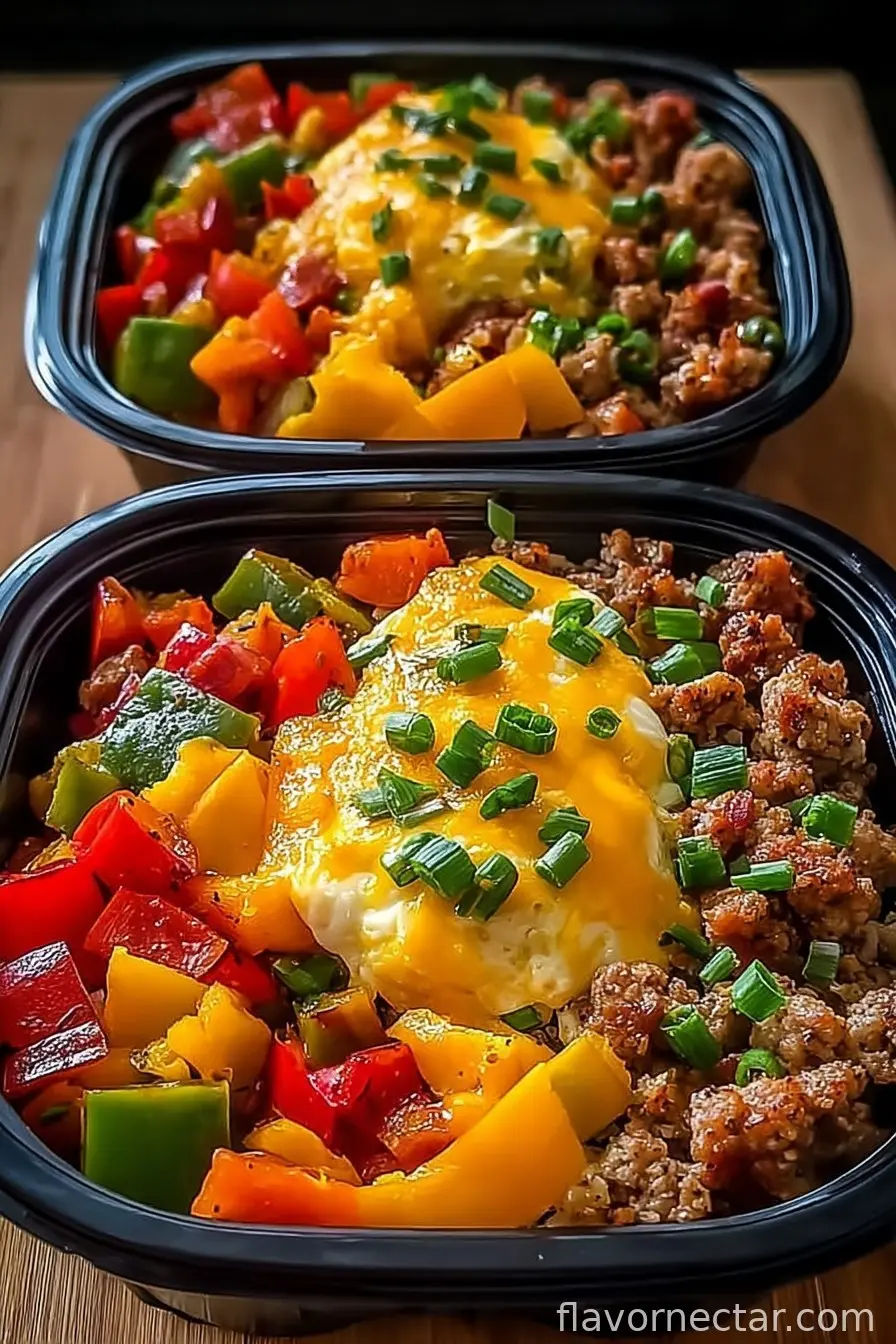
What’s In The Bowl? (And What Can I Mess With?)
- 6 large Eggs: Absolute protein heroes here. Sometimes I use extra if I’ve skipped a proper lunch (not recommending, just being real).
- 1 pound Breakfast Sausage: Classic flavor! But I’ve swapped in turkey sausage, and my vegan neighbor claims plant-based works, too. Personally, I just grab whatever’s on sale.
- 4 cups Red Potatoes, diced: You want them in small bite-sized pieces for max crispiness. If I’m in a colorful mood, I sub in sweet potato. My grandmother used to say only red potatoes were worth buying, but I think any will do if they’re not sprouting in your pantry.
- 1 cup Green Bell Pepper: Adds that little pop. Sometimes I raid the fridge and throw in yellow or red if that’s what I’ve got left. Or, you know, skip it entirely if bell peppers aren’t your thing.
- 1 cup Cheddar Cheese: Melty, sharp, glorious. I’ve tried Monterey Jack too (not bad!), and once… mozzarella, but that made things weirdly stringy.
- 1/4 cup Milk: To smooth out the eggs. I reach for almond milk when we’re out of the real stuff—nobody noticed except me.
- Salt & Pepper to taste: Measuring? Who does that? I go with a few pinches here and there.
How To Make It: Step by Step, Real Life Version
- Crank your oven to 400°F (about 200°C) while you try to clear a little space on the counter. Don’t forget to preheat—it matters, otherwise those potatoes never quite get crispy.
- Dice up your red potatoes into little cubes (think, dice-size for backgammon, not Monopoly). Toss them with a generous sprinkle of salt and pepper, then spread them all over a greased baking sheet. I sometimes use parchment when I’m not in the mood to scrub. Roast in the oven for about 20 to 25 minutes. I usually peek in and flip them around at the halfway mark—sometimes with a spatula, sometimes with a fork if that’s what I find first.
- Meanwhile, get your sausage cooking in a skillet on medium heat. Break it up with a spoon as you go. When it starts to brown and smell irresistible (the kind of thing that gets folks poking their heads into the kitchen), toss in the diced green bell pepper. Let those cook together until the pepper is a little soft—doesn’t take long, maybe 5 minutes?
- In a mixing bowl, whisk up your eggs with the milk, plus another dash of salt and pepper. I try to really get air in there, but sometimes, honestly, I’m just aiming for “well combined.” Pour the eggs into the sausage and bell pepper skillet, then scramble gently until the eggs are just barely set—they’ll keep cooking a bit once you turn off the heat. This is usually when I snag a quick taste. Quality control and all.
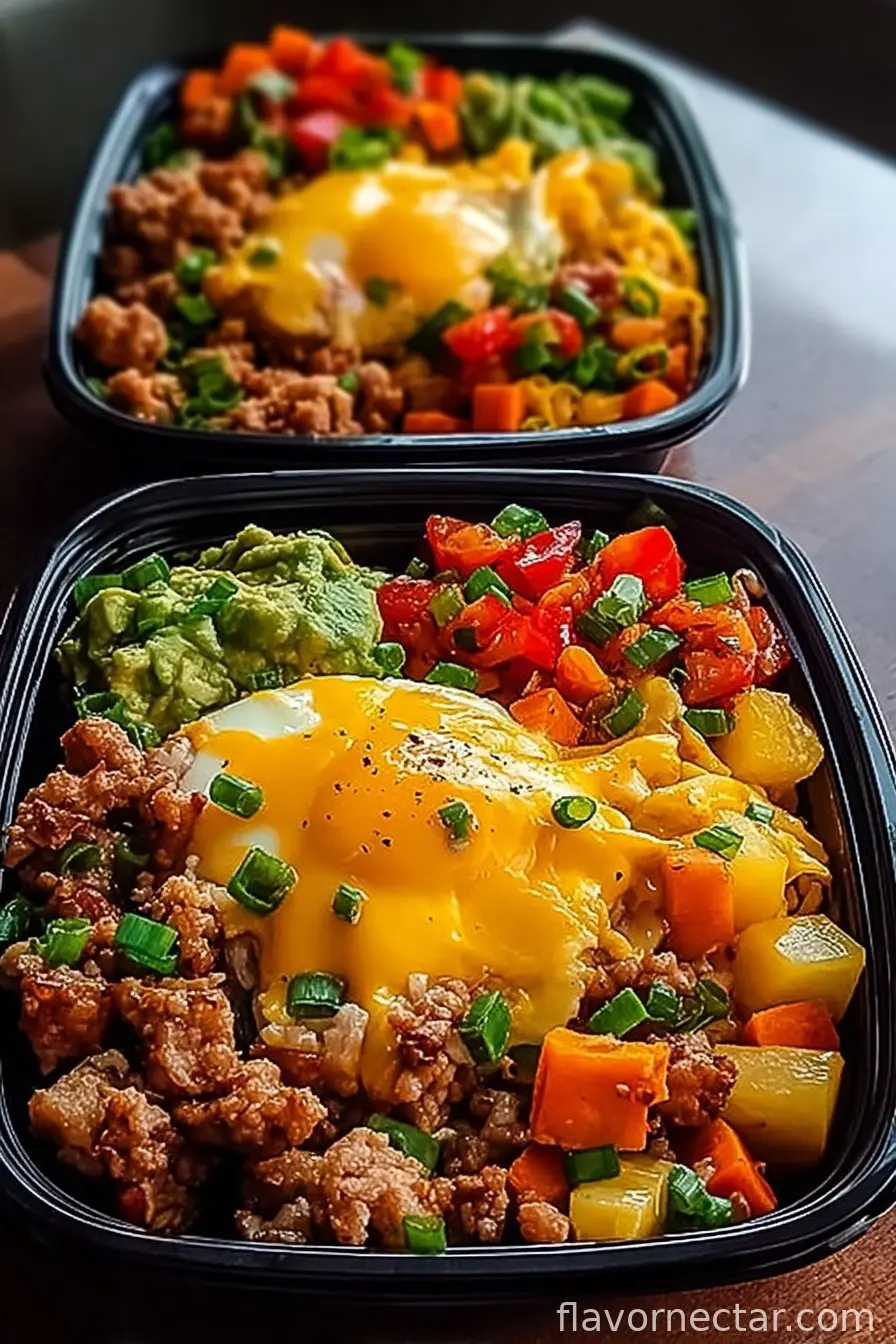
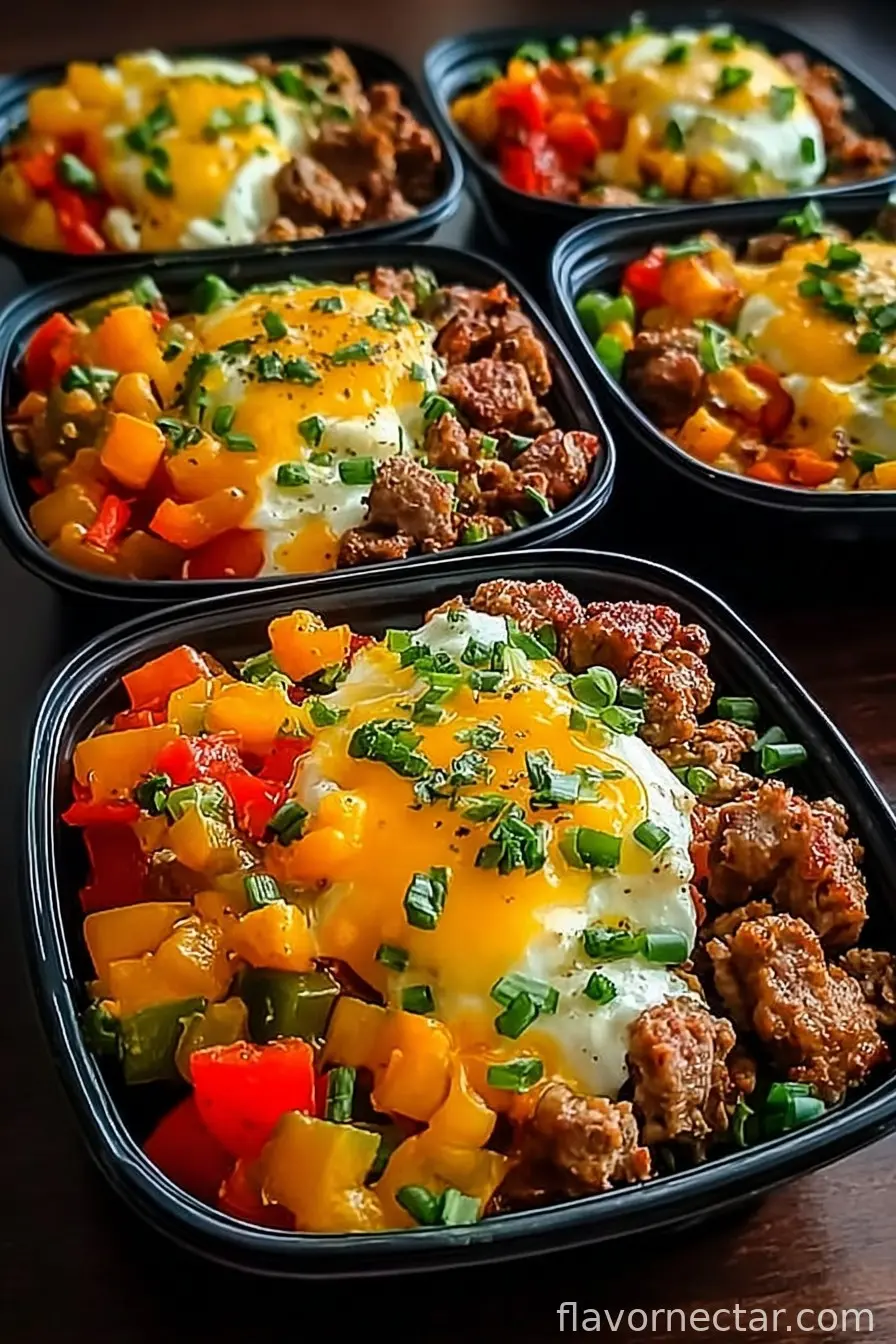
- Grab your meal prep containers and start dividing out the cooled roasted potatoes between them. Top each mound of potato with a scoop of the sausage-egg-bell pepper mixture. Don’t stress over fancy layering; it’ll all be forked together soon enough.
- Sprinkle the cheddar cheese on top of each bowl. I pile it on because I firmly believe more cheese never hurt anybody (except maybe that one time I ran out mid-sprinkle—tragedy!). Let the residual heat work its magic and get everything melty.
- Let the bowls cool off on the counter before you seal them up with airtight lids—otherwise you get that weird sweaty condensation all over the cheese. Pop them in the fridge, where they’ll be fine for about 4 days, or freeze for up to 2 months. Not that they ever last that long in our house; they vanish quick.
Scattered Notes From My Kitchen
- If you like things a little spicy, try adding a sprinkle of smoked paprika or even a dash of hot sauce with the sausage. My husband tried habanero; never again…
- For the potatoes, don’t worry if they stick a bit. I once rescued some stubborn ones with a fish spatula (use what you’ve got, right?).
- Turns out, letting the bowls cool properly really DOES keep the texture better when you reheat. I learned that after too many steamy cheese puddles.
Some Variations I’ve Survived (Good and Not-So-Good)
- I once tried these with chorizo. Flavor was amazing, but it stained every container orange. Consider yourself warned!
- Tried sneaking spinach in—nobody complained, but nobody complimented either. Maybe next time, I’ll stick to the classic vegetables.
- Add black beans if you want to bulk it up. My daughter is convinced this makes it “like a breakfast burrito in a bowl.” Sure, kid.
What If I Don’t Have The Right Tools?
No baking sheet? I’ve just used a big ovenproof pan before—took a little longer, but worked fine. And, meal prep containers can just be anything with a decent lid. I used lunchboxes once when I was really desperate.
The Truth About Storage (A Little Real Talk)
Technically, you’ll get 4 days in the fridge or 2 months zipped up tight in the freezer. But honestly, these never make it past breakfast two days later in my house. The flavor seems to get better after a night in the cold—I don’t know why, maybe some culinary magic?
How We Serve ‘Em At My Place
I usually plop a bowl in the middle of a plate (because I can’t stand microwave fingers) and toss on some sliced avocado, hot sauce, or maybe just a handful of chopped green onion. On special occasions (okay, weekends), we do these with crispy toast or even wrapped in a tortilla. Breakfast for dinner? All the time.
Little Pro Tips I Learned The Hard Way
- Don’t rush the potatoes. I once pulled them out early—they were basically steamed, not crisped. Patience really does taste better here.
- Whisk those eggs! Lumpy eggs aren’t quite as nice; get some air in there if you can.
- Let things cool before sealing. Trapped steam = soggy cheese and weird texture. Yep, learned that one (embarrassingly) late in my cooking journey.
FAQ (aka, Questions People Text While I’m Trying To Nap)
- Can I use different veggies? Sure! Just keep them bite-sized. I’ve used leftover roasted squash and it was odd, but edible.
- Do I need to thaw before reheating if I froze them? Actually, I just pop mine straight into the microwave. Extra minute or two and it’s perfect.
- Is it okay if my sausage is a bit spicy? That’s the best kind! Nothing wrong with a little morning fire (unless you’ve got little ones—use your judgment).
- How many bowls does this make? Four solid adult lunches—or six if you add sides. But who’s counting, really?
- Milk alternative works? Yep, tried and tested with almond and oat. Can barely tell a diff.
Ingredients
- 6 large Eggs the backbone of this dish, offering a hearty protein source.
- 1 pound Breakfast Sausage infuses flavor; turkey or plant-based sausage can be great alternatives.
- 4 cups Red Potatoes diced for crispy texture; sweet potatoes can be used as a twist.
- 1 cup Green Bell Pepper adds freshness and crunch; can swap colors or skip entirely.
- 1 cup Cheddar Cheese creates creamy richness; substitute with Monterey Jack if desired.
- 1/4 cup Milk smooths scrambled eggs; almond or oat milk can be dairy-free.
- to taste Salt fundamental seasoning.
- to taste Pepper fundamental seasoning.
Instructions
-
1Crank your oven to 400°F (about 200°C) while you try to clear a little space on the counter. Don’t forget to preheat—it matters, otherwise those potatoes never quite get crispy.
-
2Dice up your red potatoes into little cubes (think, dice-size for backgammon, not Monopoly). Toss them with a generous sprinkle of salt and pepper, then spread them all over a greased baking sheet. I sometimes use parchment when I’m not in the mood to scrub. Roast in the oven for about 20 to 25 minutes. I usually peek in and flip them around at the halfway mark—sometimes with a spatula, sometimes with a fork if that’s what I find first.
-
3Meanwhile, get your sausage cooking in a skillet on medium heat. Break it up with a spoon as you go. When it starts to brown and smell irresistible (the kind of thing that gets folks poking their heads into the kitchen), toss in the diced green bell pepper. Let those cook together until the pepper is a little soft—doesn’t take long, maybe 5 minutes?
-
4In a mixing bowl, whisk up your eggs with the milk, plus another dash of salt and pepper. I try to really get air in there, but sometimes, honestly, I’m just aiming for “well combined.” Pour the eggs into the sausage and bell pepper skillet, then scramble gently until the eggs are just barely set—they’ll keep cooking a bit once you turn off the heat. This is usually when I snag a quick taste. Quality control and all.
-
5Grab your meal prep containers and start dividing out the cooled roasted potatoes between them. Top each mound of potato with a scoop of the sausage-egg-bell pepper mixture. Don’t stress over fancy layering; it’ll all be forked together soon enough.
-
6Sprinkle the cheddar cheese on top of each bowl. I pile it on because I firmly believe more cheese never hurt anybody (except maybe that one time I ran out mid-sprinkle—tragedy!). Let the residual heat work its magic and get everything melty.
-
7Let the bowls cool off on the counter before you seal them up with airtight lids—otherwise you get that weird sweaty condensation all over the cheese. Pop them in the fridge, where they’ll be fine for about 4 days, or freeze for up to 2 months. Not that they ever last that long in our house; they vanish quick.
CLICK FOR NUTRITION INFO
↑
Approximate Information for One Serving
Serving Size:
1 serving
Calories:
480 caloriescal
Protein:
31gg
Fat:
28gg
Saturated Fat:
0g
Trans Fat:
0g
Cholesterol:
0mg
Sodium:
0mg
Potassium:
0mg
Total Carbs:
29gg
Fiber:
0g
Sugar:
0g
Net Carbs:
0g
Vitamin A:
0
Vitamin C:
0mg
Calcium:
0mg
Iron:
0mg
Nutrition Disclaimers
Number of total servings shown is approximate. Actual number of servings will depend on your preferred portion sizes.
Nutritional values shown are general guidelines and reflect information for 1 serving using the ingredients listed, not including any optional ingredients. Actual macros may vary slightly depending on specific brands and types of ingredients used.
To determine the weight of one serving, prepare the recipe as instructed. Weigh the finished recipe, then divide the weight of the finished recipe (not including the weight of the container the food is in) by the desired number of servings. Result will be the weight of one serving.
Did you make this recipe?
Please consider Pinning it!