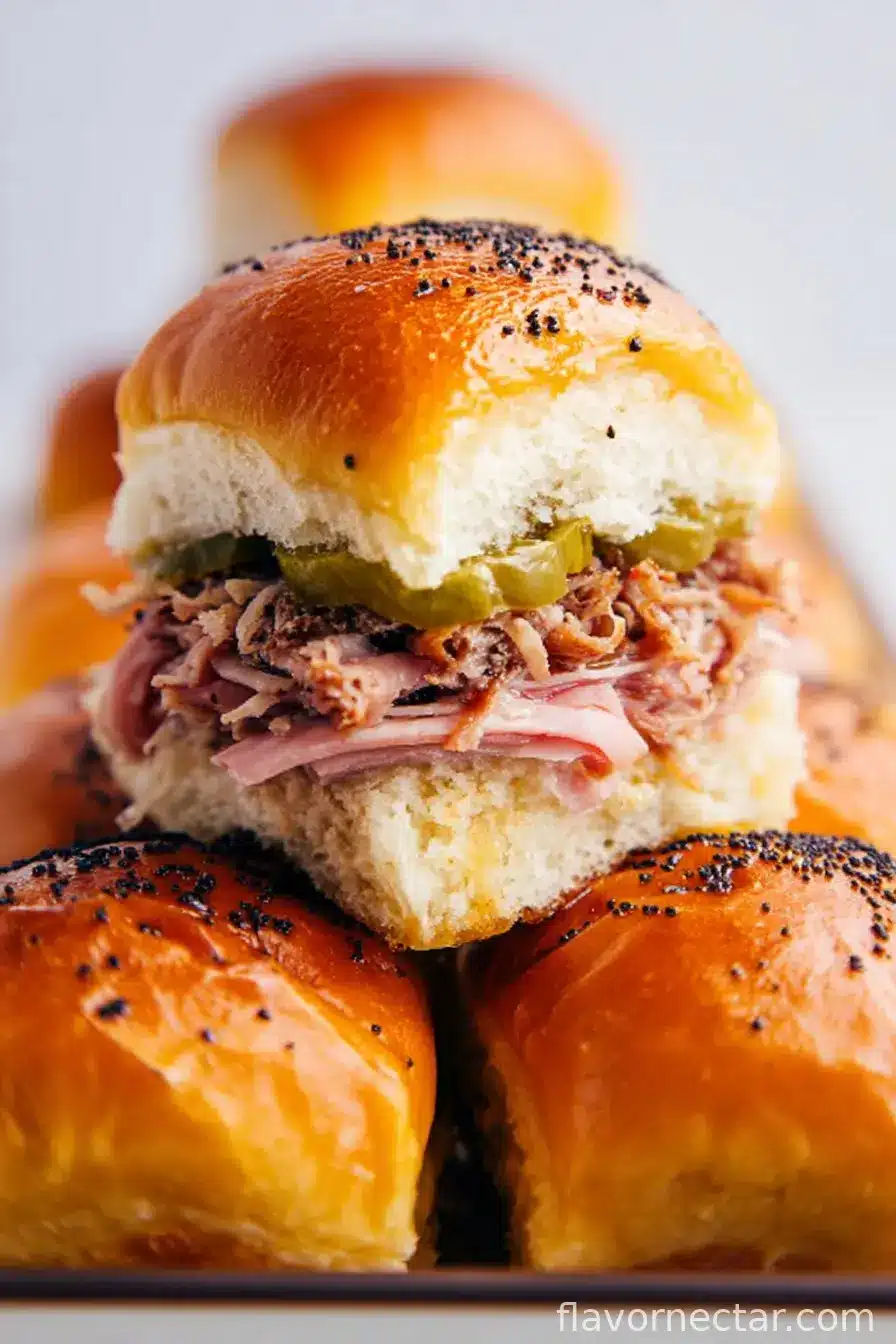
If you’ve ever craved a Cuban sandwich but didn’t want the kitchen to look like a tornado hit it…
Okay, real talk — I’ve made these Easy Cuban Sliders for everything from a lazy Saturday lunch to my cousin’s somewhat chaotic game night (he’s the type who “forgets” to bring ice and just grins about it). The first time, my sister-in-law said, “wait, you made these? They taste like real sandwiches!” so, naturally, I make them way more often now. There’s just something about melty cheese and good pickles that makes you feel like you have your act together, even if you’ve got mismatched socks and half a sink of dishes (like last Friday).
Fair warning though: the smell will make neighbors suddenly pop by. Not that I’m complaining; just be ready.
Why You’ll Love These (Other Than For Sanity)
I turn to these when I’m craving something hearty but can’t stomach the thought of turning on the grill or, honestly, doing extra dishes. My crew goes nuts for the tangy pickles and the gooey cheese — I’ll catch people sneaking extras behind my back! Oh, and if you’ve got teens who “aren’t into sandwiches anymore?” Just wait until they smell these. The best part: I can throw them together, toss them in the oven, then dance around the kitchen pretending I’m in Havana (hopefully with better salsa moves than last time… long story).
Ingredients (a little forgiving if you must improvise)
- 12 slider buns (sometimes I grab Hawaiian rolls, or just whatever’s on sale, honestly)
- 6 oz thinly sliced deli ham (you know, the everyday kind — Grandma swore by Black Forest, but I’m not as picky)
- 6 oz sliced roast pork (leftover pork is awesome, but I’ve totally used shredded rotisserie chicken when desperate)
- 6 slices Swiss cheese (or about 1.5 cups shredded, if you only have that — I’m not a cheese snob)
- 1/3 cup dill pickles, thinly sliced (got a jar of bread & butter pickles? They work too, just a bit sweeter)
- 4 tablespoons yellow mustard (Dijon works, but classic yellow reminds me of actual Cubans)
- 3 tablespoons unsalted butter, melted
- 1/2 teaspoon garlic powder
- 1/2 teaspoon poppy seeds (optional, but my daughter once said, “these make it taste fancy, Mom”)
How I Usually Throw These Together
- First, preheat your oven to 350°F (or 175°C, for those thinking metrically). No need to be exact — my old oven is finicky, and honestly, close enough is good here.
- Slice your slider buns in half horizontally (keep the tops and bottoms in big pieces — like a sandwich sheet). Try not to squish them a ton, but it happens.
- Arrange the bottom halves in a baking dish — 9×13 inches should do it, though I once squished them onto a pizza pan in a pinch. It’s fine.
- Brush the bottoms lightly with a bit of mustard (I just use a spoon and spread it like I’m painting).
- Layer on the ham, then the pork. Don’t overthink the layers — just make sure every bite gets both. This is where I sneak a piece.
- Scatter or layer on the cheese. Shredded, sliced, whatever — as long as it melts.
- Arrange the pickle slices over the cheese. Should you overlap? Up to you; I just try to get pickle on every bite (a personal pickle policy of mine).
- Slap the bun tops back on. No need to press down violently — just settle them like a cozy blanket.
- Mix up the melted butter with the rest of the mustard, garlic powder, and poppy seeds (if using). Pour or brush this over the tops like you’re giving them a little spa treatment.
- Cover with foil (otherwise the tops get super dark and, well, I’ve learned from crispy mistakes). Bake for 15 minutes, then uncover and bake for another 7 to 9ish minutes. You want the cheese melted and tops lightly golden — not brown like a shoe sole.
- Let them sit for a couple minutes — trust me, if you dive in too fast, you’ll lose cheese everywhere. Then just slice and serve. If they fall apart a bit… well, they’re still delicious. Plus, less assembling, more eating.
Things I’ve Learned (Let’s Call Them Notes)
- Brushing butter on the tops feels like overkill, but skipping it makes them just a little too dry for my taste.
- Ham and pork layering: it doesn’t have to be perfect. Actually, I think it tastes better if it’s a bit messy.
- I once tried honey mustard — but honestly, the sweetness overpowered the cheese, so I stick with classic yellow or Dijon now.
Some Variations and My Hit-and-Miss Experiments
- I once swapped pork for turkey. It was…okay, but why deny yourself? Stick with pork if you can.
- Add a thin slice of tomato if you’re feeling wild — my kid liked it, my husband didn’t (you pick).
- If pickles aren’t your jam, skip them, or swap in banana peppers for tang with a bite. Though, full honesty, my cousin called those “chaos sliders.” Kinda liked the name though.
Useful Gear – Or How to Improvise
- 9×13 inch casserole dish (but if you only have a sheet tray… line it with foil and form a little wall with a second layer — done it, works fine)
- Basting brush: fancy, but a spoon or fingers (washed!) work in a pinch
- Sharp serrated knife for slicing (though honestly, I’ve torn them apart with my hands before when no one was looking)
Storing Leftovers (If You Have Any, Which I Seldom Do)
Stick leftovers in a sealed container in the fridge — they keep for maybe 2 days. They reheat great in the oven (350°F for about 7-8 minutes does it) but, real talk, I’ve eaten them cold; still tasty. Honestly, they rarely make it past breakfast at my place.
Best Way to Serve (According to My Family)
On a big platter, with extra mustard on the side for dipping. Sometimes I’ll pile on a handful of kettle chips or, if I’m feeling ambitious, a simple green salad. The kids eat them straight out of the pan — not even kidding.
Stuff I Wish I’d Known (Pro Tips Earned the Hard Way)
- Don’t rush baking. I once pulled them too early — cheese wasn’t melted, and the buns were still pale (underwhelming, trust me).
- If you forget to tent the foil, the tops can look…erm…unceremoniously charred. Learn form me, cover them first.
- Let them rest 2-3 min before cutting — it really does help everything stay together, even if the smell makes patience impossible.
FAQ (Seriously, people ask these!)
- Can I use only ham or only pork? Yep! Use what you’ve got. All ham works. But both is the best, in my opinion.
- What if I hate Swiss cheese? Substitute provolone or even a mild cheddar. I won’t tell the cheese police.
- Do these freeze well? Sorta — they get a little soggy. I’ve done it, but reheating from frozen makes the buns a bit sad.
- Help! No poppy seeds! You can totally skip them; honestly, sometimes I forget them on purpose (less mess for the dog to lick up off the floor).
- Can I prep them ahead? Absolutely. Assemble, cover, and refrigerate, then bake when you need ’em. Maybe add 3-4 minutes extra on baking since you’ll start form cold.
- My cheese leaked out, help? It happens. Usually means they were too hot or you sliced too soon. No big deal; just scoop up the cheese and keep going.
And there you go — Easy Cuban Sliders, with all my kitchen confessions laid bare. If you try ’em, let me know what you tweak or what disaster strikes (not that I wish you disaster, but you know what I mean). Happy kitchen dancing, friend!
Ingredients
- 12 slider buns (sometimes I grab Hawaiian rolls, or just whatever’s on sale, honestly)
- 6 oz thinly sliced deli ham (you know, the everyday kind — Grandma swore by Black Forest, but I’m not as picky)
- 6 oz sliced roast pork (leftover pork is awesome, but I’ve totally used shredded rotisserie chicken when desperate)
- 6 slices Swiss cheese (or about 1.5 cups shredded, if you only have that — I’m not a cheese snob)
- 1/3 cup dill pickles, thinly sliced (got a jar of bread & butter pickles? They work too, just a bit sweeter)
- 4 tablespoons yellow mustard (Dijon works, but classic yellow reminds me of actual Cubans)
- 3 tablespoons unsalted butter, melted
- 1/2 teaspoon garlic powder
- 1/2 teaspoon poppy seeds (optional, but my daughter once said, “these make it taste fancy, Mom”)
Instructions
-
1First, preheat your oven to 350°F (or 175°C, for those thinking metrically). No need to be exact — my old oven is finicky, and honestly, close enough is good here.
-
2Slice your slider buns in half horizontally (keep the tops and bottoms in big pieces — like a sandwich sheet). Try not to squish them a ton, but it happens.
-
3Arrange the bottom halves in a baking dish — 9×13 inches should do it, though I once squished them onto a pizza pan in a pinch. It’s fine.
-
4Brush the bottoms lightly with a bit of mustard (I just use a spoon and spread it like I’m painting).
-
5Layer on the ham, then the pork. Don’t overthink the layers — just make sure every bite gets both. This is where I sneak a piece.
-
6Scatter or layer on the cheese. Shredded, sliced, whatever — as long as it melts.
-
7Arrange the pickle slices over the cheese. Should you overlap? Up to you; I just try to get pickle on every bite (a personal pickle policy of mine).
-
8Slap the bun tops back on. No need to press down violently — just settle them like a cozy blanket.
-
9Mix up the melted butter with the rest of the mustard, garlic powder, and poppy seeds (if using). Pour or brush this over the tops like you’re giving them a little spa treatment.
-
10Cover with foil (otherwise the tops get super dark and, well, I’ve learned from crispy mistakes). Bake for 15 minutes, then uncover and bake for another 7 to 9ish minutes. You want the cheese melted and tops lightly golden — not brown like a shoe sole.
-
11Let them sit for a couple minutes — trust me, if you dive in too fast, you’ll lose cheese everywhere. Then just slice and serve. If they fall apart a bit… well, they’re still delicious. Plus, less assembling, more eating.
CLICK FOR NUTRITION INFO
↑
Approximate Information for One Serving
Serving Size:
1 serving
Calories:
360 caloriescal
Protein:
18 gg
Fat:
17 gg
Saturated Fat:
0g
Trans Fat:
0g
Cholesterol:
0mg
Sodium:
0mg
Potassium:
0mg
Total Carbs:
34 gg
Fiber:
0g
Sugar:
0g
Net Carbs:
0g
Vitamin A:
0
Vitamin C:
0mg
Calcium:
0mg
Iron:
0mg
Nutrition Disclaimers
Number of total servings shown is approximate. Actual number of servings will depend on your preferred portion sizes.
Nutritional values shown are general guidelines and reflect information for 1 serving using the ingredients listed, not including any optional ingredients. Actual macros may vary slightly depending on specific brands and types of ingredients used.
To determine the weight of one serving, prepare the recipe as instructed. Weigh the finished recipe, then divide the weight of the finished recipe (not including the weight of the container the food is in) by the desired number of servings. Result will be the weight of one serving.
Did you make this recipe?
Please consider Pinning it!