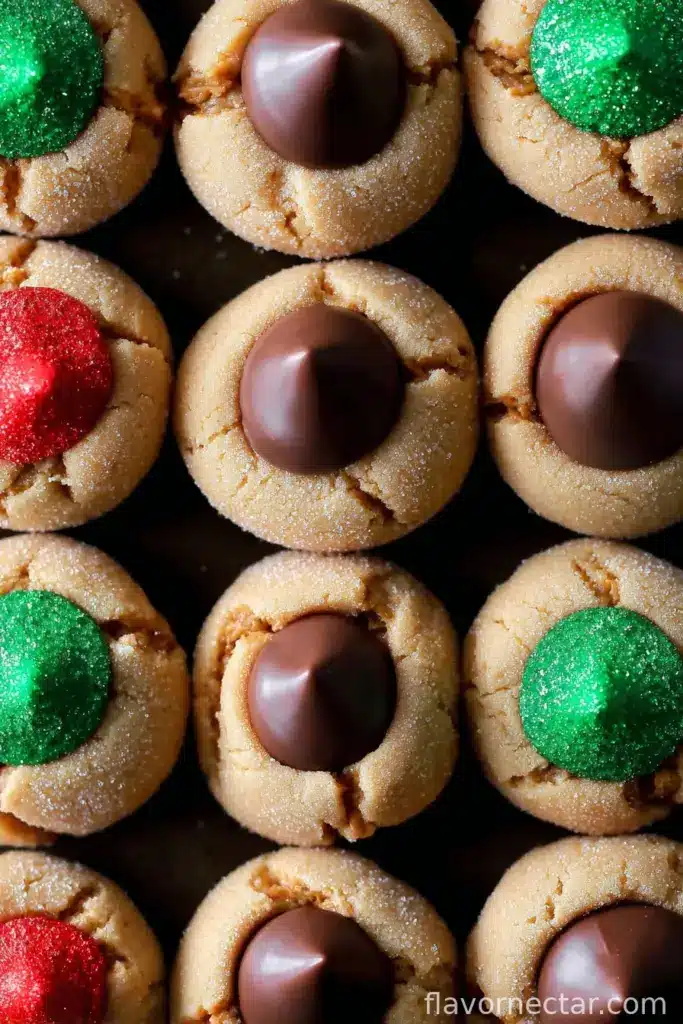
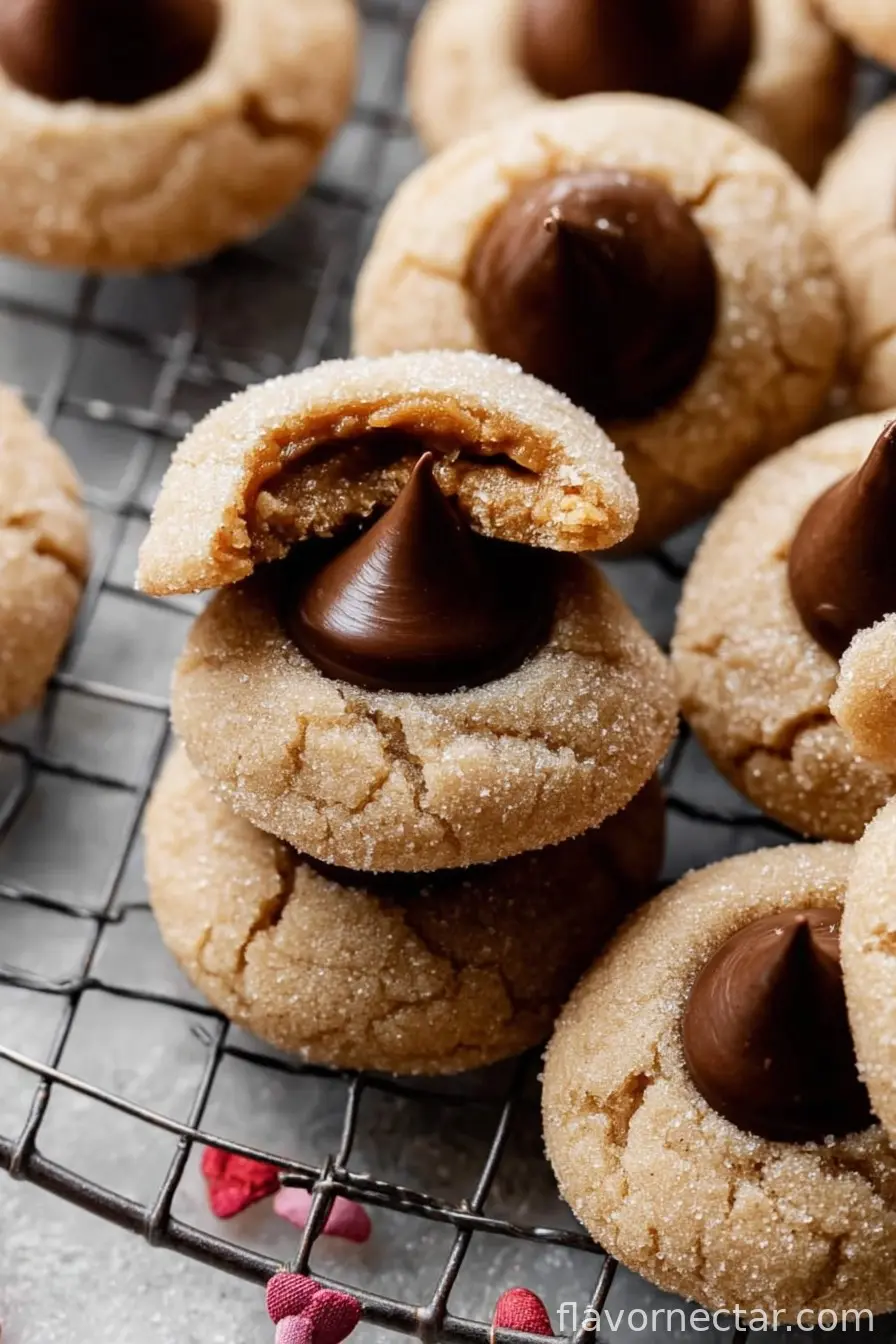
Hey, Want to Make Classic Peanut Butter Blossoms with Me?
Alright, so: Classic Peanut Butter Blossoms. If you know, you know. But let me tell you, these cookies bring me right back to winter break at my grandma’s house, the radio playing a bit too loudly (I swear she loved static) and the legendary hiss of her old oven which, honestly, probably belonged in a museum. I once tried hiding the Hershey’s Kisses behind the flour canister thinking she wouldn’t spot my little snack—didn’t work. She always knew. Anyway, if there’s any cookie that says ‘nostalgia’ to me, it’s these.
There was even this one crazy year we tried making them in July for no real reason…and I swear they tasted even better? Must’ve been some summer magic or maybe just the fact that nobody expects a Christmas cookie when it’s 95 degrees.
Why You’ll Want to Bake These (Trust Me)
I usually make these when my sanity is hanging by a thread during the holidays—like, I need something easy that everyone universally loves, even that weird cousin who puts ketchup on eggs. My family honestly goes wild for these, especially since you get a chocolatey kiss with every soft Peanut Butter cookie (which, by the way, should be its own food group, right?). Sometimes I get impatient waiting for cookies to cool, but actually, it works better if you pop the chocolate on as soon as they come out; it gets all glossy and melty. Pure heaven.
They’ve rescued me form more than one last-minute cookie exchange, and that’s saying something.
What You’ll Need (and Some Swaps I’ve Tried)
- 1/2 cup (a stick) unsalted butter, soft but not melted—sometimes I use salted if that’s what’s hanging out in the fridge
- 1/2 cup creamy Peanut Butter (Skippy is my go-to, but my grandmother would only use Jif; honestly, any kind does the trick)
- 1/2 cup granulated sugar, plus a bit extra for rolling—sometimes I just eyeball the extra, not gonna lie
- 1/2 cup packed light brown sugar (dark brown works if that’s all you have, it just adds a hint more caramel flavor)
- 1 egg
- 1 1/2 cups all-purpose flour (gluten-free mixes also work here, though the texture’s a tad different)
- 3/4 teaspoon baking soda
- 1/2 teaspoon baking powder
- 1/4 teaspoon salt (skip if you used salted butter, though it’s not a science)
- About 24-30 Hershey’s Kisses, unwrapped (or as many as you haven’t eaten already—mini Peanut Butter cups work in a pinch!)
How I Actually Make Them
- Set your oven to 375°F (or about 190°C), but I’ve done 350 in a wonky oven and survived. Line a baking sheet with parchment paper, or honestly just grease it—unless you love scrubbing pans.
- Cream the butter, Peanut Butter, granulated sugar and brown sugar together until it’s kinda fluffy—I use a hand mixer because my stand mixer is, well, somewhere in the garage. You can use a wooden spoon. Bit of a workout, but worth it.
- Add your egg and beat it in well. Then, toss in the flour, baking soda, baking powder, and salt. Mix until you can’t spot any flour streaks. This is where I always sneak a taste, no shame.
- Roll dough into small balls (like golf ball size or smaller, honestly I’ve never measured), then roll them in some extra sugar if you’re feeling fancy. Place ’em on your tray, spaced a bit apart so they’ve got room to puff up.
- Bake for about 9-11 minutes. You’re looking for pale golden-brown bottoms—they’ll puff and maybe even crack on top. Don’t panic if they look a bit weird at this point, that’s totally normal.
- As soon as they’re out (seriously, no dawdling!), press a Kiss into the center of each. It’ll squish the cookie a little—part of the charm.
- Let them hang out on the tray for 5 minutes, then transfer to a rack (or, like me, a plate balanced on top of the microwave because kitchen space is imaginary).
A Few Notes from My Many Attempts
- If they end up dry, you’ve probably baked them a hair too long. I always forget about the last batch and then just dunk them in coffee, so it’s not a lost cause.
- This dough is oddly forgiving. I’ve chilled it for 30 minutes, or not at all, and both seem fine—though it might make the balls less sticky if it’s cold.
- Oh, and don’t worry if your Kisses get melty and shiny while the cookies cool. That’s peak deliciousness, IMHO.
Honestly, You Can Switch Things Up
- I’ve swapped out Kisses for those mini peanut butter cups, and wow, that’s a peanut explosion. Big win there.
- Chunky peanut butter turns the texture a bit rustic, which I dig, but my kids, not so much. They’re creatures of habit.
- Once, I tried sprinkling sea salt on top thinking I was a genius—turns out, not my fave. But hey, live and learn!
What If You Don’t Have Fancy Equipment?
Honestly, all you really need is a bowl, a decent spoon (or a mixer if you like power tools), and a baking sheet. Don’t have a wire cooling rack? Just use a clean dish towel on your counter, works just fine. Trust me, I’ve balanced cookies on everything from cutting boards to upside-down colanders in a pinch.
How Long Do They Keep? (If They Do!)
Theoretically, kept in a tight container, these last 4-5 days at room temp. But in my house, they’re barely around for a full day, let alone enough time for me to “test” storage solutions. Still, if you end up with leftovers, they freeze pretty well—it’s just, they never make it that far in our kitchen.
How We Serve Them (And Sometimes Squabble Over Them)
I’m a big fan of pairing these with hot cocoa and, okay, sometimes a scoop of vanilla ice cream (don’t judge me, just try it). If we ever have extras at a party, I sneak one into my afternoon coffee break; it’s like a little edible hug when no one is looking.
My ‘Please Don’t Skip These’ Lessons
- Letting the cookies cool on the sheet for a couple of minutes is not just for fun. I once tried rushing them onto a rack and ended up with a hot, crumbly mess—learn form me, friends.
- If you press the Kiss in too soon, it gets gooey, but too late and it won’t stick. There’s a sweet spot. I still mess it up once in a while (oops).
Burning Questions I Get All the Time
- Can I double the recipe? Oh, absolutely! In fact, you probably should, unless you think you have more willpower than anyone I’ve ever met.
- Can I use natural peanut butter? Eh, you can, but sometimes the dough gets a bit runny—add extra flour if needed. Or just use the regular stuff if you’re not feeling like a culinary daredevil.
- Why do my cookies come out flat? That could be over-softened butter, or maybe you forgot the baking powder (I’ve done that). Start again—it happens to the best of us.
- Do I have to use Kisses? Nah, get creative! Mini peanut butter cups, Rolos, or whatever chocolate bites you’ve got hiding somewhere—have fun with it.
Oh—totally random, but if you’re looking for a foolproof hot chocolate, check out Smitten Kitchen’s killer mix. And, since I’m already thinking about Christmas, I always peek at Sally’s recipe to “compare notes”—turns out, we both sneak a few extra Kisses during baking.
Anyway, Classic Peanut Butter Blossoms might not be fancy, but they honestly never let me down. Give ‘em a go, and let me know your favorite twist!

Ingredients
- 1/2 cup unsalted butter, softened
- 3/4 cup creamy peanut butter
- 1/3 cup granulated sugar, plus extra for rolling
- 1/3 cup packed light brown sugar
- 1 large egg
- 2 tablespoons milk
- 1 teaspoon vanilla extract
- 1 1/2 cups all-purpose flour
- 1 teaspoon baking soda
- 1/2 teaspoon salt
- 24 chocolate kisses, unwrapped
Instructions
-
1Preheat oven to 375°F (190°C) and line two baking sheets with parchment paper.
-
2In a large bowl, cream together butter, peanut butter, granulated sugar, and brown sugar until light and fluffy.
-
3Beat in the egg, milk, and vanilla extract until well combined.
-
4In a separate bowl, whisk together flour, baking soda, and salt. Gradually add to the wet ingredients and mix until just combined.
-
5Shape dough into 1-inch balls and roll in extra granulated sugar. Place on prepared baking sheets about 2 inches apart.
-
6Bake for 8-10 minutes, or until the edges are set. Immediately press a chocolate kiss into the center of each cookie. Cool on baking sheets for a few minutes, then transfer to a wire rack to cool completely.
CLICK FOR NUTRITION INFO
↑
Approximate Information for One Serving
Serving Size:
1 serving
Calories:
120cal
Protein:
2 gg
Fat:
6 gg
Saturated Fat:
0g
Trans Fat:
0g
Cholesterol:
0mg
Sodium:
0mg
Potassium:
0mg
Total Carbs:
15 gg
Fiber:
0g
Sugar:
0g
Net Carbs:
0g
Vitamin A:
0
Vitamin C:
0mg
Calcium:
0mg
Iron:
0mg
Nutrition Disclaimers
Number of total servings shown is approximate. Actual number of servings will depend on your preferred portion sizes.
Nutritional values shown are general guidelines and reflect information for 1 serving using the ingredients listed, not including any optional ingredients. Actual macros may vary slightly depending on specific brands and types of ingredients used.
To determine the weight of one serving, prepare the recipe as instructed. Weigh the finished recipe, then divide the weight of the finished recipe (not including the weight of the container the food is in) by the desired number of servings. Result will be the weight of one serving.
Did you make this recipe?
Please consider Pinning it!!