The time my oven almost mutinied (but the bread was so worth it)
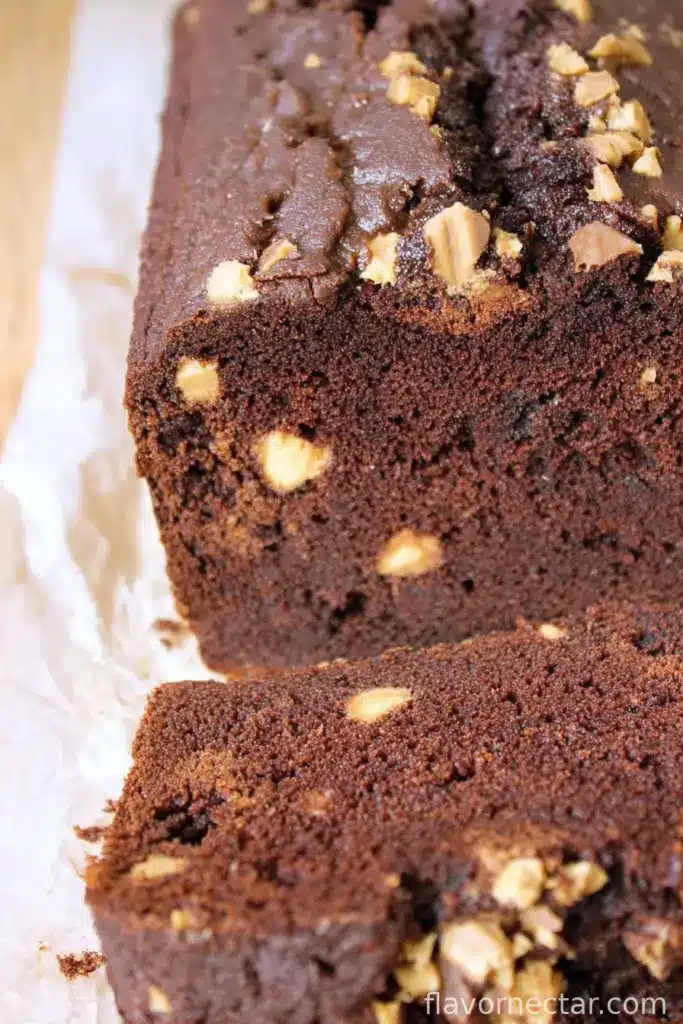
Okay, have you ever tried baking something just to relieve a bit of stress and ended up with the whole house smelling so dang good nobody even remembered what they were annoyed about? That’s exactly what happened the first time I made this Chocolate Peanut Butter Bread. My oven was being a bit, well, opinionated—temperature swinging all over the place, timer going off before it should, honestly I almost abandoned ship. But then, you get this rich, fudgy, sliceable loaf with swirls of Peanut Butter, and between mouthfuls, no one cared if the edges were a bit more “caramelized” than planned. I’m telling you, it’s a bread that forgives you for your baking sins.

Why I keep making this (even when everyone says they’re full)
I make this when someone needs cheering up or there’s nothing good left in the biscuit tin (seriously, who keeps eating all the digestives?). My family goes slightly bonkers for the combo—the kids call it “birthday breakfast bread,” which is wild because it has, like, no actual party qualities except it makes you a little too happy to eat it straight out of the tin. I also love that it’s honestly not a fussy recipe, except when I accidentally skimp on the Peanut Butter—don’t be like me, the swirl is the whole show.
What you’ll need (and what you can swap if you’re raiding the pantry)
- 1 3/4 cups (220g) plain/all-purpose flour (sometimes I’ll use half whole wheat if I’m feeling, you know, virtuous)
- 1/2 cup (45g) unsweetened cocoa powder (Dutch-process makes it richer, but regular old cocoa powder is fine—I’ve used both, depending what’s hiding in my cupboard)
- 1 cup (200g) granulated sugar (brown sugar works, too, but then it’s kind of a different flavor—still good though!)
- 2 tsp baking powder (my grandmother always insisted on the fancy brand, but just use what you have, honestly)
- 1/2 tsp baking soda
- 1/2 tsp salt (I once forgot this, don’t do that)
- 2 large eggs (I have totally used three small ones, no drama)
- 1 cup (240ml) milk (whatever you’ve got—almond, oat, whole)
- 1/3 cup (80ml) neutral oil (like vegetable, or you can honestly melt butter, which makes it extra rich)
- 2 tsp vanilla extract (never measure it, just splash—oops, did I say that?)
- 1/2 cup (120g) creamy peanut butter (crunchy is a vibe too, but makes slicing messier—up to you)
- 3/4 cup (130g) chocolate chips (I often forget these, but the kids notice every time)
How I actually make it (plus where I sneak a first taste)
- Preheat your oven to 350F (175C), and grease or line a standard loaf pan (9x5in is what I use, but once I squashed it into an 8in cake tin—don’t recommend, but no one complained).
- In a large bowl, whisk together the flour, cocoa powder, sugar, baking powder, baking soda, and salt. If you want to, sift the cocoa so you don’t end up with weird little lumps (I forget half the time; turns out fine).
- In a second bowl or big jug, whisk the eggs, milk, oil, and vanilla until smooth. Looks a bit odd at first—just keep whisking.
- Pour wet stuff into the dry, and mix gently just until no big streaks of flour are left (this is where I usually sneak a tiny bit of batter—so chocolatey).
- Fold in the chocolate chips, but don’t overdo it—otherwise your bread texture gets a bit chewy, which honestly isn’t the end of the world either.
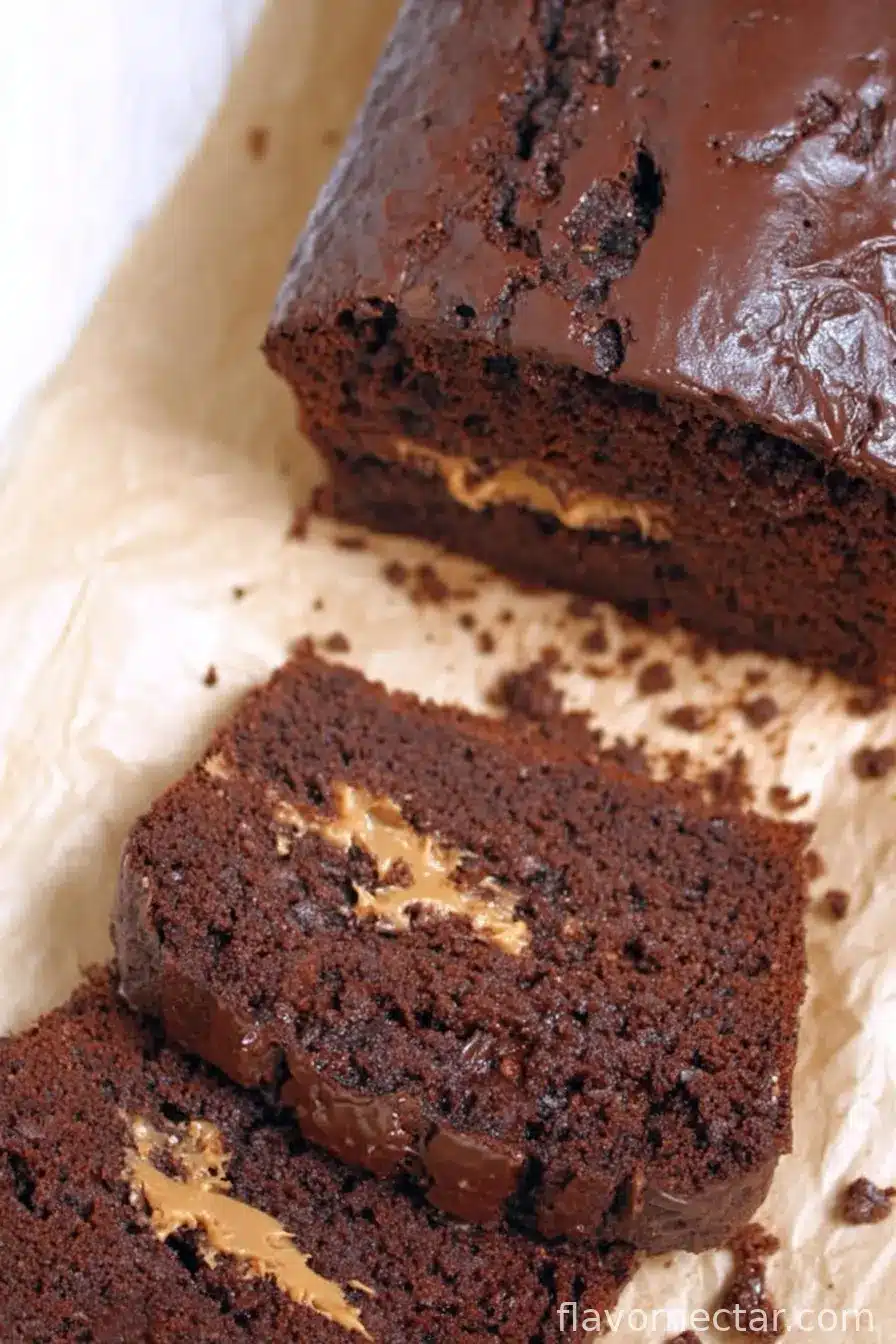
- Scoop about two-thirds of the batter into your loaf pan. Dollop big blobs of peanut butter over the surface, then add the rest of the batter on top in blobs. Run a butter knife through the whole thing, kind of swirling but not fully mixing, like you’re marbling paint at school.
- Bake 50 to 55 minutes or until a skewer stuck in the center comes out with just a few moist crumbs (don’t fret if it’s a bit gooey; underbaked > dry bread, imo).
- Let it cool in the pan for 10-15 minutes, then turn out onto a rack—or don’t, if you’re impatient like me, just slice from the pan (but the steam makes it a bit sticky, warning you now).

Notes from my slightly chaotic kitchen
- Once I tried doubling the peanut butter swirl. Made it near impossible to slice, but 10/10 gooeyness.
- If you forget to grease the pan—lift it out with parchment, but if I’m honest, I’ve pried slices out with a butterknife more times than I care to admit.
- I think this actually tastes even better the next day, though it rarely survives that long at my place.
When I went off-script (and what didn’t quite work)
- I swapped in almond butter for peanut once—still tasty, but kind of lost some punch (hazelnut spread was a sugar bomb, would not repeat unless for a kid’s sleepover maybe?).
- Tried it as muffins—baked faster, but lost the dramatic peanut butter swirl. Still snackable.
- Skipped the cocoa once (by accident!), ended up with more of a peanut butter tea bread, weird but not unwelcome.
What you actually need in the kitchen (plus a few workarounds)
- Loaf pan (in theory, but I’ve used a round cake tin and even muffin trays)
- Two mixing bowls (or in a pinch, just wash out the same one between steps—yeah, I’m lazy sometimes)
- Whisk and a wooden spoon (fork’s fine too, in a pinch; don’t stress over it)
- Parchment paper for lining, unless you’re living dangerously
How to store it (as if it sticks around…)
Tightly wrapped, it’s good for two, maybe three days at room temp; fridge buys you a couple extra, but mine never makes it past breakfast round two. Can freeze, but honestly it’s best fresh.
How I like to serve mine (and what my teens demand)
Served warm, thick slabbed, with a mug of milky coffee or—controversial—chilled with a scoop of vanilla ice cream. My youngest dunks it in chocolate milk, which I thought was bonkers until I tried it myself. Party trick? Make tiny open-faced sandwiches with extra peanut butter.
A few hard-won lessons (so you don’t repeat my errors)
- That swirl step? Don’t over-mix or you’ll get muddy bread instead of a marbled look. Trust, I’ve ruined a loaf or three.
- If you try to skip cooling, it kind of falls apart (but warm bread is its own reward, so, your call).
- Be generous with the peanut butter blobs; skimping there really does matter. I once went light and everyone noticed.
FAQ—Because people do ask!
Can I make it dairy-free? Yes! Use your favorite non-dairy milk (almond, oat, whatever’s on sale), and chocolate chips that don’t sneak in milk fat. Done.
Why does my bread sometimes sink? Usually it’s from too much liquid, or maybe even opening the oven too early (guilty). Also, expired baking powder—who knew that had a shelf life?
Do I need an electric mixer? Nope. In fact, I’ve made this with just a fork and some elbow grease. Actually, it turns out lighter if you just mix by hand, in my opinion.
Is this sweet enough for dessert? For me, yes! But if you want something more cake-like, bump up the sugar and scatter sugar on top before baking. Oh and on second thought, a drizzle of melted chocolate post-bake doesn’t hurt.
Can I freeze this? Absolutely. Just wrap tightly. Thaw at room temp. (Microwaving a slice for ten seconds is *chef’s kiss*.)
If there’s anything else you want to know, just shout. Or, if you discover a way to make it less addictive, send help.
Ingredients
- 1 3/4 cups (220g) plain/all-purpose flour (sometimes I’ll use half whole wheat if I’m feeling, you know, virtuous)
- 1/2 cup (45g) unsweetened cocoa powder (Dutch-process makes it richer, but regular old cocoa powder is fine—I’ve used both, depending what’s hiding in my cupboard)
- 1 cup (200g) granulated sugar (brown sugar works, too, but then it’s kind of a different flavor—still good though!)
- 2 tsp baking powder (my grandmother always insisted on the fancy brand, but just use what you have, honestly)
- 1/2 tsp baking soda
- 1/2 tsp salt (I once forgot this, don’t do that)
- 2 large eggs (I have totally used three small ones, no drama)
- 1 cup (240ml) milk (whatever you’ve got—almond, oat, whole)
- 1/3 cup (80ml) neutral oil (like vegetable, or you can honestly melt butter, which makes it extra rich)
- 2 tsp vanilla extract (never measure it, just splash—oops, did I say that?)
- 1/2 cup (120g) creamy peanut butter (crunchy is a vibe too, but makes slicing messier—up to you)
- 3/4 cup (130g) chocolate chips (I often forget these, but the kids notice every time)
Instructions
-
1Preheat your oven to 350F (175C), and grease or line a standard loaf pan (9x5in is what I use, but once I squashed it into an 8in cake tin—don’t recommend, but no one complained).
-
2In a large bowl, whisk together the flour, cocoa powder, sugar, baking powder, baking soda, and salt. If you want to, sift the cocoa so you don’t end up with weird little lumps (I forget half the time; turns out fine).
-
3In a second bowl or big jug, whisk the eggs, milk, oil, and vanilla until smooth. Looks a bit odd at first—just keep whisking.
-
4Pour wet stuff into the dry, and mix gently just until no big streaks of flour are left (this is where I usually sneak a tiny bit of batter—so chocolatey).
-
5Fold in the chocolate chips, but don’t overdo it—otherwise your bread texture gets a bit chewy, which honestly isn’t the end of the world either.
-
6Scoop about two-thirds of the batter into your loaf pan. Dollop big blobs of peanut butter over the surface, then add the rest of the batter on top in blobs. Run a butter knife through the whole thing, kind of swirling but not fully mixing, like you’re marbling paint at school.
-
7Bake 50 to 55 minutes or until a skewer stuck in the center comes out with just a few moist crumbs (don’t fret if it’s a bit gooey; underbaked > dry bread, imo).
-
8Let it cool in the pan for 10-15 minutes, then turn out onto a rack—or don’t, if you’re impatient like me, just slice from the pan (but the steam makes it a bit sticky, warning you now).
CLICK FOR NUTRITION INFO
↑
Approximate Information for One Serving
Serving Size:
1 serving
Calories:
310 caloriescal
Protein:
7 gg
Fat:
15 gg
Saturated Fat:
0g
Trans Fat:
0g
Cholesterol:
0mg
Sodium:
0mg
Potassium:
0mg
Total Carbs:
39 gg
Fiber:
0g
Sugar:
0g
Net Carbs:
0g
Vitamin A:
0
Vitamin C:
0mg
Calcium:
0mg
Iron:
0mg
Nutrition Disclaimers
Number of total servings shown is approximate. Actual number of servings will depend on your preferred portion sizes.
Nutritional values shown are general guidelines and reflect information for 1 serving using the ingredients listed, not including any optional ingredients. Actual macros may vary slightly depending on specific brands and types of ingredients used.
To determine the weight of one serving, prepare the recipe as instructed. Weigh the finished recipe, then divide the weight of the finished recipe (not including the weight of the container the food is in) by the desired number of servings. Result will be the weight of one serving.
Did you make this recipe?
Please consider Pinning it!