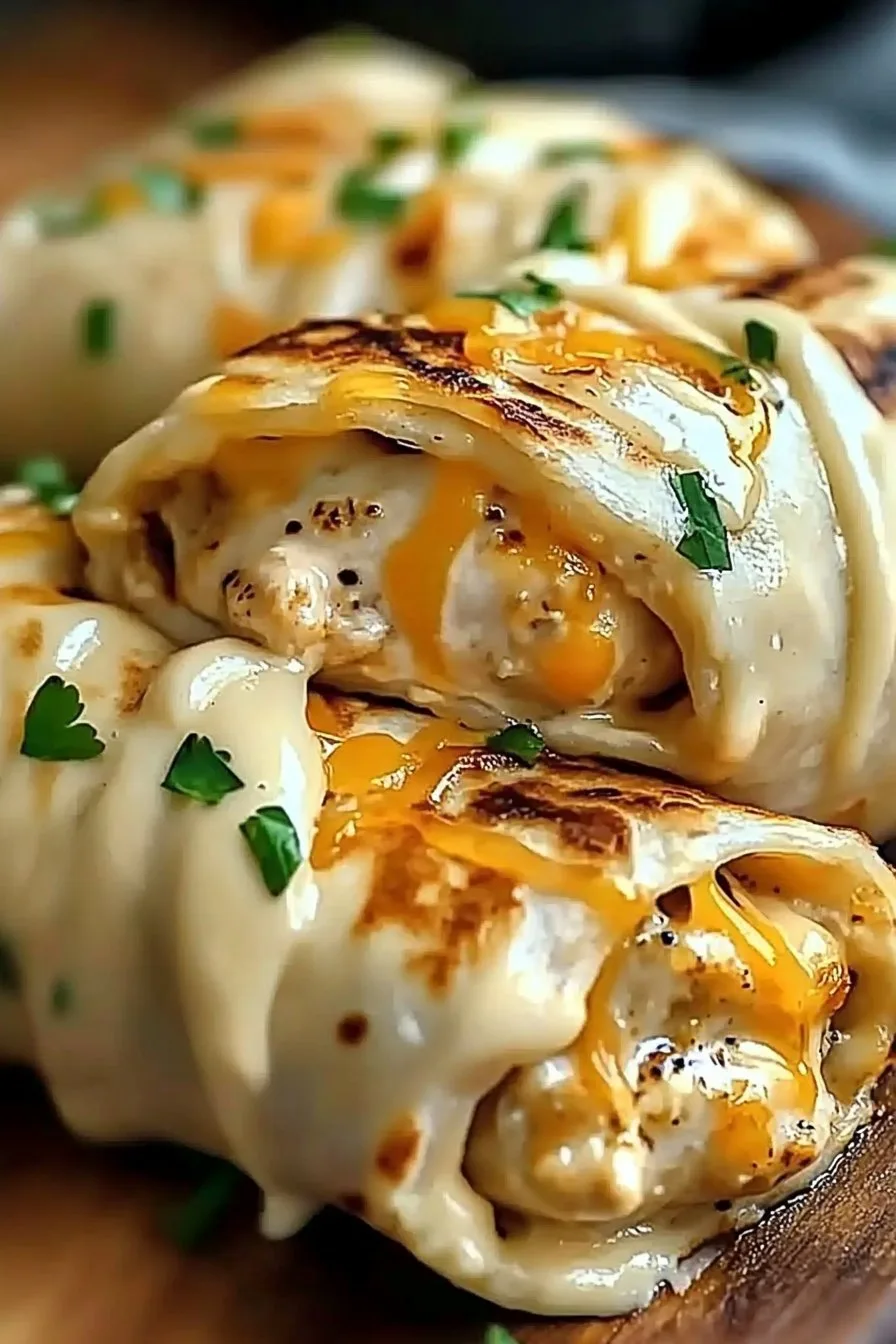
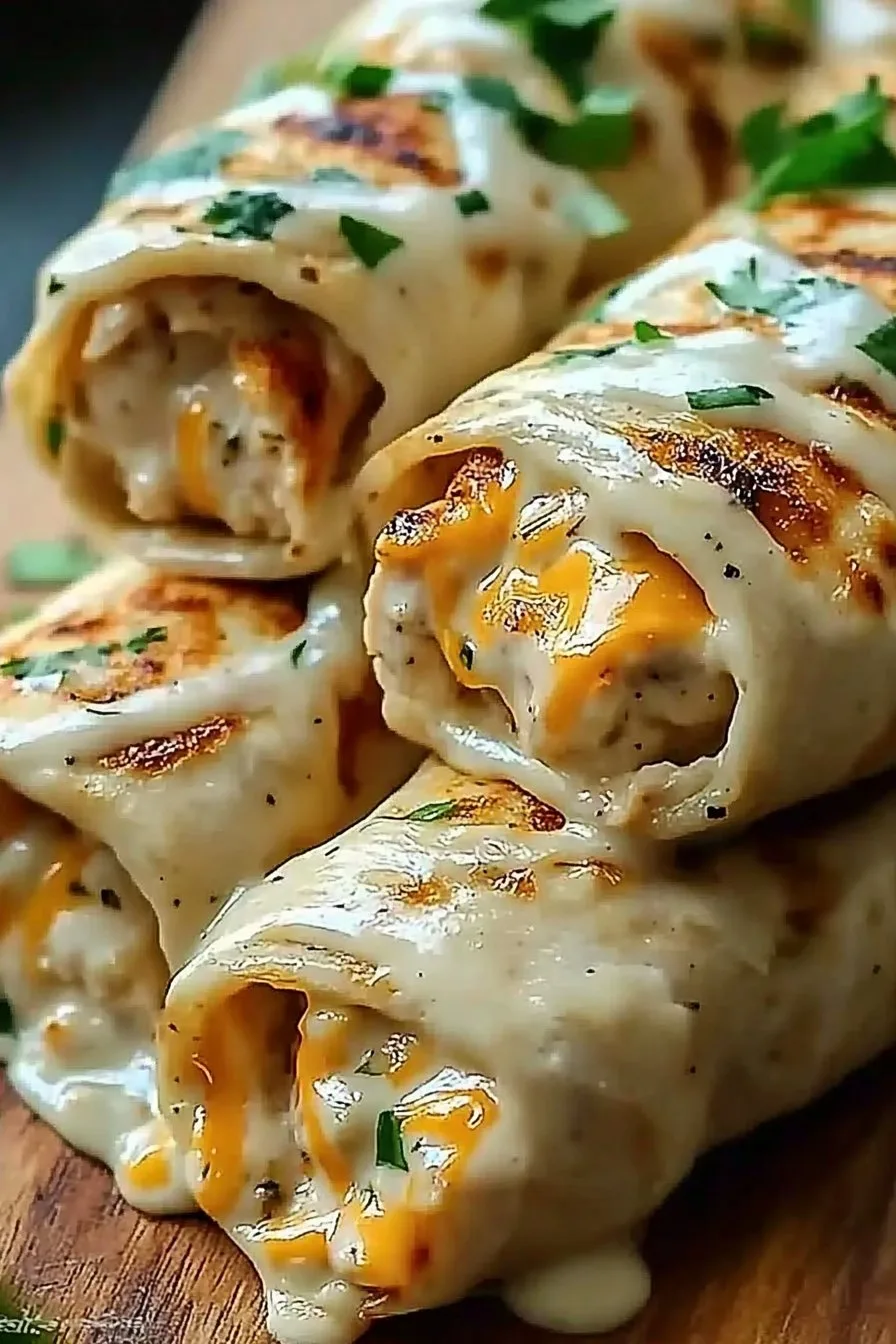
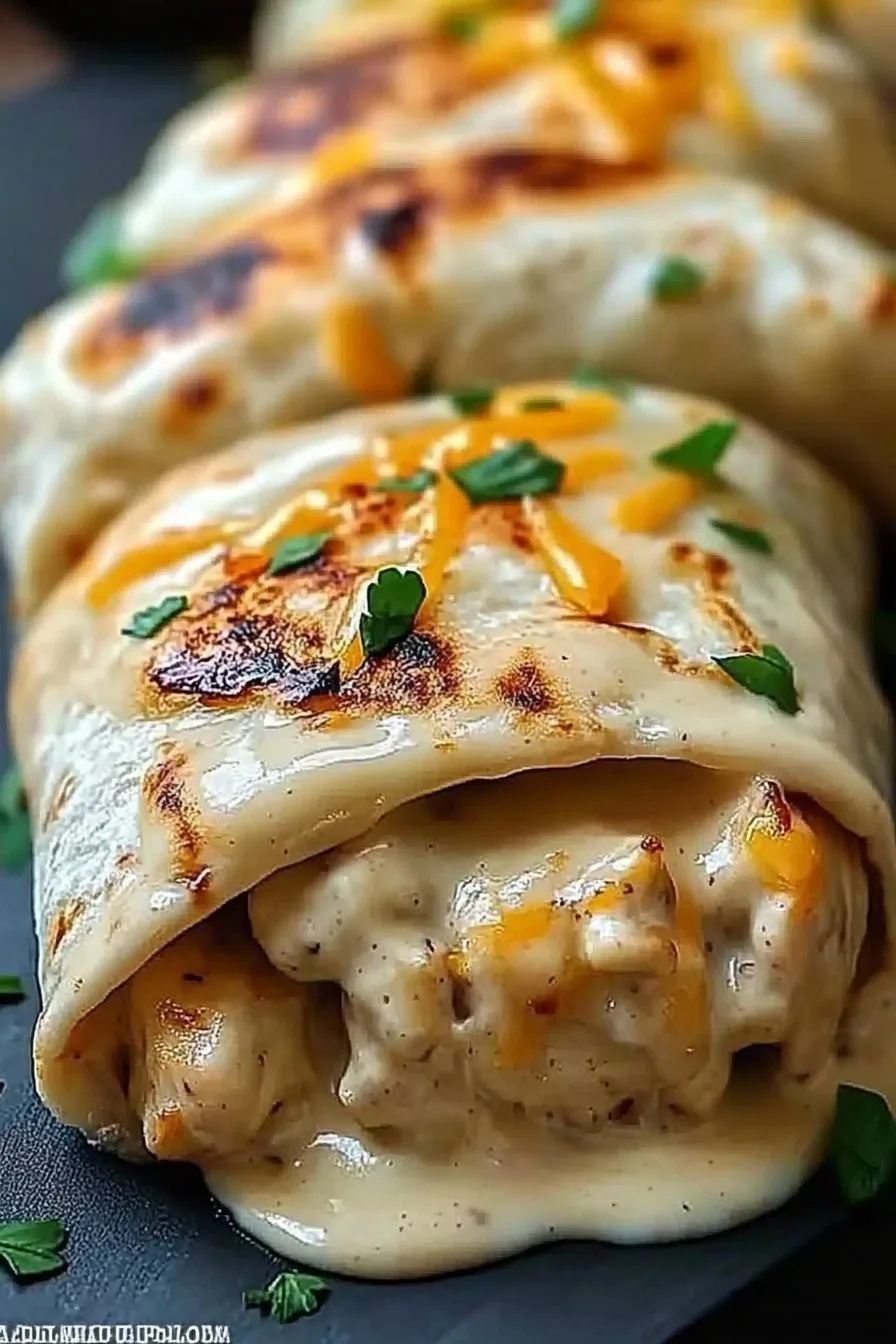
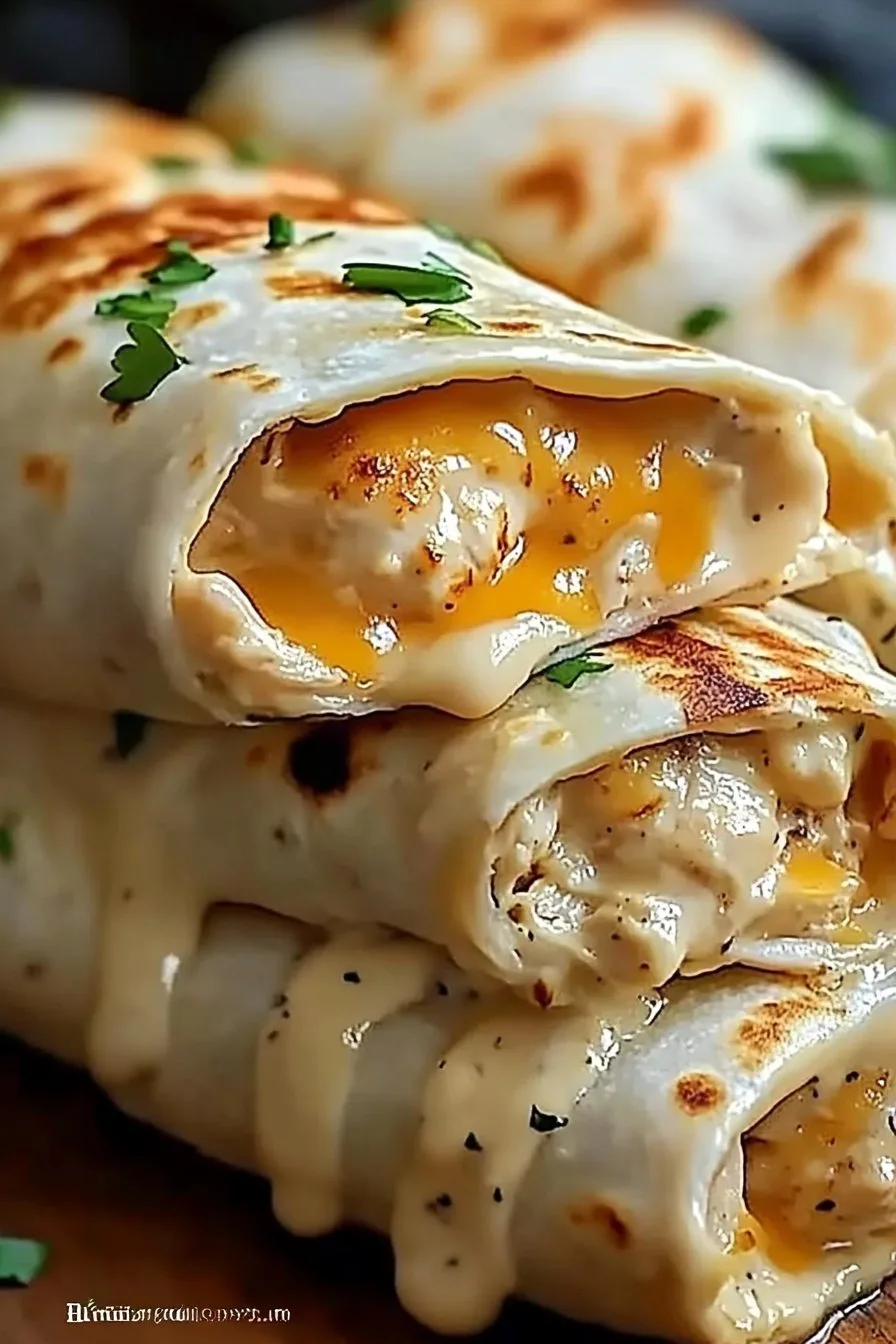
Hey y’all! If you’re hunting for an easy, crave-worthy meal that works for busy weeknights, picnics, or game-day bites, these Cheesy Garlic Chicken Wraps are about to be your new go-to. We’re talking juicy seasoned chicken, garlicky goodness, and loads of melty cheese all rolled into a soft tortilla—what’s not to love? Whether you’re feeding a crew or just treating yourself, this recipe hits every comfort food note. Let’s get cooking!
Why You’ll Love This Cheesy Garlic Chicken Wraps Recipe
- Super quick and simple—ready in under 30 minutes.
- Loaded with melty cheese and zesty garlic flavor in every bite.
- Perfect as a main, snack, or party appetizer.
- Easily customizable to suit your taste and dietary needs.
- Kid-friendly and ideal for meal prepping ahead of time.
Cheesy Garlic Chicken Wraps Ingredients
- 2 large boneless, skinless chicken breasts (about 1 lb)
- 1 tablespoon olive oil
- 1 teaspoon garlic powder
- 2 cloves garlic, minced
- 1/2 teaspoon smoked paprika
- 1/2 teaspoon salt
- 1/4 teaspoon black pepper
- 1 cup shredded mozzarella cheese
- 1/2 cup shredded cheddar cheese
- 1/4 cup grated Parmesan cheese
- 4 large flour tortillas (10-inch)
- 2 tablespoons unsalted butter, melted
- 2 tablespoons chopped fresh parsley (optional, for garnish)
How to Make Cheesy Garlic Chicken Wraps: Step-by-Step Directions
Step 1: Prep and Cook the Chicken
- Slice the chicken breasts into thin strips for even cooking.
- In a large skillet, heat olive oil over medium-high heat.
- Add the chicken strips, garlic powder, minced garlic, smoked paprika, salt, and pepper.
- Cook for 6-8 minutes, stirring occasionally, until chicken is golden and cooked through (internal temp 165°F/74°C).
- Remove from heat and let cool slightly.
Step 2: Assemble the Cheesy Garlic Chicken Wraps
- Lay out the tortillas on a clean surface.
- Divide the cooked chicken evenly among each tortilla, placing it in the center.
- Sprinkle mozzarella, cheddar, and Parmesan cheese over the chicken for ultra-cheesy flavor.
- Fold the sides in and roll up each tortilla tightly into a wrap.
Step 3: Toast the Wraps
- Brush the wraps with melted butter for golden color and extra garlic flavor.
- Heat a non-stick skillet or grill pan over medium heat.
- Place the wraps seam-side down and toast for 2-3 minutes per side, or until crispy and cheese is melted.
- Garnish with chopped fresh parsley if desired. Slice and serve warm!
Notes for the Best Cheesy Garlic Chicken Wraps
- For best results, use freshly shredded cheese—it melts better than pre-shredded. Learn how to shred cheese easily.
- Let the chicken cool just slightly before assembling to prevent soggy tortillas.
- If you love extra garlicky flavor, rub the inside of each tortilla with a cut garlic clove before filling.
Cheesy Garlic Chicken Wraps Variations
- Spicy Kick: Add sliced jalapeños or a dash of hot sauce to the filling.
- Greek Style: Swap cheddar for feta, and add sliced olives and diced tomatoes.
- Veggie Boost: Throw in sautéed bell peppers, spinach, or mushrooms for extra nutrition.
Equipment Needed for Cheesy Garlic Chicken Wraps
- Large non-stick skillet or grill pan
- Mixing bowls
- Sharp knife and cutting board
- Measuring spoons and cups
- Spatula or tongs
Storing Cheesy Garlic Chicken Wraps
- Let wraps cool completely before storing.
- Wrap tightly in foil or plastic wrap and refrigerate for up to 3 days.
- Reheat in a skillet or toaster oven for best texture; microwaving may soften the tortilla.
Serving Suggestions & Pairings for Cheesy Garlic Chicken Wraps
- Serve with a side of crisp salad, roasted veggies, or classic potato wedges.
- Pair with garlic aioli, ranch, or spicy sriracha mayo for dipping.
- Enjoy with a refreshing iced tea or sparkling lemonade for a complete meal.
Pro Tips for Cheesy Garlic Chicken Wraps
- For ultimate crispiness, weigh down the wraps with a heavy pan while toasting.
- Use rotisserie chicken for an even faster meal—just toss with garlic and spices before filling. For more time-saving tips, check out these ideas from Bon Appétit.
- Warm the tortillas before rolling to prevent cracking—wrap in a damp paper towel and microwave for 15 seconds. More quick cooking tips here.
Cheesy Garlic Chicken Wraps FAQ
- Can I use pre-cooked chicken for this recipe?
- Absolutely! Just shred or chop, then toss with garlic and seasonings before assembling.
- Can I freeze Cheesy Garlic Chicken Wraps?
- Yes, wrap tightly and freeze for up to 2 months. Thaw overnight in the fridge and reheat in a skillet.
- Are there low-carb alternatives to flour tortillas?
- Yes, swap flour tortillas for low-carb wraps or large lettuce leaves for a lighter version.
Prep Time: 10 minutes
Cook Time: 15 minutes
Total Time: 25 minutes
Servings: 4 wraps
Ingredients
- 2 cups cooked chicken breast, shredded
- 1 cup shredded mozzarella cheese
- 1/2 cup shredded cheddar cheese
- 4 large flour tortillas
- 2 tablespoons unsalted butter
- 3 cloves garlic, minced
- 1/4 cup mayonnaise
- 1 tablespoon chopped fresh parsley
- Salt and black pepper to taste
Instructions
-
1In a small skillet, melt the butter over medium heat. Add the minced garlic and sauté for 1-2 minutes until fragrant. Remove from heat and let cool slightly.
-
2In a large bowl, combine the shredded chicken, mozzarella cheese, cheddar cheese, mayonnaise, parsley, and the sautéed garlic butter. Season with salt and black pepper to taste. Mix well.
-
3Lay out the flour tortillas on a clean surface. Divide the chicken mixture evenly among the tortillas, placing it in the center of each.
-
4Fold in the sides of each tortilla and roll them up tightly to form wraps.
-
5Heat a large non-stick skillet over medium heat. Place the wraps seam-side down and cook for 2-3 minutes per side, or until golden brown and the cheese is melted.
-
6Slice the wraps in half and serve warm, garnished with extra parsley if desired.
CLICK FOR NUTRITION INFO
↑
Approximate Information for One Serving
Serving Size:
1 serving
Calories:
420 caloriescal
Protein:
28gg
Fat:
22gg
Saturated Fat:
0g
Trans Fat:
0g
Cholesterol:
0mg
Sodium:
0mg
Potassium:
0mg
Total Carbs:
28gg
Fiber:
0g
Sugar:
0g
Net Carbs:
0g
Vitamin A:
0
Vitamin C:
0mg
Calcium:
0mg
Iron:
0mg
Nutrition Disclaimers
Number of total servings shown is approximate. Actual number of servings will depend on your preferred portion sizes.
Nutritional values shown are general guidelines and reflect information for 1 serving using the ingredients listed, not including any optional ingredients. Actual macros may vary slightly depending on specific brands and types of ingredients used.
To determine the weight of one serving, prepare the recipe as instructed. Weigh the finished recipe, then divide the weight of the finished recipe (not including the weight of the container the food is in) by the desired number of servings. Result will be the weight of one serving.
Did you make this recipe?
Please consider Pinning it!!