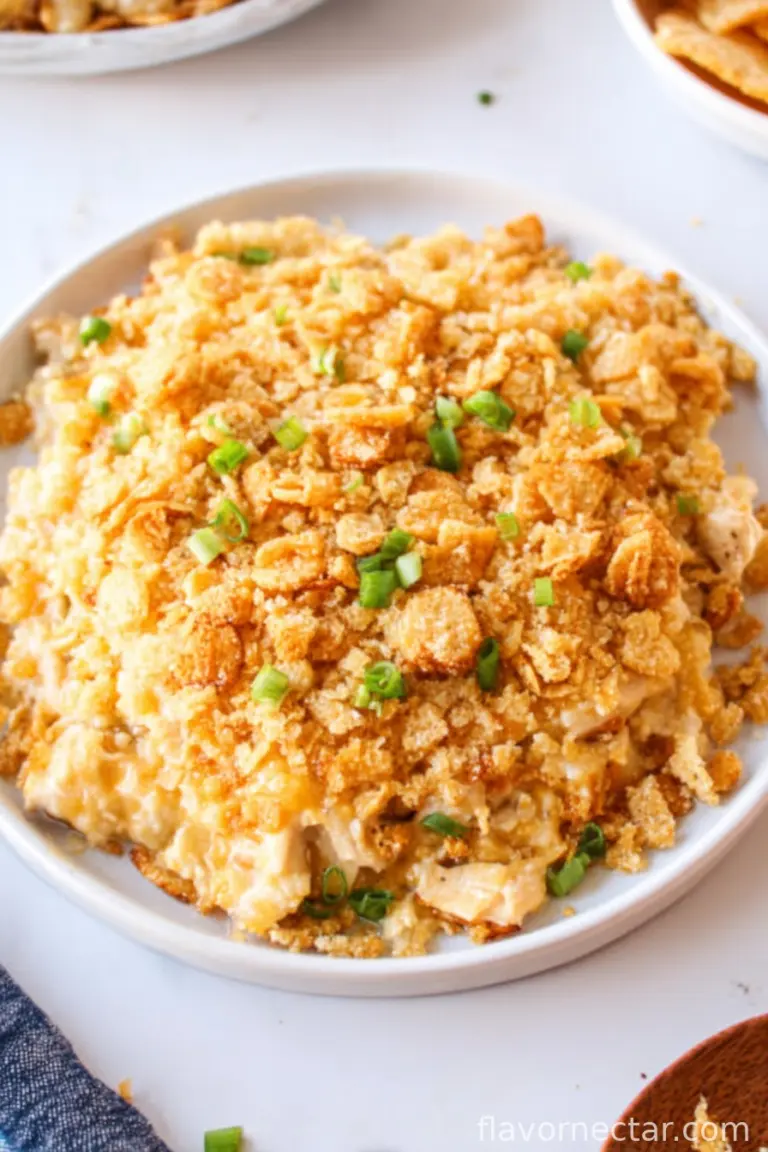
Oh, baked mac and cheese. I’ve lost count of how many times I’ve made this—honestly, it’s my fallback on busy weeknights or whenever I want food that feels like home. The first time I attempted it, I nearly welded the noodles to the pot (pro tip: stir more often than you think you need to), but now I’ve got it down. Sorta. My kids call it “fancy cheese pasta” and one time, my cousin brought her British boyfriend around and even he admitted it’s better than his mum’s. I’ll take that as a win, even if he was mostly trying to charm us (he did go back for seconds, though). If you want to make friends or, let’s be honest, just treat yourself, this is the dish.
Why I Keep Coming Back to This Mac
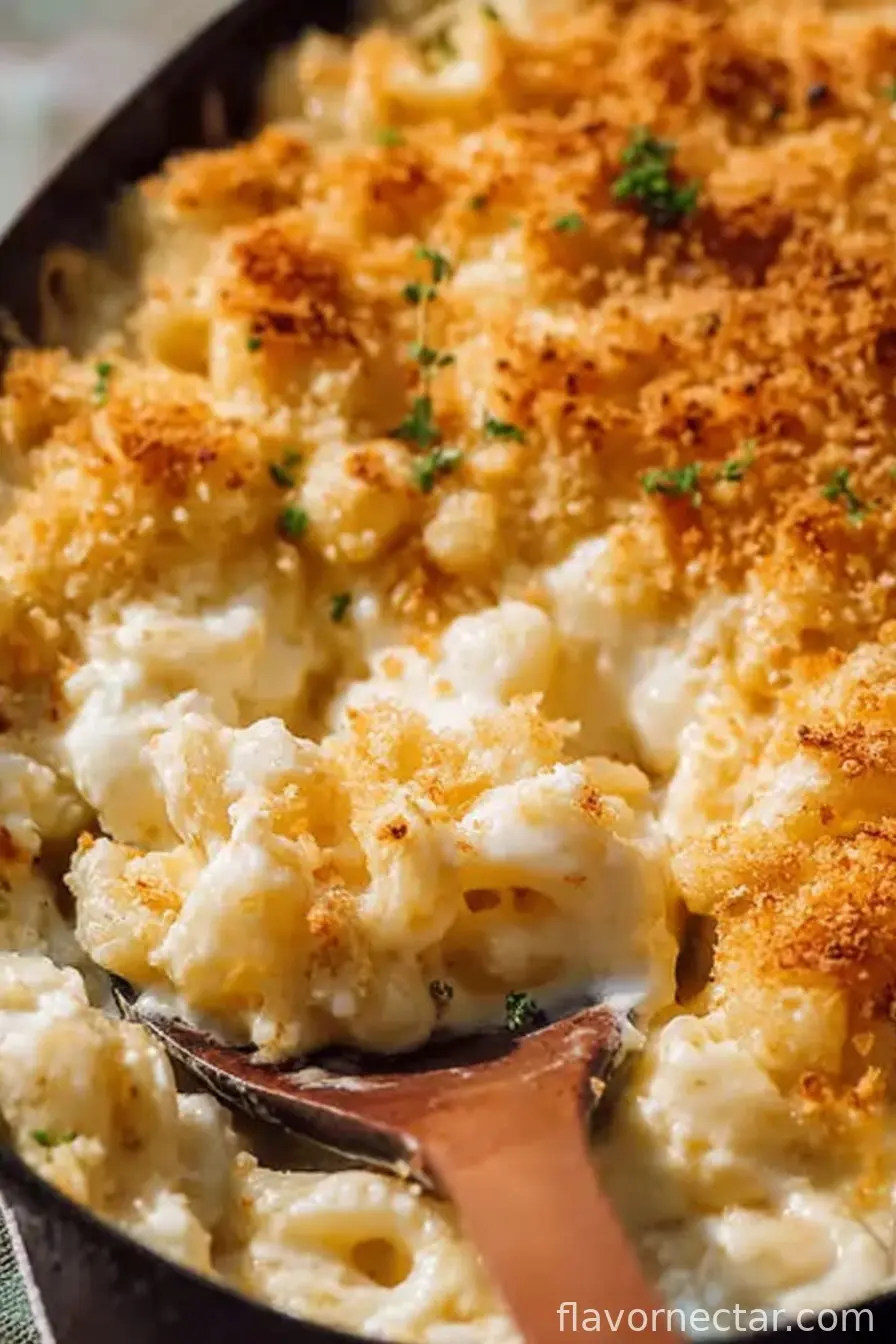
I make this when someone needs cheering up… or when the weather’s grumpy and I can’t be bothered with salads. My family goes bananas for it because it’s creamy under a crunchy, golden top—though, confession: I used to think I could get away with skipping the baking step, and it was always missing something. (Turns out the oven part matters. Who knew?) Also, if I ever have leftover cheese, it gets chucked into this. Seriously, I once used a bit of brie hiding in the fridge; it was weirdly good.
What You’ll Need (and What’s Actually Swappable)
- 400g (about 14oz) dried elbow macaroni (or shells—sometimes I use whatever’s lurking at the back of the cupboard. My auntie even tried fusilli, said it worked fine.)
- 3 tablespoons unsalted butter (I’ve gone for salted in a pinch, just skip extra salt later)
- 1/4 cup plain flour (all-purpose flour, not self-raising—that did NOT work, trust me)
- 2 1/2 cups whole milk (I sometimes use a mix of milk and half cream if I want to feel fancy)
- 1 teaspoon mustard powder (or a squirt of regular yellow mustard because that’s all I had once)
- 2 cups grated sharp cheddar cheese (good cheese is lovely, but supermarket stuff totally does the trick)
- 1 cup grated mozzarella (optional, but it does make it stretchier in a good way)
- 1/2 cup grated parmesan (sometimes I swap in Grana Padano—don’t tell my Italian friend!)
- Salt and black pepper, to taste
- 1/2 cup breadcrumbs (panko is best for crunch, but regular works too. Or crumbled crackers, in a pinch)
- 1 tablespoon melted butter (for mixing with the crumbs)
Alright, Ready? Here’s the Actual How-To
- First up, preheat your oven to 200°C (that’s about 400°F). Put a big pot of salted water on to boil for your pasta. I usually cook mine just shy of al dente—maybe 1 minute less than the package says. You don’t want mush later (gross, right?). Drain and set aside. Don’t rinse it.
- In the same pot—because who wants more washing up—melt the butter over medium heat. Whisk in the flour and stir constantly for a couple of minutes until it looks sort of foamy and smells nutty. This is your roux. Don’t let it brown, though; learned that the hard way.
- Now, slowly pour in the milk, whisking like mad to avoid lumps. At first it’ll look like a hot mess, but it’ll come together. When it’s smooth, add the mustard and keep stirring until the sauce thickens up to a kind of gravy consistency. This is where I usually sneak a taste (be careful, it’s silly hot).
- Turn heat to low, then add in all your cheeses except about half the parmesan. Stir until melty and you get that cheese-pull moment. Season it up with salt and pepper. Sometimes I add a pinch of cayenne here, if I’m feeling wild.
- Tip in your drained pasta. Mix till every piece is coated. If it looks soupy, don’t panic—pasta soaks it up while baking.
- Pour everything into a greased 9×13-inch baking dish (or two smaller ones, if you want to freeze one—though I’ve rarely managed to have enough left over for freezing, ha!).
- Mix the breadcrumbs with a spoonful of melted butter and the rest of your parmesan, then scatter all over the top. More is better here. I’ve never once heard anyone say “too much crunchy stuff on top”.
- Bake uncovered for 25-30 minutes or until the top is bubbling and golden. Leave it to cool for at least 10 minutes, or you’ll end up with molten cheese lava burns (ask me how I know).
What I Wish Someone Had Told Me (Aka, my Notes)
- If your sauce goes lumpy, just blitz it with a hand blender. No one knows the difference.
- I used to under-season it, so now I taste as I go. Cheese can be salty, so it’s a guessing game.
- Crumbs get soggy in the fridge after a day, but a quick broil sorts that out. Or just eat it cold—my son does.
If You Fancy Mixing it Up: Variations I’ve Actually Tried
- Adding crispy bacon bits—delicious, obviously.
- Sneaking in steamed broccoli. Kids spotted it immediately, but I still liked it.
- One time I tried crumbling in blue cheese… can’t say I loved it, but if you’re into bold flavors, go for it.
- For a Tex-Mex twist, toss in a handful of chopped jalapeños and use pepperjack. Not traditional, but great for a twist.
Gear You Probably Have (But Don’t Panic If You Don’t)
- A big saucepan (I’ve used a wok before, just stir gently and things won’t fly out—much!)
- Whisk (fork will do if you’re desperate, though your arm might complain later)
- Baking dish, around 9×13” or something similar. Honestly, any ovenproof dish works—as long as the pasta fits.
How I Store It (For That One Time There are Leftovers)
Let it cool, then cover and pop in the fridge. It’ll be fine for up to 3 days, though honestly, in my house it never lasts more than a day! Reheat slices in the microwave or pop it in the oven until piping hot. Freezing? Sure, just wrap well. Don’t expect that golden top to stay crisp, though—still tastes like a dream.
How I Like to Serve This (Plus Odd Traditions)
Usually straight from the dish with a big spoon. If I’m feeling proper, I might add a sprinkle of chives. At family get-togethers, we’ve been known to put a dollop of ketchup on the side (don’t judge—just try it). Goes with roast veggies or jus a simple salad, if you want something green.
Pro Tips I Wish I’d Known Before
- Don’t overcook the pasta. I once left it too long while distracted and it turned into cheese porridge. Probably fine for toddlers, but not my thing.
- Adding cheese all at once can make the sauce grainy—patience wins here, go a handful at a time.
- Trying to rush the baking step? Regretted it. The crust is the whole point!
Your Questions, My (Haphazardly Gathered) Answers
- Can I make this ahead? Absolutely. Assemble the lot, cover, and stick in the fridge. Bake when you’re ready (may need an extra 10 mins straight from the fridge).
- Can I skip the oven bit? Well, you could, but then it’s just stovetop mac and cheese—not the same, in my humble (and possibly slightly bossy) opinion.
- Is this freezer-friendly? Kinda! It’s still nice, but the topping isn’t as crispy once thawed. Worth it for a fast comfort meal, though. If you want to know more about freezer meal tricks, this Bon Appétit article has some handy advice I’ve used.
- Which cheeses are best? Honestly, use your favorites or whatever’s left in the fridge. Cheddar, mozzarella, and parmesan are classic, but I once chucked in gouda and it was fab. Serious Eats tested a bunch of them if you want to go down that rabbit hole.
- Why is my sauce kinda grainy? Usually the cheese went in when the sauce was too hot. Drop the temp, add in handfuls, stir gently, and it’ll stay smooth. If it splits a bit, just close your eyes and enjoy—tastes the same!
- Do I have to use mustard? I think it adds a nice kick, but if you hate it, just skip. Nobody’s going to call the mac police.
Oh, and if you’re looking for tips on knife skills, I stumbled on Jamie’s onion-chopping video last week—it’s not about mac and cheese, but it’s oddly mesmerizing.

Ingredients
- 12 ounces elbow macaroni
- 4 tablespoons unsalted butter
- 1/4 cup all-purpose flour
- 3 cups whole milk
- 2 cups shredded sharp cheddar cheese
- 1 cup shredded mozzarella cheese
- 1/2 cup grated Parmesan cheese
- 1/2 cup breadcrumbs
- 1 teaspoon salt
- 1/2 teaspoon black pepper
- 1/2 teaspoon paprika
Instructions
-
1Preheat the oven to 375°F (190°C). Grease a 9×13-inch baking dish.
-
2Cook the elbow macaroni according to package instructions until al dente. Drain and set aside.
-
3In a large saucepan, melt butter over medium heat. Whisk in flour and cook for 1-2 minutes until bubbly.
-
4Gradually whisk in the milk and cook, stirring constantly, until the sauce thickens, about 4-5 minutes.
-
5Stir in cheddar, mozzarella, and Parmesan cheeses until melted and smooth. Season with salt, black pepper, and paprika.
-
6Combine cooked pasta with the cheese sauce and pour into the prepared baking dish. Sprinkle breadcrumbs evenly on top.
-
7Bake for 25-30 minutes until the top is golden brown and bubbly. Let cool slightly before serving.
CLICK FOR NUTRITION INFO
↑
Approximate Information for One Serving
Serving Size:
1 serving
Calories:
490 caloriescal
Protein:
21 gg
Fat:
25 gg
Saturated Fat:
0g
Trans Fat:
0g
Cholesterol:
0mg
Sodium:
0mg
Potassium:
0mg
Total Carbs:
45 gg
Fiber:
0g
Sugar:
0g
Net Carbs:
0g
Vitamin A:
0
Vitamin C:
0mg
Calcium:
0mg
Iron:
0mg
Nutrition Disclaimers
Number of total servings shown is approximate. Actual number of servings will depend on your preferred portion sizes.
Nutritional values shown are general guidelines and reflect information for 1 serving using the ingredients listed, not including any optional ingredients. Actual macros may vary slightly depending on specific brands and types of ingredients used.
To determine the weight of one serving, prepare the recipe as instructed. Weigh the finished recipe, then divide the weight of the finished recipe (not including the weight of the container the food is in) by the desired number of servings. Result will be the weight of one serving.
Did you make this recipe?
Please consider Pinning it!!