Let Me Tell You About My Bacon and Cheddar Quiche (and Why You’re Gonna Love It)
So, picture this: it’s a lazy Saturday, I’ve probably got bed hair, and my old flannel pajamas are hanging on for dear life. The only thing on my mind? Making this ridiculously simple Bacon and cheddar quiche. I first whipped up something like it back in uni with the cheapest grocery store bacon I could find (the kind that shrinks to half its size and sticks to the pan like glue), and ever since, it’s been my secret weapon when folks turn up hungry.

Funny story, actually—I once tried swapping out the bacon for leftover ham from Christmas. Big mistake; it was so salty we needed a pint of water each to recover. But that’s the thing: this quiche recipe doesn’t need to be fancy, and it’s forgiving when you accidentally overcook the bacon (not that I ever do that… except, well, last week).
Why I Keep Coming Back to This Recipe
I make this quiche whenever I want something that feels a bit special but without faffing about for hours—especially after a night out (please don’t tell my mum). My little niece even eats the crust, which is saying something if you’ve ever tried feeding a two-year-old. Plus, cleaning the pie dish is pretty painless, and for some reason, the messy middle part always sets just right. It’s also a fridge-clearing masterpiece: toss in some wilty spinach or the ends of random cheeses, and you’re golden. If only everything in life was this low maintenance.
What Goes in This Quiche (and What You Can Switch Up)
- 1 9-inch unbaked pie crust (I cheat and buy the bakery’s frozen ones—my grandmother would’ve frowned, but you do you. Homemade is grand if you’ve got the patience. Or honestly, I’ve made this in a puff pastry shell once; bit odd but still edible!)
- 6-8 strips bacon, chopped (Smoked or unsmoked—just use what you’ve got. I tried turkey bacon one time when I was trying to be “healthy”; not the same but not terrible)
- 1 1/2 cups shredded sharp cheddar cheese (but mild is fine if you prefer—my mate Paul says he sneaks in aged Red Leicester, just to be different)
- 4 large eggs (I’ve used three when I was one short and, weirdly, it worked out alright)
- 1 cup whole milk (or half-and-half if you’re feeling bold. Skim milk is… okay, but why bother?)
- 1/4 teaspoon black pepper (who’s really measuring though?)
- A sprinkle of salt, but watch it if your bacon is particularly salty
- Optional: 1/2 cup diced onion or scallions (I chuck these in if I remember, honestly)
How I Actually Cook This Quiche—Step by Wobbly Step
- Preheat your oven to 375°F (190°C). Or about 190, if you’re metric. Give it time to heat up, because a cold oven is the enemy here, trust me. (I forgot once and ended up with slightly raw pie. Not ideal.)
- Blind-bake the crust. Plop your crust into the pie dish, poke a few holes with a fork—don’t skip this or you’ll get bubbles. Bake empty (toss in some beans or rice if you’ve got them, or just wing it like I do) for about 8 minutes until it looks just a bit golden around the edges.
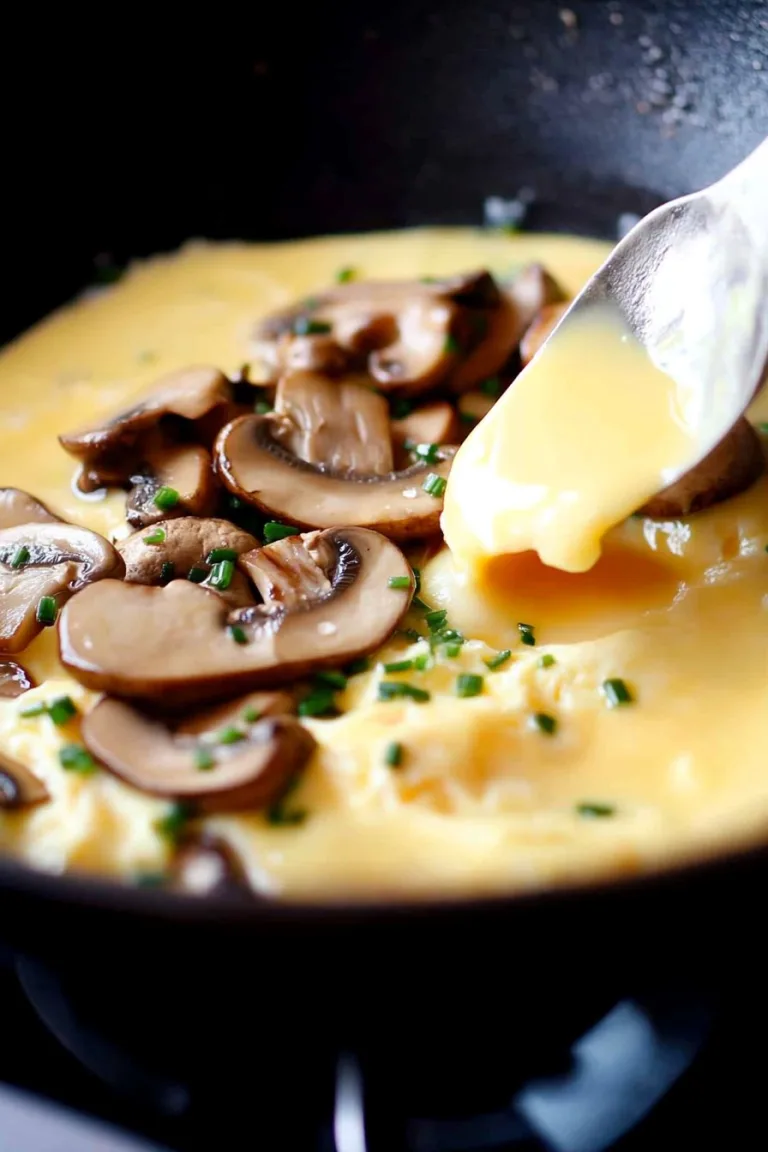
- Fry the bacon. Toss chopped bacon in a skillet until crisp. I always sneak a bit when it’s done (chef’s treat!). Drain it on paper towels—otherwise, your quiche will swim in grease.
- Mix up the custard. Just whisk eggs, milk, pepper, and salt in a bowl. I sometimes drop the bowl; don’t be like me. Good arm workout, though.
- Layer the fun stuff. Scatter bacon, cheese, and onions (if you remembered them) all over the crust. Pour the egg mix on top. Don’t freak out if some cheese floats to the top; it always evens out when baking.
- Bake. Pop it all in the oven for 35–40 minutes. You want the middle just set, with a little jiggle when you tap the dish. The quiche may puff up and then collapse—a perfectly normal quiche thing.
- Cool a bit. Let it sit 5–10 minutes (unless you like molten cheese lava burns), then slice and serve. Actually, I think it tastes better the next morning, cold and straight from the fridge, but maybe I’m odd.
Good-to-Know Notes (Hard-Won Wisdom!)
- If you overbake, it gets rubbery, but honestly, I’ve eaten far worse at posh brunch spots.
- Cheese blends are fun—a bit of Gruyere or even some blue cheese crumbles, if you’re brave. The family split on that one; the smell was, erm… intense.
- Don’t panic if the crust shrinks a little; just call it “rustic” and get on with your day.
Oddball Variations I’ve Actually Tried
- Sautéed mushrooms plus bacon—super earthy (but honestly made it a bit soggy if you don’t cook off all the liquid, learned that the hard way)
- Tomato slices on top. Looks pretty, but can go watery if you’re not careful.
- Spinach instead of bacon—actually quite light, but my brother refuses to call it “quiche” without meat, so do what you must.
- I tried crumbled feta once. A step too far, maybe.

If You Don’t Have a Fancy Pie Dish
You can honestly use an ovenproof cake tin, or even those foil pie pans from the supermarket if you’re in a bind. I have a silly collection of mismatched dishes now—makes for a fun-looking table, though nothing matches. If you really need to, a cast iron skillet works, but it’ll taste a bit different (still good, though.).
How to Store Leftovers (If You Actually End Up With Any)
Just wrap slices in foil or shove the whole dish in the fridge. Should keep for about 3 days, but, to be fair, it’s never stuck around for more than a day or so in my place! Also, it’s surprisingly edible cold—quiche for breakfast is a hidden delight.
Serving It Up My Way
Most times, I serve it next to a pile of greens (not that anyone actually eats them, but it looks nice), and a blob of really tangy chutney or spicy ketchup. On Sundays, sometimes just with strong coffee and a slice of buttered brown bread—that’s my Northern roots showing through, I guess.
Tales From the Trenches: Quiche Pro Tips
- I once tried to use pre-shredded cheese to save time—turns out, it doesn’t melt as nicely as fresh stuff. Lesson learned, but, you know, in a pinch it’s fine.
- Don’t rush the resting—the eggs need time to set. I’ve burned my tongue more times than I care to admit (maybe I never learn?)
Some Quiche Questions I’ve Actually Gotten
- Can you freeze this? Sort of. It can go a bit soggy when defrosted, but it’s handy if you’re meal prepping. I’d say wrap it up tight and eat within a month.
- Whole milk or cream? If you really want it hearty, use half cream, half milk—just be ready for a heavier bite. Sometimes it’s too rich for my taste, but hey, life’s short.
- What if I don’t have bacon? Leftover cooked sausage works, or you can just bulk up the cheese and go meatless. On second thought, roasted peppers and onions are good too, if you’ve got them hanging about.
- How do you tell if it’s done? When the top has a bit of golden colour and the middle doesn’t wobble too much. I just gently poke the middle with a knife—it should come out, well, not covered in raw egg.
- Do I need to serve it right away? Nope! I think it’s tastier after a rest, even cold from the fridge. My mate Sam likes it with hot sauce for breakfast… I haven’t gone that far yet.
And, because sometimes my attention wanders in the kitchen, I have to admit: once I left the quiche cooling and forgot about it for hours. The housemate ate half, left me a Post-It saying ‘Top snack, cheers!’ So, if you’re feeding a crowd, maybe double the recipe—or hide a slice for yourself.
Ingredients
- 1 9-inch refrigerated pie crust
- 6 slices bacon
- 1 cup cheddar cheese, shredded
- 4 large eggs
- 1 cup whole milk
- 1/4 cup heavy cream
- 1/4 teaspoon salt
- 1/4 teaspoon ground black pepper
- 2 tablespoons chopped green onions (optional)
Instructions
-
1Preheat the oven to 375°F (190°C). Place the pie crust in a 9-inch pie dish and crimp the edges.
-
2Cook the bacon in a skillet over medium heat until crisp. Drain on paper towels, then chop into small pieces.
-
3Sprinkle the chopped bacon and shredded cheddar cheese evenly over the bottom of the prepared pie crust. Add chopped green onions if using.
-
4In a mixing bowl, whisk together the eggs, milk, heavy cream, salt, and black pepper until smooth.
-
5Pour the egg mixture over the bacon and cheese in the pie crust.
-
6Bake for 35 minutes or until the center is set and the top is lightly golden. Let cool for 10 minutes before slicing and serving.
CLICK FOR NUTRITION INFO
↑
Approximate Information for One Serving
Serving Size:
1 serving
Calories:
320 caloriescal
Protein:
13gg
Fat:
23gg
Saturated Fat:
0g
Trans Fat:
0g
Cholesterol:
0mg
Sodium:
0mg
Potassium:
0mg
Total Carbs:
16gg
Fiber:
0g
Sugar:
0g
Net Carbs:
0g
Vitamin A:
0
Vitamin C:
0mg
Calcium:
0mg
Iron:
0mg
Nutrition Disclaimers
Number of total servings shown is approximate. Actual number of servings will depend on your preferred portion sizes.
Nutritional values shown are general guidelines and reflect information for 1 serving using the ingredients listed, not including any optional ingredients. Actual macros may vary slightly depending on specific brands and types of ingredients used.
To determine the weight of one serving, prepare the recipe as instructed. Weigh the finished recipe, then divide the weight of the finished recipe (not including the weight of the container the food is in) by the desired number of servings. Result will be the weight of one serving.
Did you make this recipe?
Please consider Pinning it!!