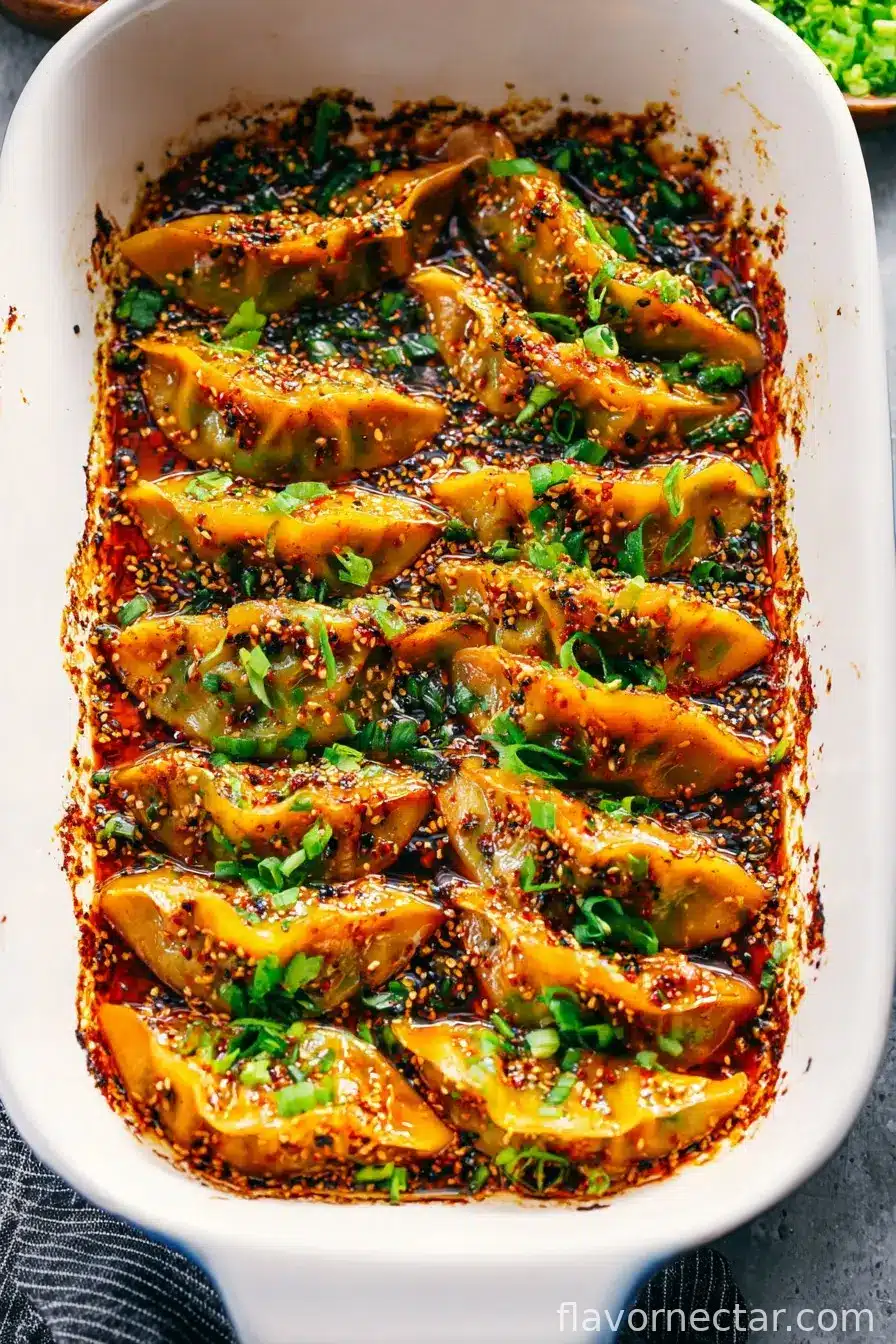
If you knocked on my door at 7pm, odds are you’d catch me wrangling two hangry teens and standing over this one pan dumpling dinner, which I swear should have its own fan club. I started making this back in my broke uni days—usually just with frozen dumplings and whatever sad veg I had left. Funny thing, my roommate was convinced I was some culinary wizard (really, it’s just knowing how not to burn the bottoms, ha!). Still, the magic’s survived, just with a little more skill… and fewer instances of setting off the smoke alarm. Actually, not none. Just fewer.

Why You’ll Love This One Pan Dumpling Sit-Down
I trot this dinner out whenever I can’t even face the chopping block. Like, my brain is toast, but I want something that looks like I tried. Everybody crowds the kitchen the second those dumplings start getting crispy. Not kidding, my youngest tries to eat them straight out of the pan (dangerous, but I get it). Also, fewer dishes = happy me (my dishwasher’s on strike again, typical). If you love those golden, crispy-bottomed dumplings but you hate fuss, you’ll probably get why this is my ace-in-the-hole weeknight meal.
What You’ll Need (Plus My Slightly Chaotic Substitutions)
- 16 frozen dumplings (any kind—vegetable, chicken, pork… you name it! I sometimes use gyoza; my cousin swears by the ones from the Korean place, but honestly, whatever’s on sale)
- 1 tablespoon vegetable oil (I’ve used olive oil in a pinch, but it’s not the same crispness)
- 1/2 small cabbage, thinly sliced (honestly, any leafy green works—spinach if you’re feeling lazy)
- 1 bell pepper, cut into strips (red, green, or even one that’s seen better days)
- 3 green onions, chopped (my gran always used regular yellow onion, so go wild)
- 2 cloves garlic, minced (or cheat and use that pre-chopped jar stuff if you must)
- 1 tablespoon soy sauce (dark, light, whatever, even tamari if gluten’s your enemy)
- 1/2 cup water (or slightly more if you’re heavy-handed like me)
- 1 teaspoon sesame oil (skip if you hate that nutty smell—some days I just forget)
- Chili flakes or sriracha, to taste (completely optional, but I like a little fire)
How To: The Unofficial One Pan Method
- Grab a big nonstick skillet (or your trusty wok, if you’ve got one). Pour in your veg oil and heat on medium-high. Wait until it shimmers—that’s when you know it’s go time.
- Line those dumplings in the pan, flat-side down. Try not to crowd them too much (I almost always do, they still work). Fry for about 2 minutes; the bottoms should start to get that gorgeous golden color. Don’t poke them too much—or, do, but just know they’ll stick a bit.
- Chuck in your garlic, cabbage, and peppers all around the dumplings. If things look wild, it’s fine, just keep piling—this bit always looks like a mess but somehow sorts itself out.
- Pour in your water—careful, it spits. Pop a lid on. Let everything steam for 5–6 minutes, or until the dumplings look puffed and you can hear that hissing, almost-done noise.
- Remove the lid, drizzle soy sauce over the veg and dumplings, give the whole thing a gently stir (or just shake the pan a bit—less risk of ripping the wrappers that way), then add the sesame oil and green onions.
- If you’re feeling bold, add your chili or sriracha now. This is where I sneak one dumpling to ‘check doneness’ (it’s mostly for me).
- Keep cooking uncovered for another minute or two, just until any extra liquid sizzles off. The bottoms will crisp back up, promise.
- Scoop it all out, plop onto plates, and eat straight away! (Well, after burning your tongue at least once…)
Notes from My Real Kitchen
- Don’t stress over the veg. Some nights I use shredded carrots or those sad broccoli stems lurking in the fridge. No shame.
- If you forget the sesame oil (like yours truly last week), just blame “minimalism.”
- I once tried a cheese version… let’s just say, never again. That’s one for the bin.
My Variations and, Occasionally, Bad Ideas
- Toss a handful of frozen peas in the pan—laziest way to feel ‘healthy.’
- I swapped in frozen pierogis once (odd, but not terrible!).
- Sliced mushrooms make it ‘fancy’ according to my teenage critics.
- Cheese—ehhh, see above; not my finest hour.
What If I Don’t Have a Lid?
No stress—aluminum foil or even a big baking tray balanced on top works. I’ve even used a dinner plate in desperate times (just mind your fingers).
How Does It Keep? (Spoiler: It Won’t Last!)
Technically, you can fridge leftovers in a snap-lock container for a day or two. But honestly, in my house, there’s never more than a spoonful left by bedtime. It reheats great in a pan—but, it’s a bit like cold pizza: either you love it, or you don’t.
How I Like to Serve It
I go classic: pile it high in bowls, sprinkle with more scallions, and splash with even more chili crisp. Oh! Sometimes I put out a small bowl of vinegar for dipping if I’m feeling old-school. Fridays, we eat it straight from the pan in front of the TV, and nobody judges, which I think is half the appeal.
Things I’ve Learned (Sometimes the Hard Way)
- Don’t rush the pan heating—if it’s not hot enough, dumplings stick. I once had to chisel off the entire batch. Never again.
- Lifting the lid too soon = half-cooked dumplings. Better to check late than eat doughy centers (bleurgh).
- Soy sauce at the end is better, trust me. I poured it in with the water once and wondered why it tasted like cardboard.
FAQ: Stuff People Have Actually Asked Me
- Can I use fresh dumplings? Yep! They cook even faster, but watch them like a hawk—the skin can go mushy in what feels like a blink.
- What about gluten-free? I’ve used gluten-free dumplings and tamari, came out grand. Just check your dumplings aren’t too soft or they might fall apart.
- My dumplings stuck to the pan, help? Welcome to the club! Honestly, a well-oiled pan (hot!) is the ticket. Or, on second thought, maybe a nonstick is non-negotiable for this one. I used cast iron twice and regretted it.
- Can I double this? Technically—but unless you’ve got a skillet the size of Kansas, I’d rather do two batches.
- Is it freezer friendly? Strangely, yes. The finished dish looks a bit ragged post-microwave, but flavors are still lovely. Maybe don’t serve to dinner guests, though, heh.
Anyway, if you try this, let me know how it goes! And if you somehow make cheese work, give me a shout—I’m ready to be proven wrong.
Ingredients
- 16 frozen dumplings (any kind—vegetable, chicken, pork… you name it! I sometimes use gyoza; my cousin swears by the ones from the Korean place, but honestly, whatever’s on sale)
- 1 tablespoon vegetable oil (I’ve used olive oil in a pinch, but it’s not the same crispness)
- 1/2 small cabbage, thinly sliced (honestly, any leafy green works—spinach if you’re feeling lazy)
- 1 bell pepper, cut into strips (red, green, or even one that’s seen better days)
- 3 green onions, chopped (my gran always used regular yellow onion, so go wild)
- 2 cloves garlic, minced (or cheat and use that pre-chopped jar stuff if you must)
- 1 tablespoon soy sauce (dark, light, whatever, even tamari if gluten’s your enemy)
- 1/2 cup water (or slightly more if you’re heavy-handed like me)
- 1 teaspoon sesame oil (skip if you hate that nutty smell—some days I just forget)
- Chili flakes or sriracha, to taste (completely optional, but I like a little fire)
Instructions
-
1Grab a big nonstick skillet (or your trusty wok, if you’ve got one). Pour in your veg oil and heat on medium-high. Wait until it shimmers—that’s when you know it’s go time.
-
2Line those dumplings in the pan, flat-side down. Try not to crowd them too much (I almost always do, they still work). Fry for about 2 minutes; the bottoms should start to get that gorgeous golden color. Don’t poke them too much—or, do, but just know they’ll stick a bit.
-
3Chuck in your garlic, cabbage, and peppers all around the dumplings. If things look wild, it’s fine, just keep piling—this bit always looks like a mess but somehow sorts itself out.
-
4Pour in your water—careful, it spits. Pop a lid on. Let everything steam for 5–6 minutes, or until the dumplings look puffed and you can hear that hissing, almost-done noise.
-
5Remove the lid, drizzle soy sauce over the veg and dumplings, give the whole thing a gently stir (or just shake the pan a bit—less risk of ripping the wrappers that way), then add the sesame oil and green onions.
-
6If you’re feeling bold, add your chili or sriracha now. This is where I sneak one dumpling to ‘check doneness’ (it’s mostly for me).
-
7Keep cooking uncovered for another minute or two, just until any extra liquid sizzles off. The bottoms will crisp back up, promise.
-
8Scoop it all out, plop onto plates, and eat straight away! (Well, after burning your tongue at least once…)
CLICK FOR NUTRITION INFO
↑
Approximate Information for One Serving
Serving Size:
1 serving
Calories:
320 caloriescal
Protein:
11gg
Fat:
10gg
Saturated Fat:
0g
Trans Fat:
0g
Cholesterol:
0mg
Sodium:
0mg
Potassium:
0mg
Total Carbs:
40gg
Fiber:
0g
Sugar:
0g
Net Carbs:
0g
Vitamin A:
0
Vitamin C:
0mg
Calcium:
0mg
Iron:
0mg
Nutrition Disclaimers
Number of total servings shown is approximate. Actual number of servings will depend on your preferred portion sizes.
Nutritional values shown are general guidelines and reflect information for 1 serving using the ingredients listed, not including any optional ingredients. Actual macros may vary slightly depending on specific brands and types of ingredients used.
To determine the weight of one serving, prepare the recipe as instructed. Weigh the finished recipe, then divide the weight of the finished recipe (not including the weight of the container the food is in) by the desired number of servings. Result will be the weight of one serving.
Did you make this recipe?
Please consider Pinning it!