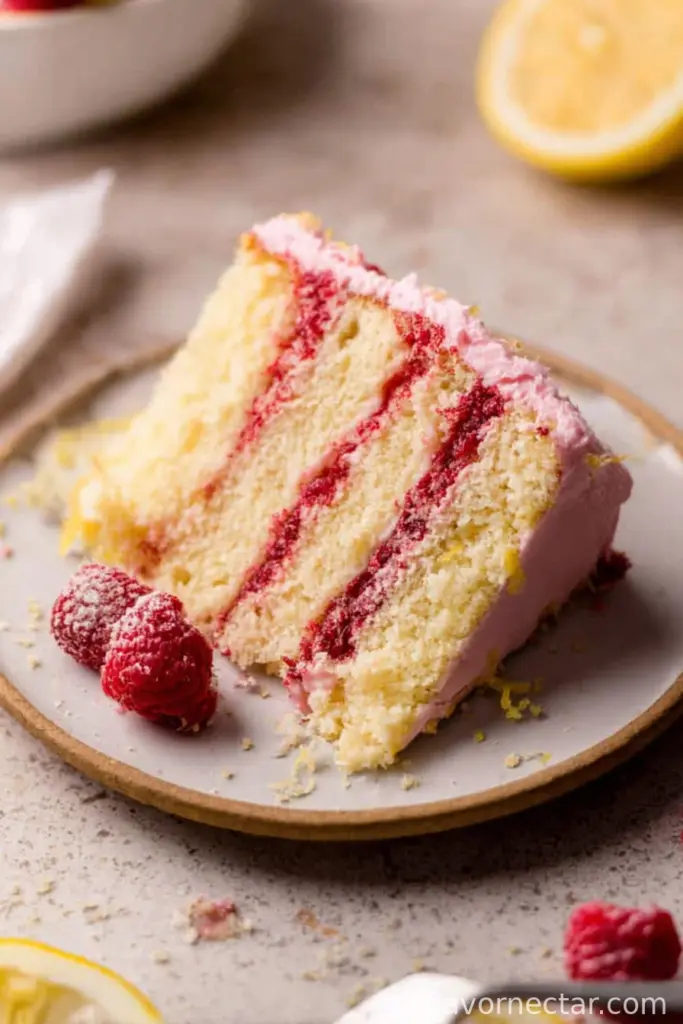
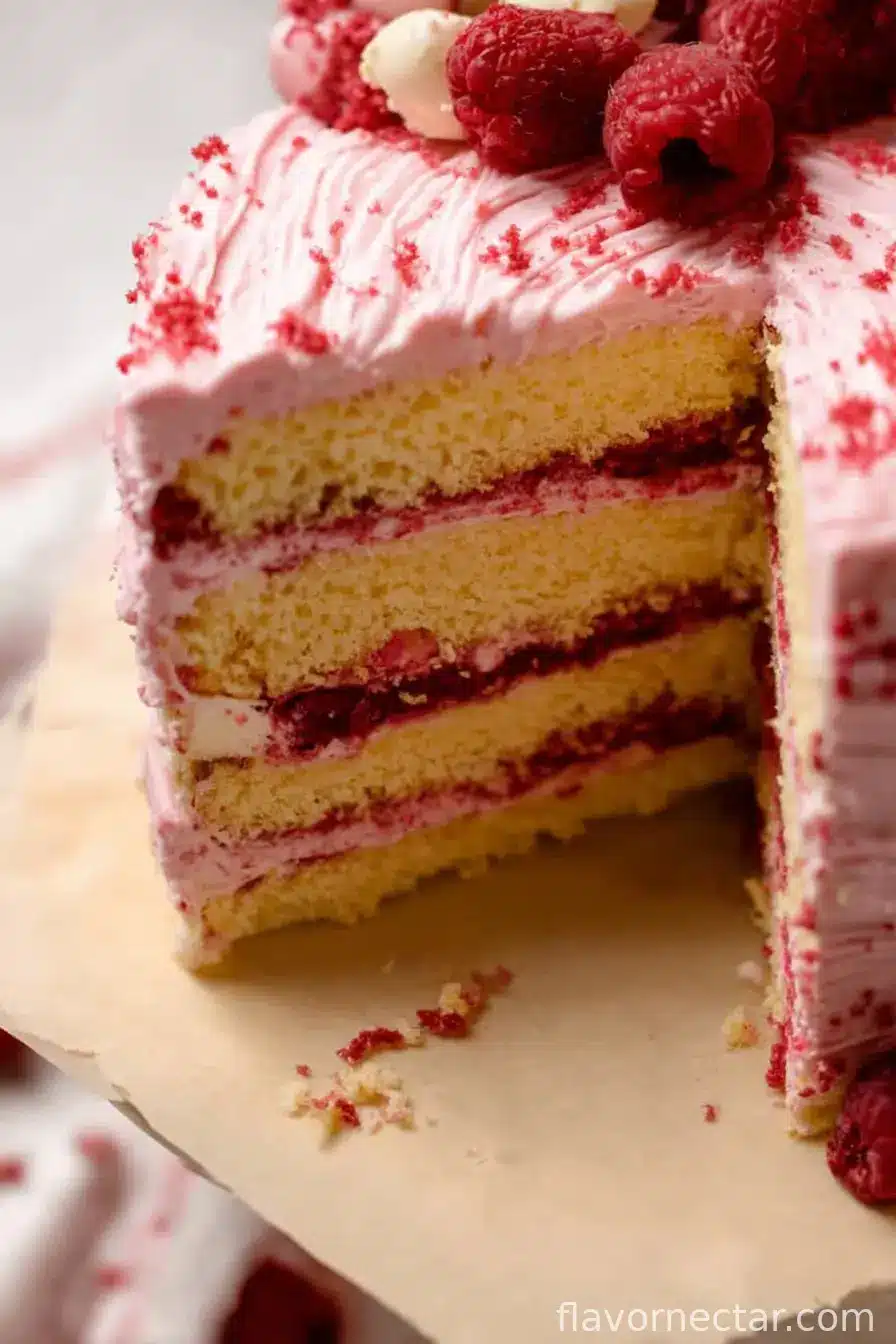
Baking Memories: My Lemon Cake with Raspberry Frosting
The first time I baked this Moist Lemon cake with Raspberry Frosting, I was wearing my favorite (and now thoroughly jam-splattered) apron and listening to my neighbor’s extremely opinionated cat through the window. That cake was for a family birthday, and—no joke—I nearly ruined it by skipping the parchment paper. (Please don’t do that. Trust me.) Since then, every time I whip up this cake, I’m instantly taken back to that day: the laughter, the relentless taste-testing, and that maddening moment I realized I’d run out of fresh lemons (lemon zest from a jar saved the day, but it’s definitely not quite the same). Anyway, if you want a cake that’s bright, tangy, and just a little bit show-offy, here we go.

Why I Can’t Stop Making This (And Maybe You Won’t Either)
I make this cake when I want my whole house to smell like spring, or when my friend stops by claiming they’re “just not a dessert person” (they always eat two slices—every time, with this sheepish little smile). My family devours it before I get around to fancy decorating, so sometimes it looks rustic. Honestly, it’s the combo of super moist lemony crumb and that raspberry frosting that wins people over—plus, spreading homemade jam between the layers always feels a little extra, like I’m channeling a British Bake Off contestant for a brief, glorious moment. Not gonna lie, Swiss meringue buttercream used to intimidate me, but I’ve found that, with a bit of patience (and only a little panic), not only does it work, it pretty much makes me look like a kitchen wizard.
Ingredients: What You’ll Need (And Quick Swaps I’ve Tried)
- 4 1/2 cups frozen raspberries (fresh work too—you may need a bit less liquid, though; I sometimes use a mix if I’m short!)
- 1/2 cup granulated sugar (regular white sugar is fine, or even caster if that’s what you’ve got at hand)
- 1 tablespoon lemon juice (fresh is brilliant, but bottle will do in a pinch—just don’t tell the lemon purists)
- 2 tablespoons cornstarch
- 2 tablespoons water
- 1 teaspoon vanilla extract (I did try vanilla bean paste once, and wow—the raspberry flavor popped even more)
- 1 1/2 cups granulated sugar
- 2 tablespoons fresh lemon zest, packed (sometimes I cheat and add an extra half tablespoon for more zing)
- 3 cups cake flour (*See my ramble in Notes below about measuring this—scooping can go hilariously wrong)
- 1 teaspoon fine sea salt
- 1 tablespoon baking powder
- 1 cup cubed unsalted European butter, room temperature (my grandma swore by Irish butter, but honestly, just use what you have—you want quality if you can swing it)
- 3 large eggs, room temperature
- 1 1/2 cups heavy cream
- 1/3 cup vegetable oil
- 2 tablespoons fresh lemon juice
- 1 teaspoon vanilla extract
- 4 large egg whites
- 1 1/2 cups granulated sugar
- 1 1/2 cups unsalted butter, cool room temperature, cut into tablespoon sized pieces
- 1/2 cup reserved raspberry jam, from above
- Pinch of fine sea salt
- Fresh raspberries, lemon slices, freeze dried raspberries, for decorating
Optional: My cousin tried making this with a little almond extract in the cake (about 1/4 teaspoon) and it was surprisingly good, though not exactly traditional lemon-raspberry.
How To Make This Cake (With Honest Side Notes!)
- Making Raspberry Jam: Dump your raspberries, sugar, and lemon juice into a saucepan over medium heat. Stir now and then and mash the fruit gently as it cooks. Once everything’s nice and juicy and bubbling away, whisk your cornstarch and water in a little cup to make a slurry (takes, what? 30 seconds). Tip that into the berries and keep stirring for another minute or two until you see it thicken up. It won’t look pretty just yet, but that’s totally fine. This is where I always have a moment of doubt, but keep going. Pour the mixture through a sieve to fish out the seeds. Stir in the vanilla. Now, set aside half a cup of this jam for your frosting later—try not to eat it all with a spoon right now. Let both cool off (they thicken as they sit).
- Preparing the Cake Batter: Crank your oven on to 350°F/180°C. Butter or spray three 8″ cake tins and line each bottom with a circle of parchment paper (seriously, don’t skip the parchment—learnt that the hard way!). In a big bowl, use your fingers to rub the lemon zest into the granulated sugar until it smells super zingy. Stir in the cake flour, salt, and baking powder. Whisk it all together so it’s sort of fluffy and combined.
- On low speed (or with a wooden spoon if you fancy a workout), mix in all the butter cubes. You want the mix to look sandy, not creamy—it won’t look like dough, more like thick, damp sand that actually smells pretty amazing.
- In another bowl, whisk together eggs, heavy cream, vegetable oil, lemon juice, and that splash of vanilla extract. I always forget one thing here and have to fish out a shell, but maybe that’s just me.
- Pour about half the wet stuff into the dry mix. Gently blend until all the flour is moistened, then scrape the sides of your bowl (I use a rubber spatula—I broke a wooden one ages ago and never replaced it). Mix in the rest of the wet bits, pulsing the mixer at first so it doesn’t spray everywhere, then beat on low until just combined. Batter will be thick but that’s what you want!
- Spoon the batter evenly into your cake pans (eyeball it, or about 485g per pan if you’re precise). Smooth the tops—it’ll feel a bit stiff. Bake in the center of the oven for 18-25 minutes. When a toothpick poked in the middle comes out with a few moist crumbs, you’re golden. Let pans cool for about 20 mins on a wire rack, then run a knife round the edges and gently tip the layers out (they’re very soft at this point—handle gently or risk cake carnage!). Cool completely before frosting.
- Making the Swiss Meringue Buttercream: Place your egg whites and sugar in a big heatproof bowl (or straight into your stand mixer’s bowl if that fits over a pot—saves washing up). Put the bowl over simmering water and whisk constantly (don’t let it turn into sweet scrambled eggs). When all the sugar dissolves and the thermometer reads 165°F, take it off the heat. (If you don’t have a thermometer, check by rubbbing a bit between your fingers—no grit means you’re good.)
- Transfer that bowl to your mixer with the whisk attachment and crank up to high. Whisk until the meringue cools to about 90-95°F. This can take 10-15 minutes; sometimes I wander off to do the dishes and forget to come back right away—it just gets extra fluffy.
- Drop the mixer speed to low. Add the butter a couple tablespoons at a time. It’ll look all kinds of wrong for a bit (soupy, curdled, you name it—it always comes together in the end, just keep going!). Once all the butter’s in, turn back up to medium-high until the frosting looks light and cloudlike. Now mix in your reserved raspberry jam and a pinch of salt. Just look at that color!
- To Assemble: If the cake layers have domed, use a serrated knife to shave off the tops so you’ve got nice flat surfaces (I snack on the trimmings, no shame). Lay one layer out on your serving plate. Spread a thin coat of buttercream over the top, pipe a ring of frosting around the edge to hold in the filling, then spoon on half the remaining raspberry jam. Add the second cake layer, repeat as before, and top with the third (I put it upside down so the final cake has a flat crown).
- Cover the whole cake in a thin layer of buttercream as a crumb coat—don’t worry if it looks patchy. Pop it in the fridge for 20-30 minutes to let it firm up (so much easier to frost). I sometimes forget this step and—well, it’s a mess, so don’t skip like me!
- Slather on the rest of the frosting. Use a spatula to create swoops or go formal with a piping bag, your call. Decorate the top with all the fun stuff: fresh berries, lemon slices, freeze-dried raspberries—or honestly, whatever happens to be in your fruit drawer.
- Let the cake chill out in the fridge for 4-6 hours (or overnight if you can stand to wait) to let everything meld—flavor’s even better the next day. Bring to room temp before you cut into it, for the softest crumb.
Things I Wish I Knew (Or, Notes to Save You Headaches)
- Measuring cake flour: Spoon it into your cup and level it off—scooping straight form the bag gives you wayyy more than you want. Learned this after one sad, dense cake.
- Don’t skip cooling layers: Frosting warm cake is an act of madness, ask my sticky counters.
- Butter for meringue: Has to be cool/soft, not melty. If it’s too cold, your frosting won’t whip up right.
- Jam can be made ahead: Keeps in the fridge for ages if you don’t eat it over yoghurt morning after.
Variations I’ve (Mostly) Loved
- Tried using all fresh raspberries once—delicious, but the jam was oddly runny (my bad, didn’t simmer long enough).
- Swapped half the lemon zest for orange: nice twist, a little sweeter, less sharp.
- Less successful: I once used coconut cream instead of heavy cream. Looked cute, tasted…well, let’s just say, stick with the original!
The Gear You Really Need (Or Not…)
- 8-inch cake pans (three)—but I’ve stacked this in two larger pans before and just baked a little longer.
- Stand or hand mixer makes things easier, sure, but elbow grease and a sturdy whisk get you there too (if you want an arm workout).
- A thermometer is ideal for Swiss meringue. If you don’t own one, that finger test (rub, check for sugar granules) works in a jam—pun intended.
- Fine mesh sieve—for the jam, but in a pinch, a clean pair of tights… actually, never mind, don’t do that.
Keeping Cake Fresher Than Fresh
If (somehow) you don’t demolish this in a day, wrap the cake well and store in the fridge—good for 4-5 days. Sometimes I stash a slice in a container and it’s even tastier 48 hours later, swear down. Freeze leftover slices wrapped tight, but, honestly, we rarely have any left to freeze!
Serving It Up (Family Style or Fancy…)
I love serving this simple, with a mug of tea or coffee. If we’re feeling posh, I’ll toss some edible flowers on top too. My niece once insisted on rainbow sprinkles—who am I to judge? Sometimes I slice the cake small and let everyone come back for seconds (or thirds)—that’s the tradition at our house.
If You Want to Nail It (My Slightly Embarrassing Tips)
- I once rushed cooling the meringue and my frosting turned into soup. Actually, waiting for it to cool is totally worth it.
- Tasting the jam as it cools is 100% necessary, for science (or at least, that’s my excuse every time).
- If the cakes come out wonky, just stack ’em and pile on the frosting—everyone will ooh and ahh anyway.
People Always Ask…
- Can I use store-bought jam?
- Sure, in a pinch! Homemade is best, but good quality raspberry jam can save you some time (I do this when I’m caught short… but try to reserve some for the frosting so it’s extra flavorful).
- Does it work as cupcakes?
- Absolutely, though you’ll want to bake them for less time—maybe start checking at 15 minutes.
- Can I use all-purpose flour?
- You can, but the cake will be a bit denser. I sometimes swap in a tablespoon of cornstarch per cup of flour if that’s all I’ve got—works pretty well!
- Help! My Swiss meringue buttercream curdled—now what?
- Don’t panic. Keep mixing, and if it’s really not coming together, a very short zap with a warm towel round the bowl (not hot!) can help bring it back together. I learned this the hard way on a stormy day.
So, go on and bake. Let your kitchen smell like lemons and jam and, if things get messy—just blame the cat.
Ingredients
- 4 1/2 cups frozen raspberries
- 1/2 cup granulated sugar
- 1 tablespoon lemon juice
- 2 tablespoons cornstarch
- 2 tablespoons water
- 1 teaspoon vanilla extract
- 1 1/2 cups granulated sugar
- 2 tablespoons fresh lemon zest, packed
- 3 cups cake flour, *See notes below for measuring*
- 1 teaspoon fine sea salt
- 1 tablespoon baking powder
- 1 cup cubed unsalted European butter, room temperature
- 3 large eggs, room temperature
- 1 1/2 cups heavy cream
- 1/3 cup vegetable oil
- 2 tablespoons fresh lemon juice
- 1 teaspoon vanilla extract
- 4 large egg whites
- 1 1/2 cups granulated sugar
- 1 1/2 cups unsalted butter, cool room temperature, cut into tablespoon sized pieces
- 1/2 cup reserved raspberry jam, from above
- Pinch of fine sea salt
- Fresh raspberries, lemon slices, freeze dried raspberries, for decorating
Instructions
-
1Making Raspberry Jam: Dump your raspberries, sugar, and lemon juice into a saucepan over medium heat. Stir now and then and mash the fruit gently as it cooks. Once everything’s nice and juicy and bubbling away, whisk your cornstarch and water in a little cup to make a slurry (takes, what? 30 seconds). Tip that into the berries and keep stirring for another minute or two until you see it thicken up. It won’t look pretty just yet, but that’s totally fine. This is where I always have a moment of doubt, but keep going. Pour the mixture through a sieve to fish out the seeds. Stir in the vanilla. Now, set aside half a cup of this jam for your frosting later—try not to eat it all with a spoon right now. Let both cool off (they thicken as they sit).
-
2Preparing the Cake Batter: Crank your oven on to 350°F/180°C. Butter or spray three 8″ cake tins and line each bottom with a circle of parchment paper (seriously, don’t skip the parchment—learnt that the hard way!). In a big bowl, use your fingers to rub the lemon zest into the granulated sugar until it smells super zingy. Stir in the cake flour, salt, and baking powder. Whisk it all together so it’s sort of fluffy and combined.
-
3On low speed (or with a wooden spoon if you fancy a workout), mix in all the butter cubes. You want the mix to look sandy, not creamy—it won’t look like dough, more like thick, damp sand that actually smells pretty amazing.
-
4In another bowl, whisk together eggs, heavy cream, vegetable oil, lemon juice, and that splash of vanilla extract. I always forget one thing here and have to fish out a shell, but maybe that’s just me.
-
5Pour about half the wet stuff into the dry mix. Gently blend until all the flour is moistened, then scrape the sides of your bowl (I use a rubber spatula—I broke a wooden one ages ago and never replaced it). Mix in the rest of the wet bits, pulsing the mixer at first so it doesn’t spray everywhere, then beat on low until just combined. Batter will be thick but that’s what you want!
-
6Spoon the batter evenly into your cake pans (eyeball it, or about 485g per pan if you’re precise). Smooth the tops—it’ll feel a bit stiff. Bake in the center of the oven for 18-25 minutes. When a toothpick poked in the middle comes out with a few moist crumbs, you’re golden. Let pans cool for about 20 mins on a wire rack, then run a knife round the edges and gently tip the layers out (they’re very soft at this point—handle gently or risk cake carnage!). Cool completely before frosting.
-
7Making the Swiss Meringue Buttercream: Place your egg whites and sugar in a big heatproof bowl (or straight into your stand mixer’s bowl if that fits over a pot—saves washing up). Put the bowl over simmering water and whisk constantly (don’t let it turn into sweet scrambled eggs). When all the sugar dissolves and the thermometer reads 165°F, take it off the heat. (If you don’t have a thermometer, check by rubbbing a bit between your fingers—no grit means you’re good.)
-
8Transfer that bowl to your mixer with the whisk attachment and crank up to high. Whisk until the meringue cools to about 90-95°F. This can take 10-15 minutes; sometimes I wander off to do the dishes and forget to come back right away—it just gets extra fluffy.
-
9Drop the mixer speed to low. Add the butter a couple tablespoons at a time. It’ll look all kinds of wrong for a bit (soupy, curdled, you name it—it always comes together in the end, just keep going!). Once all the butter’s in, turn back up to medium-high until the frosting looks light and cloudlike. Now mix in your reserved raspberry jam and a pinch of salt. Just look at that color!
-
10To Assemble: If the cake layers have domed, use a serrated knife to shave off the tops so you’ve got nice flat surfaces (I snack on the trimmings, no shame). Lay one layer out on your serving plate. Spread a thin coat of buttercream over the top, pipe a ring of frosting around the edge to hold in the filling, then spoon on half the remaining raspberry jam. Add the second cake layer, repeat as before, and top with the third (I put it upside down so the final cake has a flat crown).
-
11Cover the whole cake in a thin layer of buttercream as a crumb coat—don’t worry if it looks patchy. Pop it in the fridge for 20-30 minutes to let it firm up (so much easier to frost). I sometimes forget this step and—well, it’s a mess, so don’t skip like me!
-
12Slather on the rest of the frosting. Use a spatula to create swoops or go formal with a piping bag, your call. Decorate the top with all the fun stuff: fresh berries, lemon slices, freeze-dried raspberries—or honestly, whatever happens to be in your fruit drawer.
-
13Let the cake chill out in the fridge for 4-6 hours (or overnight if you can stand to wait) to let everything meld—flavor’s even better the next day. Bring to room temp before you cut into it, for the softest crumb.
CLICK FOR NUTRITION INFO
↑
Approximate Information for One Serving
Serving Size:
1 serving
Calories:
520 caloriescal
Protein:
5 gg
Fat:
28 gg
Saturated Fat:
0g
Trans Fat:
0g
Cholesterol:
0mg
Sodium:
0mg
Potassium:
0mg
Total Carbs:
62 gg
Fiber:
0g
Sugar:
0g
Net Carbs:
0g
Vitamin A:
0
Vitamin C:
0mg
Calcium:
0mg
Iron:
0mg
Nutrition Disclaimers
Number of total servings shown is approximate. Actual number of servings will depend on your preferred portion sizes.
Nutritional values shown are general guidelines and reflect information for 1 serving using the ingredients listed, not including any optional ingredients. Actual macros may vary slightly depending on specific brands and types of ingredients used.
To determine the weight of one serving, prepare the recipe as instructed. Weigh the finished recipe, then divide the weight of the finished recipe (not including the weight of the container the food is in) by the desired number of servings. Result will be the weight of one serving.
Did you make this recipe?
Please consider Pinning it!