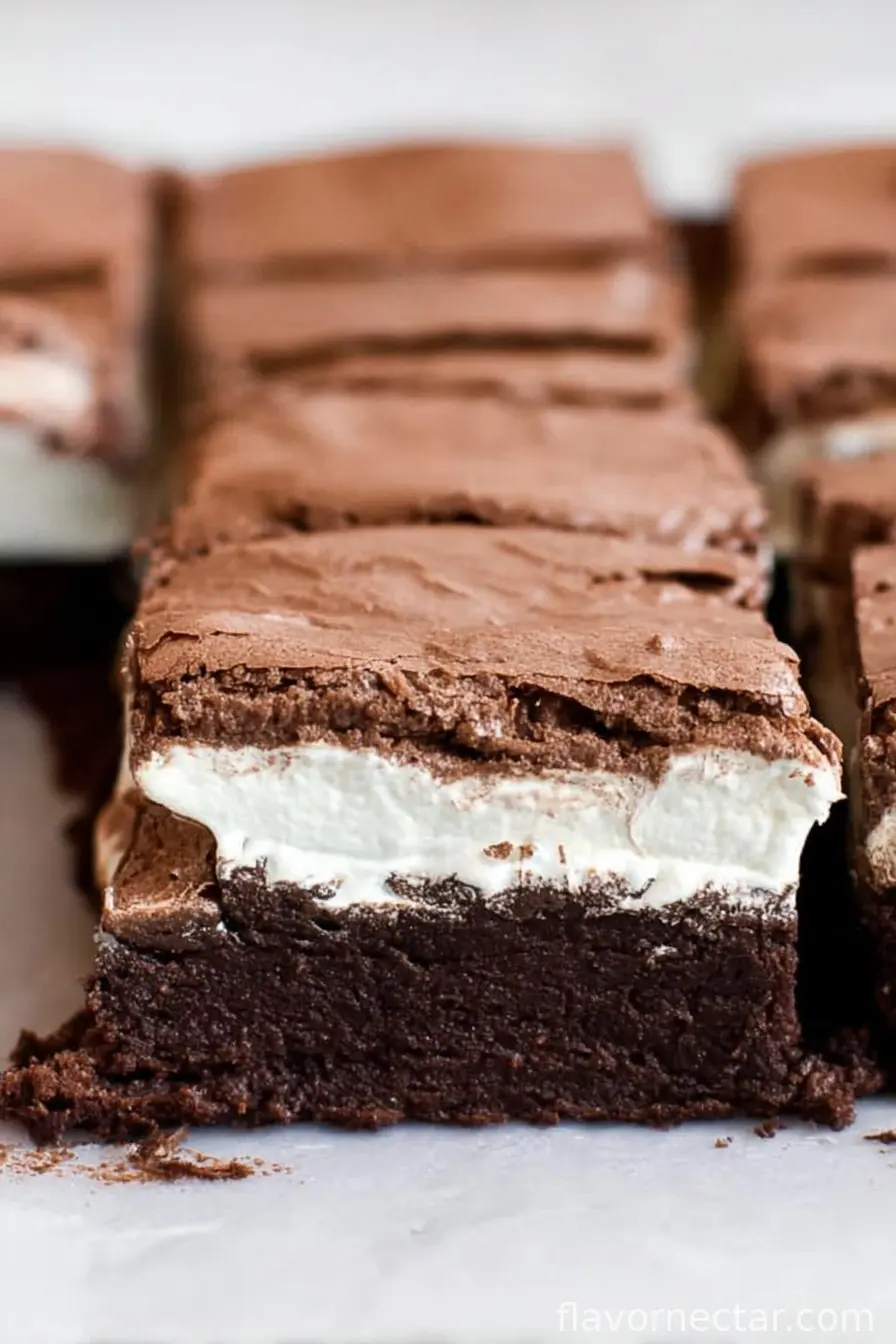
Let’s Talk About These Marshmallow Brownies (and the time my sister tried to hide them!)
Okay, so here’s the thing: if you ever need an excuse to avoid doing laundry, try baking these marshmallow Brownies. One whiff and no one will even notice the mountain of socks by the door. True story—my sister once hid the last couple at the very back of the fridge behind some questionable leftovers, but I found them anyway because, well, I know her tricks by now. It’s become an unofficial family sport. Also, if you’ve ever tried licking the bowl (who hasn’t?), this is one batter you probably won’t wanna share. Just sayin’.
Why You’re Gonna Love These (or at least I always do!)
I make this when I want something chocolaty but not just chocolate cake. My family pretty much goes crazy—there’s always a chorus of “save me an edge piece!” or my husband’s annual plea for extra marshmallows (which sometimes makes a sticky mess, but in the best way). Plus, when the marshmallows puff up and turn golden, it’s somewhere between marshmallow heaven and campfire nostalgia. Admittedly, the only problem is patience… Brownies smell done waaaayy before they’re actually cool enough to slice.
Here’s What You’ll Need (No Fancy Stuff, Promise)
- 1/2 cup (about 115g) unsalted butter (though I sometimes cheat and use margarine if we’re out)
- 1 cup sugar—my grandmother insisted on C&H, but any will do
- 2 large eggs (room temp-ish—not that I always remember to take them out)
- 1 tsp vanilla extract (honestly, the cheap stuff is fine here)
- 1/3 cup unsweetened cocoa powder—I use Dutch-process when I want it super chocolatey, but standard is fine too
- 1/2 cup all-purpose flour
- 1/4 tsp salt
- 1/4 tsp baking powder—measured with my eyeballs on lazy days
- 1 heaping cup mini marshmallows; don’t have minis? Just rip up a few big ones—it works, promise
- Optional: 1/2 cup chocolate chips or some walnuts (no one in my family eats them but I sneak a few in when I can!)
How To Make ‘Em (With a Few Sidetracks Along the Way)
- Preheat your oven to 350°F (180°C). Grease a square 8×8 inch pan. Or just line with parchment if you’re sick of scrubbing corners—been there, too.
- Melt the butter in a medium saucepan over low heat. Take it off the heat, then stir in sugar, eggs, and vanilla. It’ll look a bit lumpy-creamy at first; don’t panic.
- Next, add the cocoa, flour, salt, and baking powder. Fold it together just until no dry streaks remain—don’t overdo it. This is where I usually sneak a taste (egg safety police, avert your eyes).
- Pour batter into prepared pan. Scatter marshmallows and, if you like, chocolate chips over top. They’ll look like they’re about to take over—trust the process.
- Bake about 22–27 minutes. Here’s my secret: when a toothpick comes out with a little moist crumb, pull it. The marshmallows get gooey and slightly golden right at the end. Don’t worry if the top’s bumpy or the marshmallow bubbles in weird little craters. That means you did it right.
Notes Only a Real-Life Messy Cook Would Know
- Once I left them in ten minutes too long and got, well, “brittle fudge”—don’t do that, unless you like brownies with plum-like resilience.
- Honestly, I’ve found they taste even better the next day if you can believe it (rare occurrence at my place, but dreams do come true)
- If the marshmallow looks way too brown, just loosely tent with foil; or don’t—some of us like a little burnt sugar crunch, right?
Variations: The Good, The Odd, and That One Disaster
- Tried swirling in a bit of peanut butter; turned out, it’s a yes—just go easy or it can overpower.
- Once, I thought dried cranberries would be a genius move (nope for me—not doing that again, but you might like the tartness).
- Sometimes swap half the flour for ground almonds for a sort of nutty goodness. Or don’t. Totally your call.

If You Don’t Have the Kitchen Gear (Been There!)
No saucepan? Melt your butter in the microwave in 10-second spurts—just keep an eye so it doesn’t explode. Don’t sweat if you’re using an odd-shaped baking dish; just check for doneness a bit early or late. I’ve even done brownies in a round cake tin—just call them “brownie wedges”, and suddenly it’s fancy.
How Do You Store These? (Asking for a Friend)
I mean, technically, you can keep them in an airtight container for up to 3 days at room temp. But honestly, in my house, they never last even 24 hours. If you manage to squirrel some away, the marshmallow might get a tad stickier the next day (I kinda like that though).
Best Ways to Serve (Besides ‘One In Each Fist’)
Little squares are great for lunch boxes (if you can keep your family from sneaking them), or warm with vanilla ice cream for pudding night. Personally, I like a corner piece with coffee when the kitchen is finally quiet. My nephew insists on sprinkles for “birthday brownies”—no matter the day.
Pro Tips I Learned the Hard Way
- I once rushed them out of the pan still warm—big mistake. They squished everywhere. Let them cool awhile before slicing; your patience will thank you.
- Actually, for the deepest flavor, let them rest overnight (said no one in my family ever, but hey, I tried).
Your Burning Questions (From Real Friends and Snack Thieves)
- Can I use marshmallow fluff? You could, but it tends to melt and disappear into the brownies. I prefer the real deal minis or torn big ones.
- Can I double this recipe? Oh, absolutely! Just use a 9×13 pan, and maybe tack on a few more minutes to the baking time. Honestly, you’ll want the extras.
- Why do my marshmallows brown super fast? Sometimes it’s just the oven’s hot spots. Lay some foil on top if it looks too wild. But golden is good (burnt… eh, learned that lesson more than once).
- Can I make these gluten-free? Yep, I’ve swapped in a gluten-free all-purpose flour blend, and it works. Texture’s a little different but still works for getting your marshmallow fix.
- Wait, did you say you use margarine sometimes? I know; classic baking crime. But desperate times call for desperate measures, and nobody ever seems to notice!
If you made it this far, you probably love brownies enough to forgive my meandering instructions—and if not, make them anyway. They’re worth a stray marshmallow or two stuck to your shirt!
Ingredients
- 1/2 cup (115 g) unsalted butter, melted
- 1 cup (200 g) granulated sugar
- 2 large eggs
- 1 teaspoon vanilla extract
- 1/3 cup (40 g) unsweetened cocoa powder
- 1/2 cup (65 g) all-purpose flour
- 1/4 teaspoon salt
- 2 cups mini marshmallows
- 1/3 cup (60 g) semisweet chocolate chips (for glaze)
- 2 tablespoons unsalted butter (for glaze)
Instructions
-
1Preheat oven to 350°F (175°C). Grease an 8×8-inch (20×20 cm) baking pan.
-
2In a mixing bowl, whisk together melted butter and sugar. Add eggs and vanilla extract, mixing until combined.
-
3Stir in cocoa powder, flour, and salt until just combined. Do not overmix.
-
4Pour batter into prepared pan and bake for 25-28 minutes or until the center is just set.
-
5Remove from oven, immediately sprinkle mini marshmallows evenly over the brownies, then return to oven for 2-3 minutes until marshmallows are puffed.
-
6Melt chocolate chips with butter in a microwave or on the stovetop, stirring until smooth. Drizzle over marshmallow layer and let cool before slicing.
CLICK FOR NUTRITION INFO
↑
Approximate Information for One Serving
Serving Size:
1 serving
Calories:
245 caloriescal
Protein:
2 gg
Fat:
10 gg
Saturated Fat:
0g
Trans Fat:
0g
Cholesterol:
0mg
Sodium:
0mg
Potassium:
0mg
Total Carbs:
36 gg
Fiber:
0g
Sugar:
0g
Net Carbs:
0g
Vitamin A:
0
Vitamin C:
0mg
Calcium:
0mg
Iron:
0mg
Nutrition Disclaimers
Number of total servings shown is approximate. Actual number of servings will depend on your preferred portion sizes.
Nutritional values shown are general guidelines and reflect information for 1 serving using the ingredients listed, not including any optional ingredients. Actual macros may vary slightly depending on specific brands and types of ingredients used.
To determine the weight of one serving, prepare the recipe as instructed. Weigh the finished recipe, then divide the weight of the finished recipe (not including the weight of the container the food is in) by the desired number of servings. Result will be the weight of one serving.
Did you make this recipe?
Please consider Pinning it!!