If I’m being totally honest, the first time I made these Healthy No Bake Chocolate Oat Bars, it was one of those I-have-nothing-in-the-house-but-chocolate-and-oats scenarios; you know the ones. We were supposed to bring a treat to my son’s footy game and I’d genuinely forgotten—classic me—so I just threw together what I had and hoped for magic. Turns out, sometimes chaos equals genius (or well, decent snacking). These bars have become sort of legendary in my house, to the point that people expect them at family gatherings and I get a bit of side-eye if I bring something “healthier” like carrot sticks instead. Not that anyone actually eats the carrot sticks, but they do make a nice backdrop for the oat bars in the photos. Oh, and I almost forgot—last time, my dog tried to make off with the entire tray, so that’s a pretty solid review.
So, Why Do I Keep Making These?
I whip up these bars when school’s about to start and I realize I need lunchbox fillers, or honestly, just for those hangry afternoons when boiling pasta feels far too ambitious. My crew will inhale anything chocolate (I’m sort of the same), but I like knowing these have a bit more going for them—oats, nut butter, all that. Plus, no baking! No regrets about burned bottoms or melted spatulas (I still remember the time I melted a spatula right onto a tray of cookies; these days I just avoid baking when it’s sweltering).
Right, Here’s What You’ll Need
- 2 cups rolled oats (I’ve used quick oats before in a pinch—comes out softer, but honestly fine. My grandma would insist on Bob’s Red Mill but whatever’s on hand usually works.)
- 1 cup creamy peanut butter (or almond butter if you’re feeling fancy. I even tried sunflower seed butter once—a little earthy but not bad!)
- 1/2 cup honey or pure maple syrup (I’ve grabbed agave when we were out—turned out a bit stickier, but not a dealbreaker)
- 1/4 cup chopped dark chocolate or chocolate chips (semi-sweet, milk, whatever you’ve got lying around. That random Easter bunny? Yep, that works too)
- 2 tablespoons coconut oil (if you don’t have it, melted butter’s totally fine. I actually prefer the coconut stuff for a bit of tropical flavor)
- Pinch of salt (don’t skip this—trust me!)
- Optional: handful of chopped nuts, coconut flakes, raisins, or even some seeds. Totally up to you; sometimes I throw in chia seeds if I spot them in the cupboard
Making the Magic Happen: Step-by-Step
- Line an 8-inch square pan with parchment. Don’t stress if you don’t have the exact size—I’ve used a loaf pan before, just ended up with thicker bars.
- Grab a medium pot, toss in the peanut butter, honey (or maple syrup or whatever sticky sweet thing you grabbed), and coconut oil. Warm it over low heat, stirring until it’s melted and lovely. (Here’s where I suggest sneaking a tiny taste, but don’t burn your mouth like I did once. Oops.)
- Turn off the heat, stir in the oats and a generous pinch of salt. If it seems a little dry, just add another spoonful of nut butter—works every time.
- Press the mixture into your pan. I usually use the back of a slightly wet spoon so it doesn’t stick to everything. Or just hands, in classic messy fashion (hands beat spoons nine times out of ten for stuff like this).
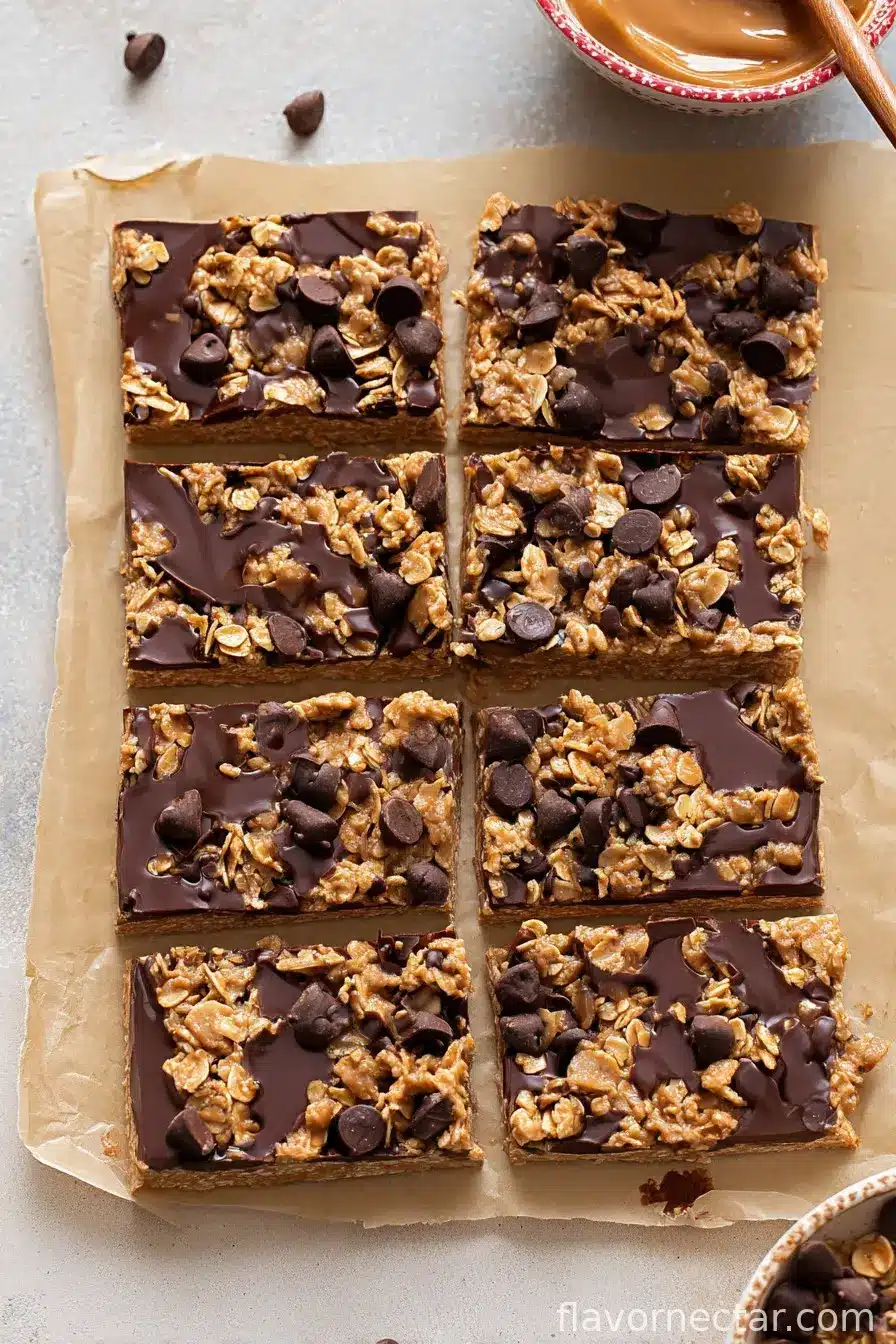
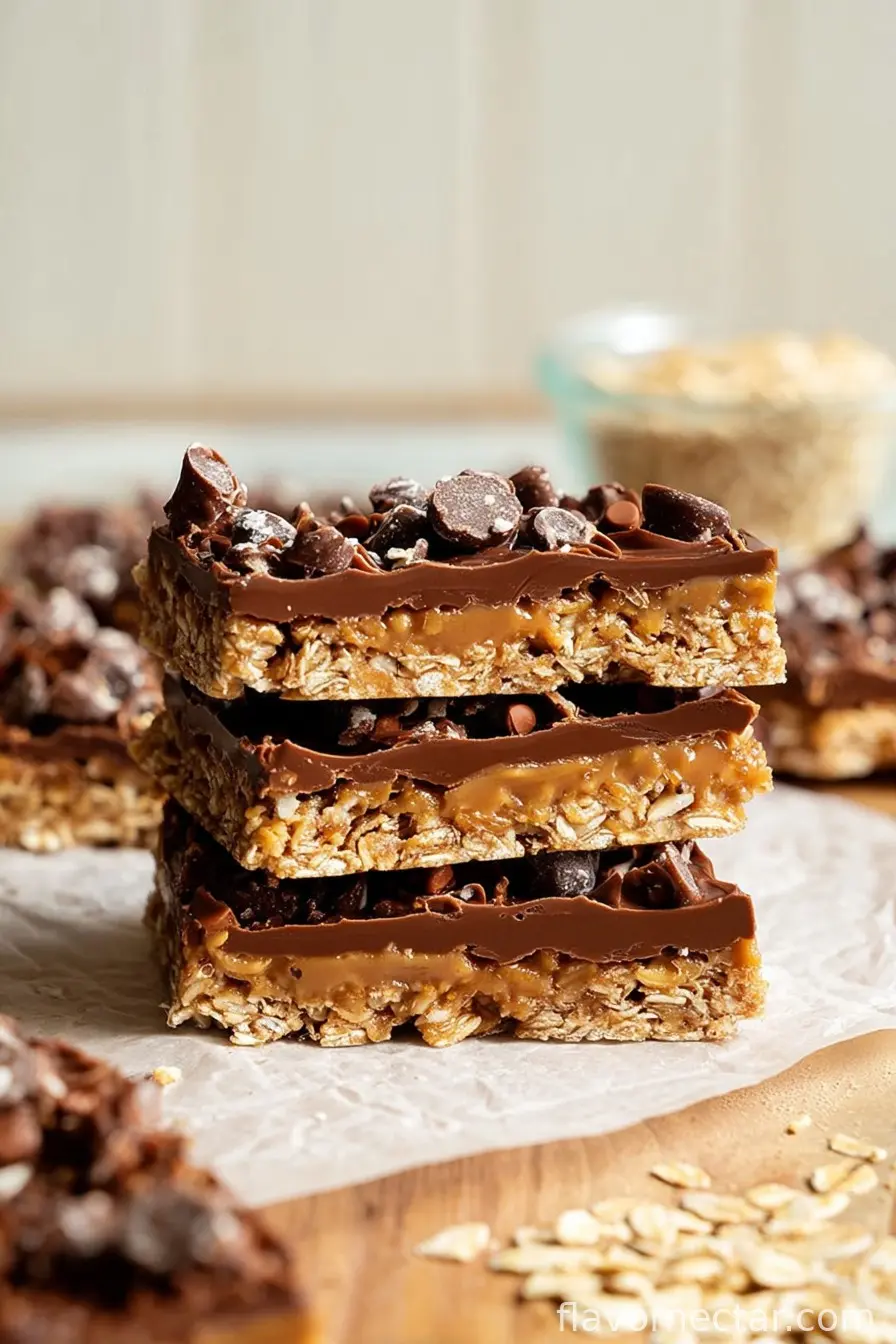
- Melt your chocolate and drizzle (or pour—no one’s judging) over the oat layer. If you want it fancy, swirl it; if not, just plop it on. Decorate with chopped nuts, coconut, or whatever you’re in the mood for. Or nothing; minimalism is still a thing, right?
- Chill in the fridge for at least 2 hours, though it’ll set faster in the freezer. (Although, if you’re me, patience is NOT my strong suit—I once tried 30 minutes and let’s just say, chocolate oat sludge is less appealing than you’d think.)
- Slice into bars or squares or… whatever shapes make you happy. Irregular triangles? Go for it.
What I’ve Learned Along the Way
- If you try to double the honey hoping for chewier bars, you just get ridiculous stickiness (learned that the messy way).
- Using parchment is essential, but honestly, I forgot it once and just pried everything out with the edge of a spatula. It sort of worked. I had a fun time eating the crumbs.
- Actually, I find they hold together best if you really press down—like, show no mercy. Kids make the best bar-packers, maybe because everything is a competition?
Variations I’ve Tried (And A Few Regrets)
- Adding dried cranberries was a win; they brought a bit of tang that worked with all that chocolate business.
- Swapping peanut butter for tahini gave me high hopes, but the flavor was oddly bitter? Might be an acquired taste, so, experiment if you’re feeling adventurous.
- Chucked in some espresso powder one afternoon—immediate upgrade. But the kids weren’t as keen, so maybe call it the ‘grown-up’ batch.
What Equipment You Actually Need
Look, I use an 8-inch pan and a regular saucepan, but in a pinch I’ve pressed these into a pie dish or even, once, that old baking tray nobody loves. No microwave? Melt your chocolate with a bowl set over simmering water, or honestly, just chop it small and let the residual heat from the oats do its thing. No whisks required (thank goodness—cleaning those is a pain).
How I (Try to) Store These
Technically, they’ll last 4–5 days in the fridge, but honestly, in my house, they’re gone by the next morning. If you’re more moderate than my lot, they’re best in an airtight container, cold—unless you enjoy a bit of stick-fingered snacking, in which case, room temp is fine for a day or so. I even froze a couple one time, and they tasted great thawed—just not too long in the freezer or the oats start to get weird.
How We Usually Serve (Or Don’t)
I always intend to put these on a pretty plate, maybe scatter some berries fancy-like, but usually someone just grabs one straight from the pan (sometimes with a spoon, not going to lie). Occasionally, we’ll have them with a cold glass of milk or—if it’s the weekend—along with my questionable homemade iced coffee. Once I added a dollop of yogurt and called it breakfast; nobody argued.
Pro Tips (Learned It The Hard Way)
- I once tried to rush the chilling step and regretted it because slicing a warm mess is no fun. Trust me, your patience will pay off.
- If you’re tempted to skip the pinch of salt, don’t. It makes the chocolate pop. Salt is a sneaky flavor hero.
- Had a go at using the microwave for the chocolate—managed to burn it. Apparently 10-second bursts are the way to go, not just cranking the dial and walking away. Lesson: chocolate wants attention.
Curious? Here’s My FAQ (The Real Kind)
- Do they come out super sweet? Not really—unless you use lots of milk chocolate, then yes, maybe a bit. I lean dark.
- Can I make these nut-free? Yup, just use sunflower seed butter (if you aren’t put off by that earthy taste I mentioned), or try oat butter if you can find it—my store almost never has it, but worth a shot.
- What if my bars fall apart? On second thought, maybe pack down the mix harder. Also, let them chill longer, and use enough sticky stuff (that’s technical, right?).
- Do oats need to be toasted first? I never bother, but I guess you could if you want a bit more nuttiness. I’m too lazy most days.
- Can I skip the chocolate? Honestly, you can, but I don’t. My family would mutiny. Maybe swap it with a drizzle of peanut butter or a dusting of cocoa powder if you’re feeling reckless.
And, oh, if you ever spill chocolate down the front of your shirt while making these—just say you’re test-tasting. Works every time, mate.
Ingredients
- 2 cups old-fashioned rolled oats
- 1 cup almond butter (or peanut butter)
- 1/2 cup pure maple syrup
- 1/3 cup unsweetened cocoa powder
- 1/4 cup coconut oil, melted
- 1 teaspoon pure vanilla extract
- 1/4 teaspoon salt
- 1/3 cup dark chocolate chips
Instructions
-
1Line an 8×8 inch baking pan with parchment paper, leaving some overhang for easy removal.
-
2In a large bowl, mix together the rolled oats, cocoa powder, and salt.
-
3In a separate microwave-safe bowl, combine almond butter, maple syrup, and coconut oil. Microwave in 20-second intervals until melted and smooth. Stir in vanilla extract.
-
4Pour the wet mixture over the dry ingredients and mix well until fully combined. Fold in the dark chocolate chips.
-
5Transfer mixture to the prepared pan. Press firmly and evenly into the pan with a spatula or your hands.
-
6Refrigerate for at least 1 hour or until the bars are set. Lift from the pan and cut into 12 bars. Serve chilled.
CLICK FOR NUTRITION INFO
↑
Approximate Information for One Serving
Serving Size:
1 serving
Calories:
220 caloriescal
Protein:
5gg
Fat:
12gg
Saturated Fat:
0g
Trans Fat:
0g
Cholesterol:
0mg
Sodium:
0mg
Potassium:
0mg
Total Carbs:
24gg
Fiber:
0g
Sugar:
0g
Net Carbs:
0g
Vitamin A:
0
Vitamin C:
0mg
Calcium:
0mg
Iron:
0mg
Nutrition Disclaimers
Number of total servings shown is approximate. Actual number of servings will depend on your preferred portion sizes.
Nutritional values shown are general guidelines and reflect information for 1 serving using the ingredients listed, not including any optional ingredients. Actual macros may vary slightly depending on specific brands and types of ingredients used.
To determine the weight of one serving, prepare the recipe as instructed. Weigh the finished recipe, then divide the weight of the finished recipe (not including the weight of the container the food is in) by the desired number of servings. Result will be the weight of one serving.
Did you make this recipe?
Please consider Pinning it!!