Let Me Tell You How This Ground Beef Zucchini casserole Became a Go-To
You know how some recipes just sort of sneak up on you and suddenly they’re a part of the regular rotation? This Ground Beef zucchini casserole is one of mine. The first time I made it, I was staring down a fridge full of zucchini my neighbor dumped on me (I think she secretly despises me in July). Combined it with a stray pound of Ground Beef and a block of cheddar hanging on for dear life, and – voila – accidental magic. And, okay, the first attempt was more “beefy zucchini puddle,” but I’ve since rescued it from those watery depths. If you’ve got zucchini threatening to take over your kitchen, this one’ll save your sanity. Or at least your crisper drawer.
Why I Keep Coming Back To This (And Maybe You Will Too)
I make this when I need to get dinner on the table while figuring out 78 other things, or when someone’s coming for dinner and I want something hearty but don’t feel like babysitting pots. My family goes nuts for this, mostly because it’s cheesy enough to qualify as comfort food, but hey, there’s a vegetable in it, so I call it balance. Kids don’t even whine about the zucchini, which is honestly the biggest win. I used to stress about the cheese melting perfectly, but honestly, it turns out differently every time–I just roll with it now. (Besides, the crispy cheesy edges are the best part anyway.)
What You’ll Need (& Some Personal Cheater Moves)
- 1 lb Ground Beef (lean if you want less grease, but I’ve used whatever was on sale; turkey works in a pinch, but my crew prefers beef)
- 2 medium zucchinis, sliced into half-moons (or coins, your call; supermarket ones are fine, but if you’ve got garden monsters, just scoop out the giant seeds)
- 1 medium onion, diced (sometimes I grab the pre-chopped stuff if I’m feeling lazy – nobody’s judging, right?)
- 2 cloves garlic, minced (full disclosure: I use the jarred stuff all the time)
- 1 can (14.5 oz) diced tomatoes, drained (my grandma swore by fire-roasted, but regular works just fine)
- 1 cup shredded cheddar cheese (use any mix you like – mozzarella gets stringy, in a good way)
- 1/2 cup grated parmesan (you know, the green can is totally okay here)
- 1/2 teaspoon dried basil (Italian seasoning if you, like me, run out sometimes)
- 1 teaspoon salt (taste as you go – I do, sometimes a bit too freely)
- 1/2 teaspoon pepper
- 1/4 teaspoon crushed red pepper flakes (totally optional – I only add it if the kids aren’t around)
- 1/2 cup breadcrumbs (storebought, or just blitz up the random heels hiding in your freezer)
- Olive oil, for sautéing
Here’s How You Actually Make It (Even If You Get Distracted…Like I Do)
- Preheat your oven to 375°F (190°C). If you forget, like me, you’ll remember halfway. No big deal.
- Heat a big ol’ skillet over medium-high. Swirl in a glug of olive oil, toss in the onion, and sauté until soft (about 4-5 minutes, or until you lose patience).
- Add the garlic and zucchini, cooking until the zucchini starts to soften (about 5 minutes). It doesn’t need to be cooked through, just not raw. If it looks watery, don’t panic—it always does at this stage.
- In goes the ground beef. Break it up with your spoon, and cook til it’s browned and crumbly. Drain off the excess grease (unless you want a casserole with a… let’s call it ‘shiny finish’).
- Stir in the drained tomatoes, basil, salt, pepper, and a pinch of red pepper flakes if you feel bold. Give it a taste (this is where I sneak a spoonful). Adjust seasoning.
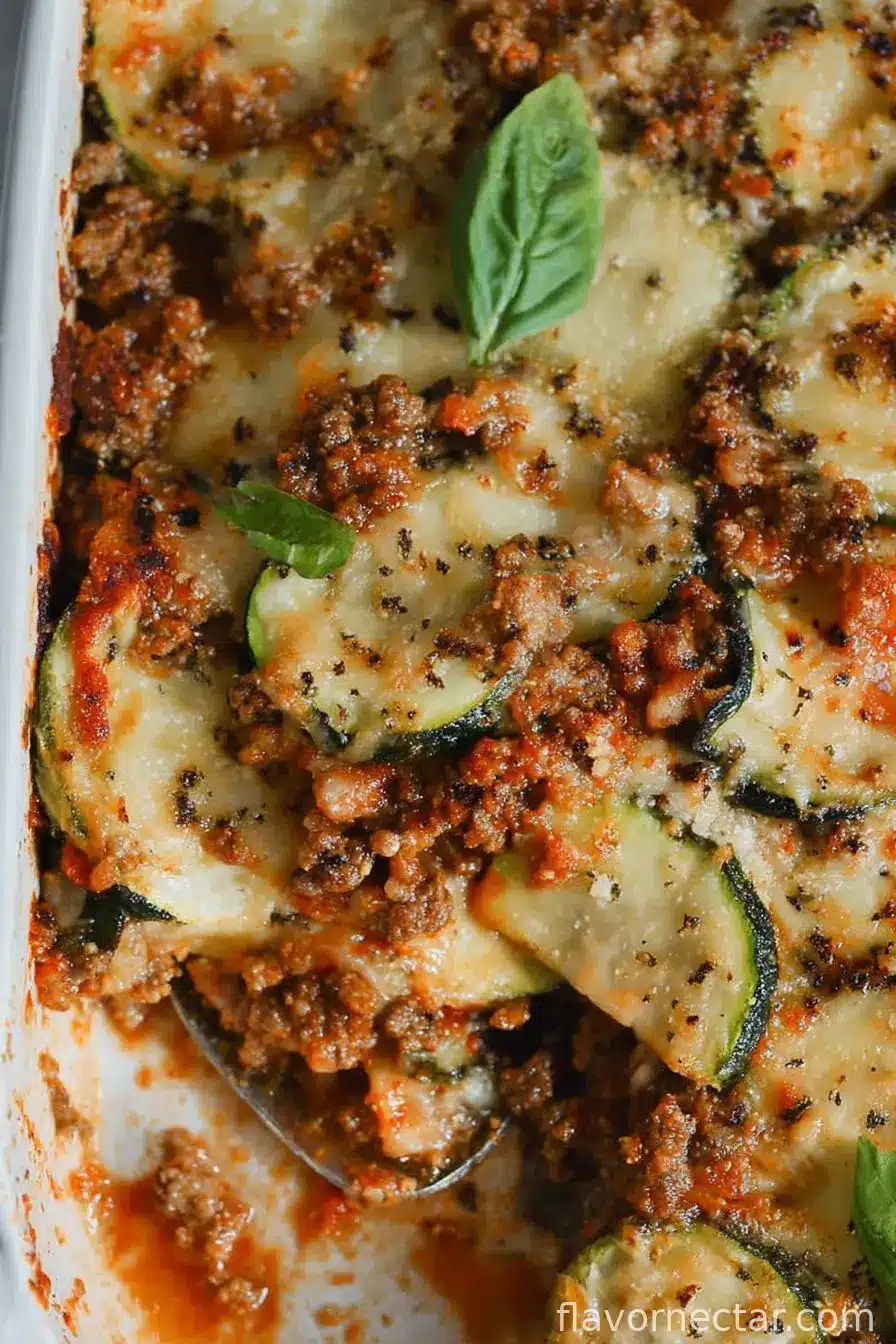
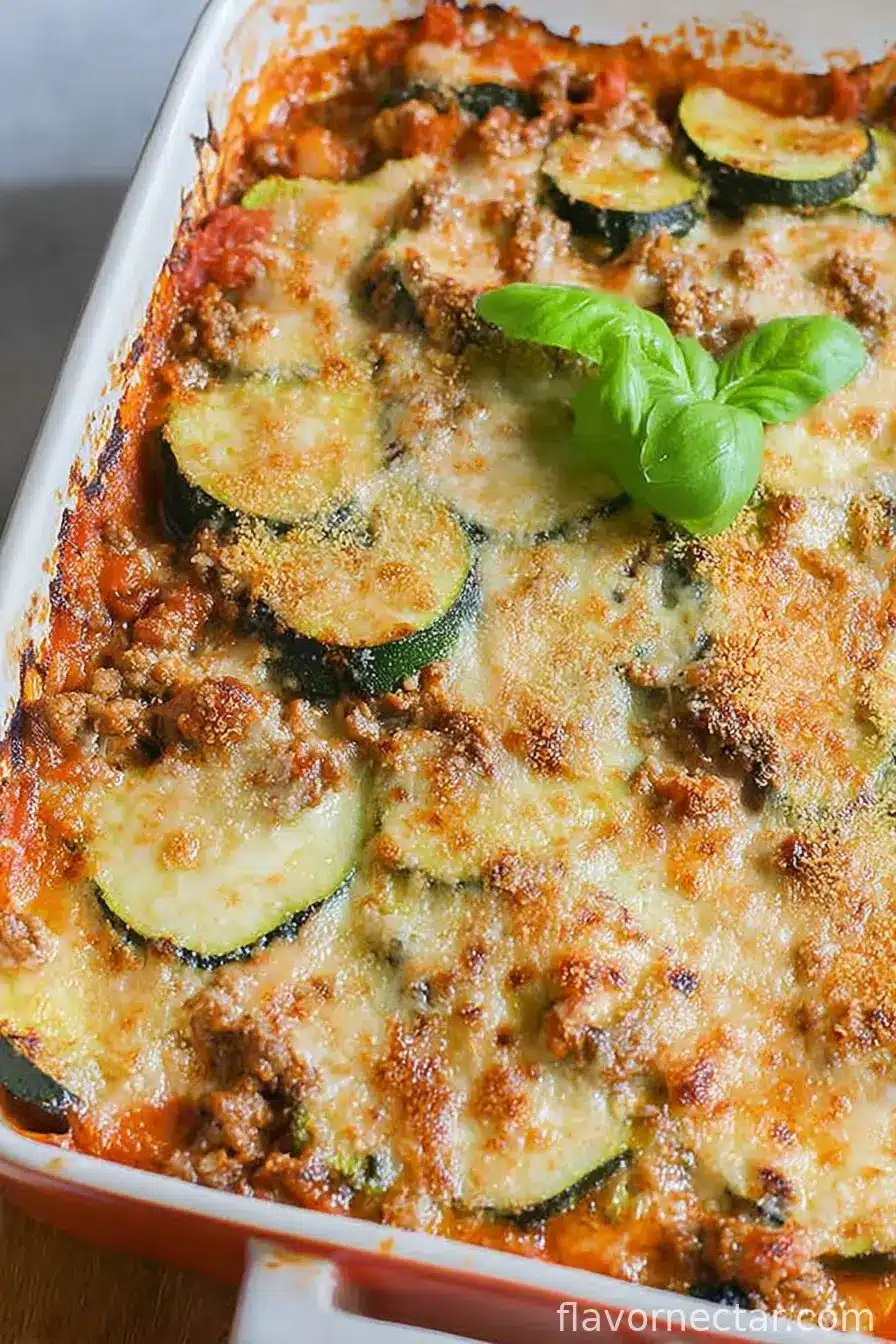
- Grab a casserole dish (mine’s about 9×13, but honestly any similar-sized one works). Spread half of your beef-zucchini mix in the dish.
- Top with half the cheddar and parmesan. Then repeat – remaining beef-zucchini, then finish with the rest of the cheese. Sprinkle breadcrumbs over the very top. If it doesn’t look photogenic, who cares? It’ll be delish.
- Bake uncovered for 25-30 minutes, until the cheese is golden and it’s bubbling around the edges (sometimes I lose track of time and end up with extra crispy bits, which aren’t the worst thing).
- Let it rest for 10 minutes before scooping–it’ll be less like a casserole landslide that way. (Although, honestly, as soon as the cheese stops looking molten, I’m in!)
Notes That’ll Save You From My Rookie Mistakes
- Honestly, letting this sit for 10 minutes after baking really helps; otherwise you end up with something resembling a cheesy beef stew. Not bad, just not a proper slice.
- If you have mega-zucchini (you know, those ones that look like they could be used as doorstops), scoop out the seedy center before slicing. Makes a difference, trust me.
- If your casserole is pooling with extra liquid, it’s usually the tomatoes or zucchini…sometimes I just pour off a bit of liquid halfway through baking. Or actually, I find it works better if you salt and drain the zucchini slices for 10 minutes beforehand, then pat them dry (but, let’s be real, I forget half the time).
Swaps & Experiments (Some More Successful Than Others)
- Swapped ground turkey for beef once – it was a smidge less rich, but still tasty. My kids noticed (of course they did).
- Tried adding bell pepper – nice for a little sweetness, but didn’t blend in as well as I hoped.
- I once used a can of Rotel instead of regular tomatoes by accident and wow, it took on a Tex-Mex personality. Not what I was going for, but not bad with tortilla chips on the side.
- Don’t ever try cottage cheese on top. Trust me, it just gets weirdly lumpy.
What If You Don’t Have the Right Pan & Other Equipment Talk
I use a 9×13 glass casserole dish, but my pal Mia said she just dumps the whole thing in a Dutch oven and bakes it with the lid off. Also, if you don’t have a skillet big enough for the beef and veg, do it in batches. When in doubt, layering is your friend. And if you run out of cheese, I once mixed in some cream cheese chunks—bit strange, but totally edible.
How I Store It (Except It Rarely Survives That Long)
Truth is, this casserole is even better the next day—if by some miracle you have leftovers. I just cover the dish with foil or shove pieces into snaplock containers. Fridge for up to 3 days. Freezer? Yep—wrap portions up snug and freeze for up to 2 months, but honestly, I usually just eat the leftovers for lunch the next day (or for breakfast—don’t judge; it works!).
This Is What I Like to Serve With It
We usually just scoop out big portions and plop them onto plates with a simple green salad. But when I’m feeling extra, I’ll do garlic bread (my son calls this “dipping armor”). If there’s red wine open, I say pour a splash; makes the whole meal feel a bit fancier. Also, apparently my uncle insists it must be eaten with hot sauce, so that’s been a friendly family debate for years (taste test and see where you stand).
Things I Wish I Knew The First Time I Made This
- Patience is key—if you rush the resting step, you’ll have a mess. Seriously, I learned the hard way (three times – slow learner, I guess).
- Don’t be afraid to taste and adjust seasoning throughout. Otherwise, it might end up bland as dishwater, which is how my first attempt turned out (oops).
- The crusty bits around the edge are kind of the best parts, so don’t worry if it gets a little more golden than golden-brown.
Burning Questions (That Have Ended Up In My Inbox…Or Texts)
- Can you make it ahead? Totally. Honestly, sometimes I prep the whole thing the night before, stash in the fridge covered, and bake it after work. Just tack on a few extra minutes if it’s cold.
- Will it be ruined if I use ground turkey? Ruined? Nah, just a little lighter. I add a bit more cheese to compensate – personal philosophy.
- What if I don’t have breadcrumbs? Crush a handful of crackers or even the end slices of bread. Cheese puffs once in a pinch… actually, that wasn’t bad.
- Is it gluten-free? Not as written, but swap breadcrumbs for GF ones and you’re sorted. Or just skip the crumbs—it’s not a deal-breaker.
- How do I keep it from getting soggy? Well, the best way is to be patient with draining zucchini and tomatoes. But some days it just happens; roll with it. Tastes good either way.
- Can I double the recipe? Sure! Might need two pans, though. Or use a giant roasting tin; just don’t over-crowd or it’ll get steamy.
Oh, and one last thing: if you try it, send me your tweaks – or your disasters! You can’t mess this up too badly, promise. It’s all about making it your own, even if your kitchen sometimes looks like a tornado swept through. (Which, to be fair, mine does most nights.)
Ingredients
- 1 lb ground beef (lean if you want less grease, but I’ve used whatever was on sale; turkey works in a pinch, but my crew prefers beef)
- 2 medium zucchinis, sliced into half-moons (or coins, your call; supermarket ones are fine, but if you’ve got garden monsters, just scoop out the giant seeds)
- 1 medium onion, diced (sometimes I grab the pre-chopped stuff if I’m feeling lazy – nobody’s judging, right?)
- 2 cloves garlic, minced (full disclosure: I use the jarred stuff all the time)
- 1 can (14.5 oz) diced tomatoes, drained (my grandma swore by fire-roasted, but regular works just fine)
- 1 cup shredded cheddar cheese (use any mix you like – mozzarella gets stringy, in a good way)
- 1/2 cup grated parmesan (you know, the green can is totally okay here)
- 1/2 teaspoon dried basil (Italian seasoning if you, like me, run out sometimes)
- 1 teaspoon salt (taste as you go – I do, sometimes a bit too freely)
- 1/2 teaspoon pepper
- 1/4 teaspoon crushed red pepper flakes (totally optional – I only add it if the kids aren’t around)
- 1/2 cup breadcrumbs (storebought, or just blitz up the random heels hiding in your freezer)
- Olive oil, for sautéing
Instructions
-
1Preheat your oven to 375°F (190°C). If you forget, like me, you’ll remember halfway. No big deal.
-
2Heat a big ol’ skillet over medium-high. Swirl in a glug of olive oil, toss in the onion, and sauté until soft (about 4-5 minutes, or until you lose patience).
-
3Add the garlic and zucchini, cooking until the zucchini starts to soften (about 5 minutes). It doesn’t need to be cooked through, just not raw. If it looks watery, don’t panic—it always does at this stage.
-
4In goes the ground beef. Break it up with your spoon, and cook til it’s browned and crumbly. Drain off the excess grease (unless you want a casserole with a… let’s call it ‘shiny finish’).
-
5Stir in the drained tomatoes, basil, salt, pepper, and a pinch of red pepper flakes if you feel bold. Give it a taste (this is where I sneak a spoonful). Adjust seasoning.
-
6Grab a casserole dish (mine’s about 9×13, but honestly any similar-sized one works). Spread half of your beef-zucchini mix in the dish.
-
7Top with half the cheddar and parmesan. Then repeat – remaining beef-zucchini, then finish with the rest of the cheese. Sprinkle breadcrumbs over the very top. If it doesn’t look photogenic, who cares? It’ll be delish.
-
8Bake uncovered for 25-30 minutes, until the cheese is golden and it’s bubbling around the edges (sometimes I lose track of time and end up with extra crispy bits, which aren’t the worst thing).
-
9Let it rest for 10 minutes before scooping–it’ll be less like a casserole landslide that way. (Although, honestly, as soon as the cheese stops looking molten, I’m in!)
CLICK FOR NUTRITION INFO
↑
Approximate Information for One Serving
Serving Size:
1 serving
Calories:
370cal
Protein:
22 gg
Fat:
24 gg
Saturated Fat:
0g
Trans Fat:
0g
Cholesterol:
0mg
Sodium:
0mg
Potassium:
0mg
Total Carbs:
16 gg
Fiber:
0g
Sugar:
0g
Net Carbs:
0g
Vitamin A:
0
Vitamin C:
0mg
Calcium:
0mg
Iron:
0mg
Nutrition Disclaimers
Number of total servings shown is approximate. Actual number of servings will depend on your preferred portion sizes.
Nutritional values shown are general guidelines and reflect information for 1 serving using the ingredients listed, not including any optional ingredients. Actual macros may vary slightly depending on specific brands and types of ingredients used.
To determine the weight of one serving, prepare the recipe as instructed. Weigh the finished recipe, then divide the weight of the finished recipe (not including the weight of the container the food is in) by the desired number of servings. Result will be the weight of one serving.
Did you make this recipe?
Please consider Pinning it!