Let’s Talk About Chicken (and Kitchen Disasters)
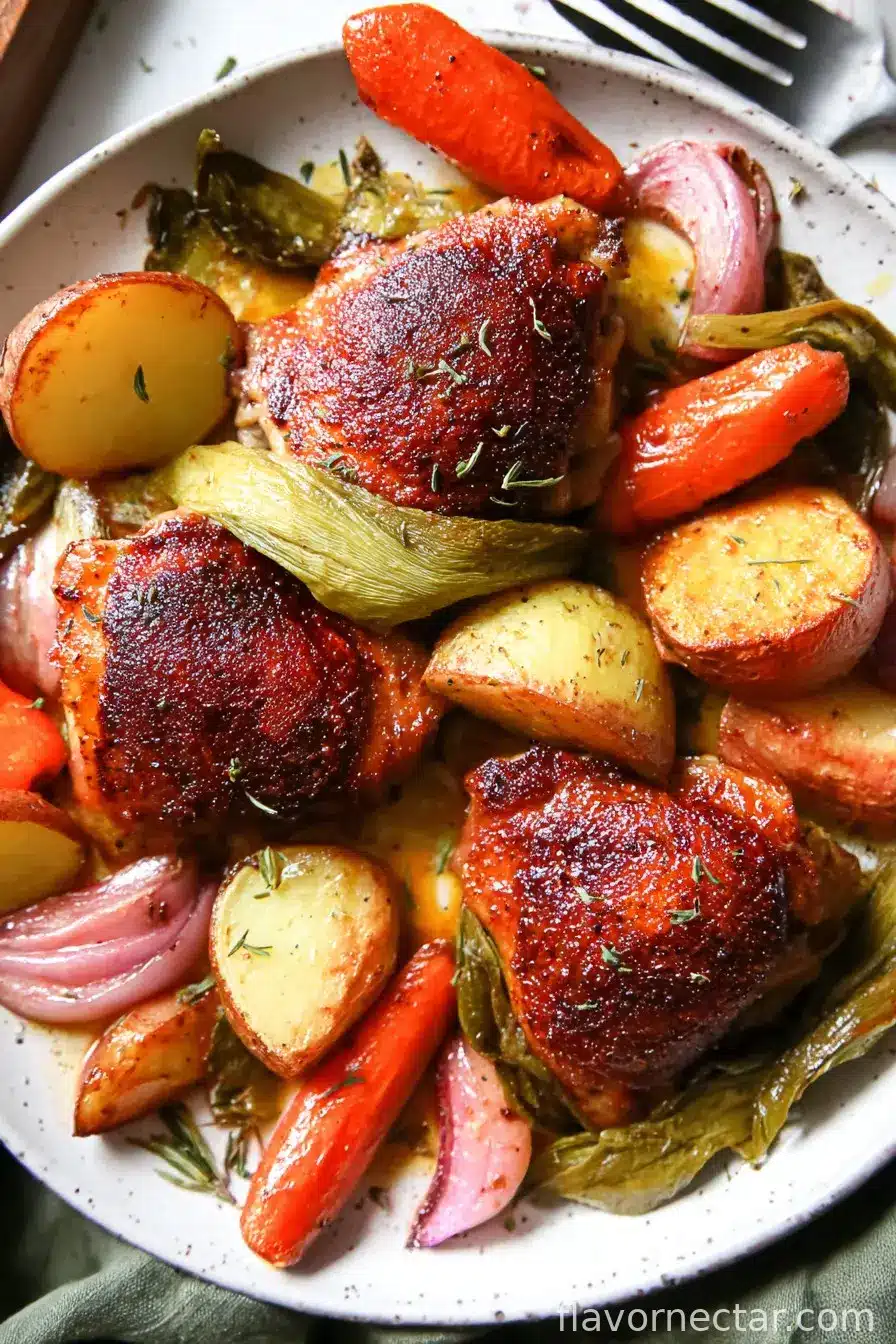
I’ll be completely honest: there was a time when roasting chicken made me nervous. I mean, as a kid, my job was “veggie chopper” not chef — and my first chicken thigh attempt was, well, let’s call it a learning experience (the smoke alarm nearly joined us at the dinner table!). But now? These crispy roasted (bone-in) chicken thighs with veggies are my go-to for just about any weeknight where I want folks to think I have my act together, even if my socks don’t match. The aroma alone makes the whole house smell like Sunday at my grandma’s. (Although, she’d probably have a word or two about my veggie choices — but that’s a story for another day.)
Why You’ll Love This Little Sheet Pan Miracle
I make this when I want to impress without, you know, actually fussing too much — like when my neighbor comes by or my family starts the “what’s for dinner” chant. My kids go nuts for the crispy chicken skin (okay, so do I, can’t lie), and the veggies soak up all that chicken-y goodness from the bottom of the pan. And when I’m not running late, I even remember to toss in a splash of lemon to brighten things up (only took me ten tries to remember that one!). It’s all about being delicious and really, really forgiving.
What You’ll Need (Plus a Few Lazy Swaps)
- 4 bone-in, skin-on chicken thighs (sometimes I use drumsticks if that’s all that’s left in the freezer)
- 1 pound baby potatoes, halved (I sometimes just dice up whatever potatoes are sprouting on the counter)
- 3 carrots, sliced into chunky coins (parsnips are fair game too, or whatever root veg that’s rolling around in your fridge)
- 1 red onion, cut into wedges (white or yellow works; I once used shallots and nobody noticed)
- 2 tablespoons olive oil (or just enough to make everyone glisten, really)
- 1 teaspoon kosher salt (I eyeball it — not always wise, but I’m a rebel)
- 1/2 teaspoon black pepper
- 1 teaspoon smoked paprika (regular paprika works; sometimes I go wild and use a pinch of cayenne if I feel saucy)
- 1 teaspoon garlic powder (fresh garlic is nice, but honestly, sometimes I’m just not peeling garlic on a Wednesday)
- 1/2 teaspoon dried thyme (or Italian seasoning, honestly anything green and herby will do in a pinch)
- 1 lemon, cut into thickish slices (optional, but try it at least once — trust me)
>
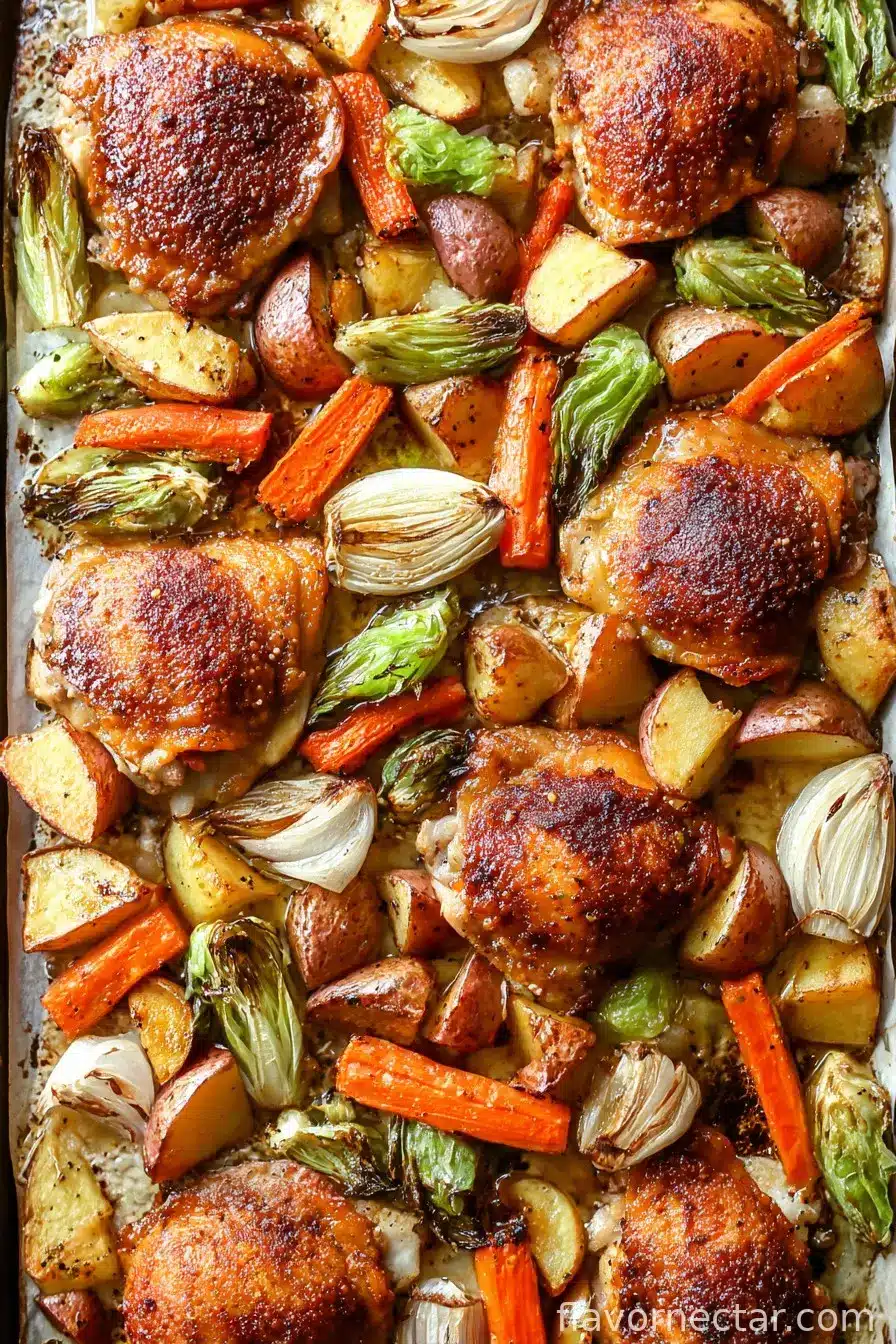
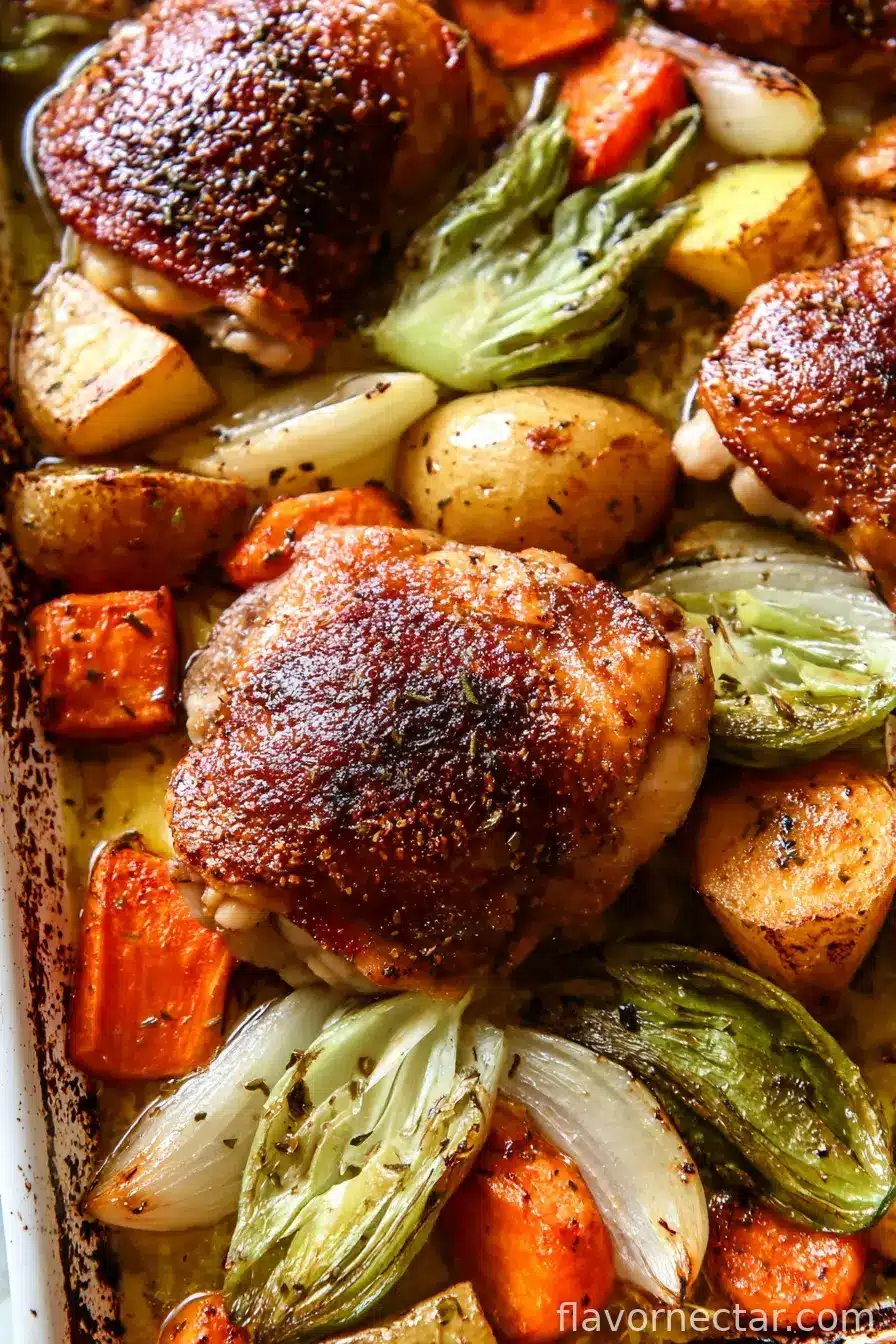
How To Actually Get These chicken thighs (and Veggies) Crispy
- First up, crank your oven to 425°F (220°C). You want hot, not “maybe just preheated” hot. Line a big sheet pan with parchment paper or foil if you like less scrubbing later.
- Dump your potatoes, carrots, and onion onto the pan. Drizzle with about half the olive oil, sprinkle half the salt, pepper, paprika, garlic powder, and thyme over the top. Toss everything with your hands — messy is more fun — then push the veggies into a rough pile in the middle.
- Grab the chicken thighs and pat them dry with paper towels (if you skip this, the skin just gets sad and floppy — ask me how I know). Rub ’em all over with the rest of the olive oil, and season skin and underside with what’s left of your spices. Nestle each thigh on top of the veggies. Make sure there’s some space between each so the skin gets a shot at crispiness.
- Scatter lemon slices around if you’re feeling fancy, or not; up to you. Pop the whole thing in the oven. Roast for about 35 minutes, then open the oven and give the veggies a little shuffle (don’t worry if the chicken wants to cling to the pan a bit — just nudge gently).
- Keep roasting until the skin is golden, the veggies are browned at the edges, and juices run clear from the chicken (about 45–50 minutes total). If your oven is, like mine, a bit touchy about even heat, maybe rotate the pan halfway through. This is usually when I tip-toe back and sneak a crispy potato as “quality control.” If the skin isn’t quite as crispy as you want, broil for 2-3 minutes at the end, but watch it like a hawk (I, um, have burned more than I care to admit).
- Let everything sit for 5–10 minutes before diving in. The juices settle, and it is somehow even better. Resist the urge to eat directly form the sheet pan — or don’t, I’m not judging.
>
Notes From a (Now-Reformed) Chicken Skeptic
- I reckon it tastes better the next day. Cold leftover chicken thighs from the fridge? Oddly satisfying.
- If the veggies look a little “rustic” (read: soft and messy), that just means they’ve soaked up all the chicken flavor — gold star for you.
- I once totally forgot the lemon and the world did not end. But when I do remember, it’s just brighter.
Some Variations I’ve Tried… For Better or Worse
- I threw in broccoli florets once near the end — they crisp up, but get kinda sad if you add them at the start.
- I tried sweet potatoes instead of regular spuds. Not bad! But maybe cut them bigger so they don’t turn to mush.
- Mushrooms sounded good in my head, but ended up a soggy, squishy mess. Wouldn’t recommend, unless you’re into that sort of thing.
The Equipment (But Don’t Sweat It)
- A large rimmed baking sheet is best (I used a weird old roasting pan once, and it worked out all right but things don’t crisp up the same way).
- Parchment is nice for cleanup, but a little oil on the pan and extra elbow grease works fine if you’re out.
- Tongs? Handy, but clean hands work perfectly. Just maybe keep a towel nearby, because chicken grease finds a way onto everything — even my phone.
Storing Leftovers (If You Even Get That Far)
Pop leftovers into a container and refrigerate for up to three days… though honestly, in my house, it never lasts that long. I had grand plans to use leftovers in a salad the next day — but someone (not naming names) always nabs them for lunch first.
How I Serve It (Or, What’s On The Side)
Honestly, there’s usually not much need for extra sides, but a crusty loaf of bread does show up if I’m feeling European. Or sometimes we just rip off bits to mop up the chicken juice. My uncle swears it needs a dab of mustard on the plate, but I’m a classicist at heart. A side salad, if I remember, rounds out the meal.
Hard-Won Pro Tips (AKA, Mistakes I’ve Already Made For You)
- Don’t skimp on drying the chicken skin — I once rushed this and ended up with limp, pale skin. Tragic.
- Pile the vegetables in a single layer if you want max crisp. Too crowded = steamed, not roasted.
- Broiling at the end is magic, but set a timer. Seriously. Two minutes can turn into charcoal before you blink.
Friends and Family Q&A (Because People Ask!)
- Can I use boneless thighs? Sure! But they don’t get quite as juicy, and you’ll have to cut the cook time by, oh, 10–15 minutes.
- My chicken skin won’t crisp! Did you dry it? And is it crowded? Also, just double check your oven temp — some run cooler (learned that the hard way after undercooked chicken at a dinner party… oops).
- Can I make this spicier? Absolutely, throw in red pepper flakes or cayenne. I sometimes sprinkle a bit on just my own piece, which led to some “fire in the hole” reactions from the kids. Proceed with caution.
- Can I freeze this? You can, though I think the veggies get a bit mushy when reheated. I guess if you’re in a jam, but I’d rather just eat it all fresh, to be honest.
- Will this work for meal prep? Definitely. Chicken keeps well, and the veggies are great for tucking into a wrap the next day. Actually, now that I say this, I’ll probably do that tonight.
So there you have it — not a flawless chef’s masterpiece, but a weeknight wonder that rarely lets me down. (And if your socks still don’t match by dinner, at least the chicken will!)
Ingredients
- 4 bone-in, skin-on chicken thighs (sometimes I use drumsticks if that’s all that’s left in the freezer)
- 1 pound baby potatoes, halved (I sometimes just dice up whatever potatoes are sprouting on the counter)
- 3 carrots, sliced into chunky coins (parsnips are fair game too, or whatever root veg that’s rolling around in your fridge)
- 1 red onion, cut into wedges (white or yellow works; I once used shallots and nobody noticed)
- 2 tablespoons olive oil (or just enough to make everyone glisten, really)
- 1 teaspoon kosher salt (I eyeball it — not always wise, but I’m a rebel)
- 1/2 teaspoon black pepper
- 1 teaspoon smoked paprika (regular paprika works; sometimes I go wild and use a pinch of cayenne if I feel saucy)
- 1 teaspoon garlic powder (fresh garlic is nice, but honestly, sometimes I’m just not peeling garlic on a Wednesday)
- 1/2 teaspoon dried thyme (or Italian seasoning, honestly anything green and herby will do in a pinch)
- 1 lemon, cut into thickish slices (optional, but try it at least once — trust me)
Instructions
-
1First up, crank your oven to 425°F (220°C). You want hot, not “maybe just preheated” hot. Line a big sheet pan with parchment paper or foil if you like less scrubbing later.
-
2Dump your potatoes, carrots, and onion onto the pan. Drizzle with about half the olive oil, sprinkle half the salt, pepper, paprika, garlic powder, and thyme over the top. Toss everything with your hands — messy is more fun — then push the veggies into a rough pile in the middle.
-
3Grab the chicken thighs and pat them dry with paper towels (if you skip this, the skin just gets sad and floppy — ask me how I know). Rub ’em all over with the rest of the olive oil, and season skin and underside with what’s left of your spices. Nestle each thigh on top of the veggies. Make sure there’s some space between each so the skin gets a shot at crispiness.
-
4Scatter lemon slices around if you’re feeling fancy, or not; up to you. Pop the whole thing in the oven. Roast for about 35 minutes, then open the oven and give the veggies a little shuffle (don’t worry if the chicken wants to cling to the pan a bit — just nudge gently).
-
5Keep roasting until the skin is golden, the veggies are browned at the edges, and juices run clear from the chicken (about 45–50 minutes total). If your oven is, like mine, a bit touchy about even heat, maybe rotate the pan halfway through. This is usually when I tip-toe back and sneak a crispy potato as “quality control.” If the skin isn’t quite as crispy as you want, broil for 2-3 minutes at the end, but watch it like a hawk (I, um, have burned more than I care to admit).
-
6Let everything sit for 5–10 minutes before diving in. The juices settle, and it is somehow even better. Resist the urge to eat directly form the sheet pan — or don’t, I’m not judging.
CLICK FOR NUTRITION INFO
↑
Approximate Information for One Serving
Serving Size:
1 serving
Calories:
425cal
Protein:
28 gg
Fat:
22 gg
Saturated Fat:
0g
Trans Fat:
0g
Cholesterol:
0mg
Sodium:
0mg
Potassium:
0mg
Total Carbs:
28 gg
Fiber:
0g
Sugar:
0g
Net Carbs:
0g
Vitamin A:
0
Vitamin C:
0mg
Calcium:
0mg
Iron:
0mg
Nutrition Disclaimers
Number of total servings shown is approximate. Actual number of servings will depend on your preferred portion sizes.
Nutritional values shown are general guidelines and reflect information for 1 serving using the ingredients listed, not including any optional ingredients. Actual macros may vary slightly depending on specific brands and types of ingredients used.
To determine the weight of one serving, prepare the recipe as instructed. Weigh the finished recipe, then divide the weight of the finished recipe (not including the weight of the container the food is in) by the desired number of servings. Result will be the weight of one serving.
Did you make this recipe?
Please consider Pinning it!