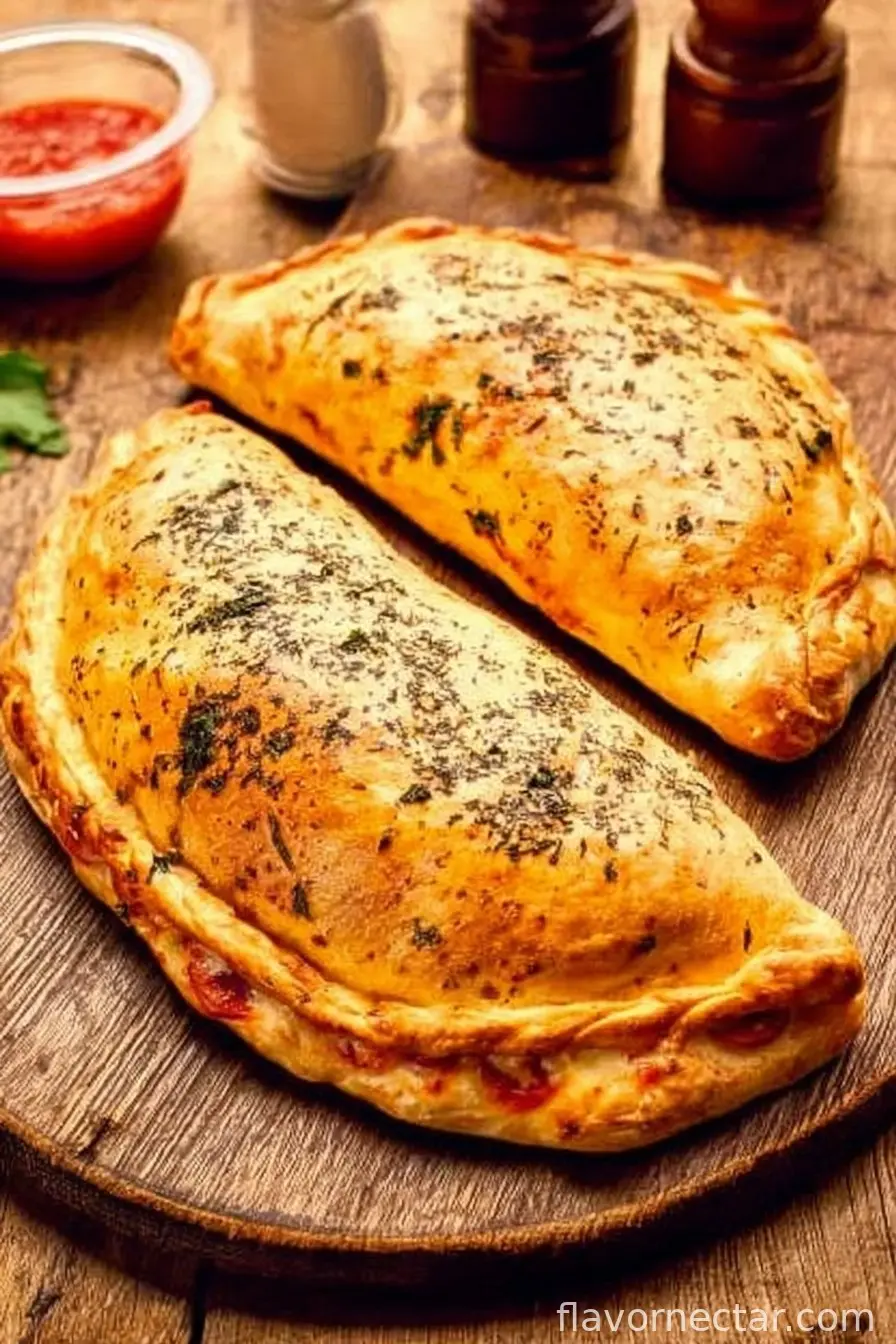
You Ever Just Want Pizza… But a Little Funkier?
Alright, picture this: it’s a random Tuesday night, fridge is looking pitiful (leftover bits of cheese, a solitary bell pepper, maybe half an onion), and I’m craving pizza. Except, you know, something a bit more ‘cozy up in your lap’ than flat-on-a-plate. Enter the calzone—my kitchen savior for years now. First time I made one, I accidentally sealed it with a coffee mug (dead serious), but hey, it worked… and the calzone turned out joyfully puffy anyway. That was ages ago but I still get a kick out of stuffing all my favorite things in dough and pretending it’s a surprise package from the universe to me (or, let’s be real, to my endlessly-hungry spouse).
Why I Keep Making Calzones (And You Probably Will Too)
I make these when I want pizza without the pressure of a perfect round crust—calzones are so forgiving. My family goes a bit bonkers for this because you can hand one to a kid and nothing falls out (unless someone takes a wild bite from the side, which—sigh—always happens). Oh, and if somebody has a weird picky phase, just don’t mention what’s inside. No one’s the wiser. Plus, it’s endlessly changeable, which honestly is good for my wildly inconsistent fridge supplies. I did have a stretch where my dough just wouldn’t rise; turns out, keeping yeast way in the back of the fridge next to the frozen peas was a terrible idea.
What You’ll Need (And What You Really Don’t)
- Pizza dough: Store-bought works fine (I won’t tell, promise). I sometimes roll with sourdough starter dough if I have it, but regular old pizza dough—about 450g or a medium handful—does the job.
- Tomato sauce: Honestly, jarred marinara is my usual, but if I’m out, a quick blend of canned tomatoes, garlic, tiny splash of olive oil and salt gets me by. My Nonna would probably disagree, but ah well.
- Mozzarella cheese: I prefer the firmer block stuff, but those little pre-shredded bags melt fine too. Burrata is lush, but a bit too much for a handheld snack, trust me.
- Ricotta cheese (optional): When I’m feeling fancy. You can skip this or use a bit of cottage cheese, but drain it well.
- Fillings—go wild: Sliced ham, cooked sausage, sautéed mushrooms, artichokes, spinach, roasted peppers… I’ve tried most things. Whatever is aging in your fridge is fair game.
- Egg (for brushing): Makes that shiny, golden crust. Water works in a pinch but you lose a bit of that bakery charm.
- Olive oil and flour: For prepping your surface and a little drizzle on top. I sometimes use semolina flour for dusting, but really, regular is fine.
How I (Usually) Make My Calzones
- Preheat things. Crank your oven. Seriously hot does the trick here. Around 230°C (450°F) or just as high as your oven goes without setting off the smoke alarm. If you have a pizza stone, use it—but I often just use a tray.
- Dust and roll out the dough. Toss some flour on your counter. Flatten the dough into a rough circle, about 10 inches wide, or honestly just however big your baking sheet lets you go. If it snaps back, let it rest a sec.
- Layer on your fillings. Spoon a bit of tomato sauce on one half—don’t overdo it or things get soggy—then scatter cheese, and whatever else you’ve got. Salt, pepper, a sprinkle of herbs. This is when I usually sneak a bite of cheese (for quality control!).
- Seal it up. Fold the dough over the fillings to make a half-moon. Press the edges together—sometimes I twist or crimp, or just mash it with a fork (doesn’t have to be pretty). Make a couple little slits for steam unless you like the risk of a pastry explosion.
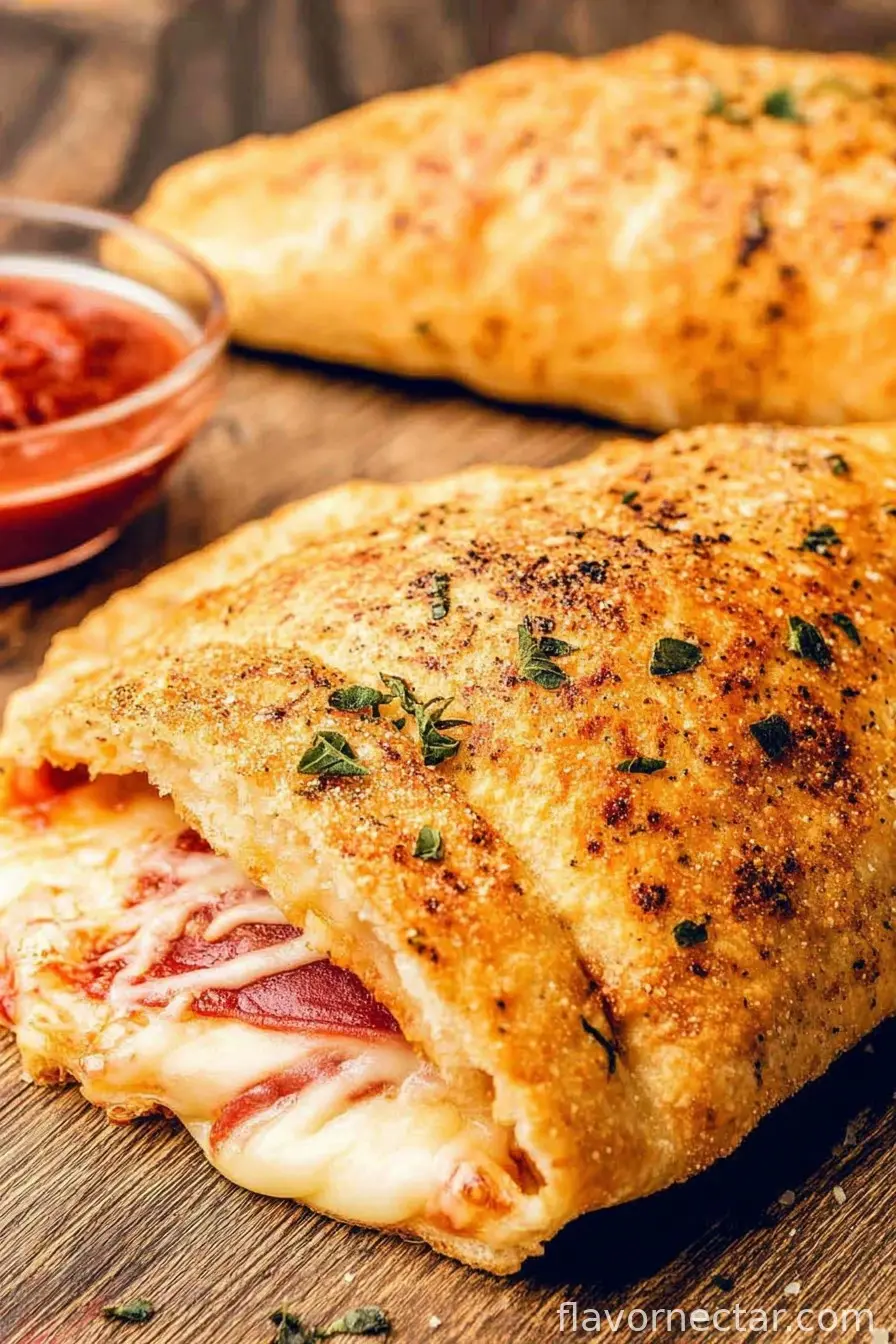
- Brush and bake. Beat an egg and brush the top; sprinkle a bit of Parmesan if you’re feeling indulgent. Slide onto the baking tray and bake for 15-18 minutes—or until golden and puffed and maybe leaking a bit of cheese (the best part, honestly).
- Cool (slightly!) and eat. Wait a couple minutes if you can—molten cheese is no joke. Then devour.
Notes From The Battle-Scarred Calzone Maker
- The first time I tried to rush, my calzone split right down the side; filling everywhere. Don’t skip sealing the edges, even if you’re hangry.
- Cold dough is a pain to roll out. Let it come to room temp for a few minutes; otherwise, you’ll be arm wrestling a boulder.
- I once forgot the little steam vents… which turned my oven into a cheese volcano. Kinda hilarious, not ideal.
Calzone Experiments (Or: What Worked and What Flopped)
- I chucked some leftover roasted veggies in once. Delicious! The time I tried baked beans? Not so much… turns out, some things are just meant for toast.
- Chicken tikka with mozzarella makes a bizarre but oddly addictive calzone, especially for Friday nights when I’m feeling rebellious.
- Every now and then I think pineapple will be a cheeky addition—it’s fine, but tomato and ham are just unmatched.
About That Baking Gear (And What To Do If You Don’t Have It)
Okay, so a pizza stone gives you the most epic crispy bottom. But I’ve baked calzones on oven trays lined with parchment loads of times and genuinely, the difference isn’t deal-breaking. A rolling pin is nice, but a wine bottle is far more exciting (just make sure it’s empty, or at least tightly capped… learned that the sticky way).
Storing Calzones: Do They Even Last?
In theory, you can wrap leftover calzones in foil and reheat in the oven the next day—maybe 180°C (350°F) for 10ish minutes. Fridge is fine for a couple days. Freezer? Sure, just wrap tightly. Though honestly, in my house, it never lasts more than a day unless I’ve hidden it behind the suspicious jar of pickles.
How We Serve Calzone in My House
I usually slice them in half and pile on extra sauce for dipping (my youngest calls it ‘pizza gravy’, which is weird and adorable). Sometimes a crisp salad on the side makes me feel slightly more virtuous, but honestly, most evenings it’s calzone on a napkin, in front of the TV, no shame at all.
What I Wish I’d Known (Pro Tips from Painful Experience)
- Don’t overload the fillings—that’s where things get messy, and not cute messy, truly apocalyptic.
- I once tried baking calzone straight from the fridge… big mistake. Letting it sit out so it’s not ice-cold helps get that golden crust.
- If it looks odd before baking, odds are it will puff up and look just fine. Don’t worry too much about looks, only you (and everyone on Instagram) will notice.
Calzone Q&A: You Asked, I Rambled
- Can I use whole wheat dough? Yup, you can. It’s a bit firmer, but with extra time to rise, it comes out good. Slightly nutty, which I like.
- What’s the weirdest combo you’ve tried? Marmite and cheddar. Nope, didn’t work for me, but maybe you’ll love it. Don’t let me cramp your style!
- How do I keep the bottom from getting soggy? Either go easy on the sauce, or if you’re feeling technical, sprinkle a bit of semolina flour underneath before baking. Sometimes I forget, and it’s still tasty.
- Can I leave out the cheese? Erm, suppose you could. It’ll be more like a bread pocket, but hey, whatever floats your boat.
- Is this just a folded pizza? Kind of! But calzone is usually sealed and cooked a bit differently. If you call it pizza, I won’t be offended.
And honestly, if you get halfway through and realize you forgot half the fillings, just roll with it. Calzone’s a forgiving dish—even when life (or your rolling pin) throws you a curveball.
Ingredients
- 1 lb pizza dough
- 1 cup ricotta cheese
- 1 cup shredded mozzarella cheese
- 1/2 cup pepperoni slices
- 1/2 cup pizza sauce
- 1/4 cup grated Parmesan cheese
- 1 teaspoon dried oregano
- 1 egg, beaten (for egg wash)
- Salt and pepper to taste
Instructions
-
1Preheat oven to 425°F (220°C). Line a baking sheet with parchment paper.
-
2In a bowl, mix ricotta, mozzarella, Parmesan, oregano, salt, and pepper until well combined.
-
3Divide pizza dough into 4 portions. Roll each into an 8-inch circle on a floured surface.
-
4Spread a thin layer of pizza sauce on one half of each dough circle, leaving a 1-inch border. Top with the cheese mixture and pepperoni slices.
-
5Fold dough over the filling to create a half-moon shape. Seal the edges by pressing with a fork. Brush tops with beaten egg.
-
6Transfer to the baking sheet and bake for 18-20 minutes, or until golden brown. Let cool slightly before serving.
CLICK FOR NUTRITION INFO
↑
Approximate Information for One Serving
Serving Size:
1 serving
Calories:
580cal
Protein:
26 gg
Fat:
23 gg
Saturated Fat:
0g
Trans Fat:
0g
Cholesterol:
0mg
Sodium:
0mg
Potassium:
0mg
Total Carbs:
65 gg
Fiber:
0g
Sugar:
0g
Net Carbs:
0g
Vitamin A:
0
Vitamin C:
0mg
Calcium:
0mg
Iron:
0mg
Nutrition Disclaimers
Number of total servings shown is approximate. Actual number of servings will depend on your preferred portion sizes.
Nutritional values shown are general guidelines and reflect information for 1 serving using the ingredients listed, not including any optional ingredients. Actual macros may vary slightly depending on specific brands and types of ingredients used.
To determine the weight of one serving, prepare the recipe as instructed. Weigh the finished recipe, then divide the weight of the finished recipe (not including the weight of the container the food is in) by the desired number of servings. Result will be the weight of one serving.
Did you make this recipe?
Please consider Pinning it!!